There was some curiosity expressed in page 13 of Oakieboy's chunk gun building thread, when he showed his little Stanley #271 router plane. Stanley has discontinued them I hear, but Lie-Nielsen still makes a similar item. They sell for about 80 bucks. You can get a nifty ECE wooden one from Germany for pushing $200. Or make your own shop made router plane that works fine for
under 5 bucks. Outside of the trip to the hardware store, I don't have an hour in this tool. My own's a little fancier, with turned handles, but you hardly need go that far. In fact, this version gives you a wider bearing surface on the sole.
All these pix should be clickable thumbnails. If your eyes are like mine, you may want the bigger pix.
The legal department insists I tell you that there are places in this process where you could hurt yourself. You must use all known safety procedures in attempting this. If you don't know what those are, stop reading now and go spend some money at the tool website.
I went to the local hardware store a couple of days ago, where they have those pull-out boxes of nuts, bolts, screws, and such, and got myself the following:
A 3/8" thumbscrew (1 1/2" thread length)
A 3/8" SQUARE nut (5/8" across the flats)
A 1/4" Allen wrench
I think the total was actually under $4, including sales tax.
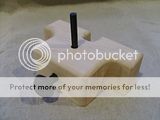
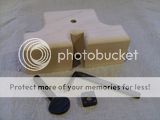
Here's pix of the completed tool, so you know where we're headed:

Start by taking the wrench to the grinder. You want to grind off about half of the short leg, up to the apexes of the opposite sides. You want to stop a little short of taking it right to the corners. You'll see why later. It's going to have a concave profile equal to the radius of your grinding wheel, but that gets fixed later. Also eyeball a bevel on the top (inside) leading edge of the cutter. Make it about 45 degrees or so. You do know to keep a bowl of water beside the grinder, don't you--of course you do. Dunk often, keep it cool, no burning allowed. Here's where you're headed:

Here's where you're headed next:

Find a hunk of hardwood. I used a piece of plain hard maple that started about 1 3/4" x 3" x 5". If you're really anal you could glue on a sole of harder wood, but it's hardly necessary unless you've chosen a block that's softer, like cherry or walnut. You're going to drill 3 holes. I used a 9/32 brad point, a 3/8 brad point, and a 5/8 forstner for these. You may need a 5/16 instead of the 9/32 if your Allen wrench is a tight fit. Test these bits on some scrap first, because you need this hole to be right the first time. Drill all your holes with a drill press if you can. Accuracy counts.
Checking the length of the thumbscrew, I laid out the center of this cutter hole so that the front side of the hole was about at the limit of the tumbscrew. That's the hole on the top in the pic. Bore it all the way through.
Next I bored the 3/8 hole, centered, into the back. This is for the thumbscrew, and it stops at the first hole--the one for the cutter/wrench. Doesn't hurt if it goes a little past.
The next is the 5/8 hole that goes up from the bottom to meet the thumbscrew hole, and go about half the width of the nut (5/16 in this case) past the center of the 3/8 hole. This has to be laid out on the bottom so that the front edge of the 5/8 hole aligns with the front edge of the 5/16 hole. This is so the "cutter" is supported all the way through the block. I didn't take a pic of this in process, so this shows it a couple of operations on:

It's the now square hole in the center. Chop this out with a sharp (is there any other kind?) chisel so that the square nut will drop in and accept the thumbscrew from the back. Try to not pare away too much on the front of the hole so that the cutter will be supported all the way through.
I made the two "handles" on the ends by drilling a couple of 1" holes with a forstner bit centered a half-inch from the ends and 1 3/4" from the front, and cutting in with a bandsaw. Not necessary. You could just as well cut these straight with a bandsaw, pulllsaw, or tenon saw. All the boring work is done now.

There are two dadoes to cut. The one on the bottom/sole of the tool is for clearance of the cutter (about 3/16 deep), allowing you to set it so you take wee shavings. The one on the front is there to allow shavings to clear more easily (about 3/4 deep). Both of these are 5/8 wide, just to match the 5/8 square hole for the nut--no other reason. I cut both of these by hogging out on the bandsaw and paring the bottoms flat with a chisel. Could as well be done with a backsaw/pullsaw and chisel. DO NOT attempt these short dados on a table saw--shudder. Looks like this now:


Hardware notes: The nut and thumbscrew came cad plated. I just don't like the look, so I dunked them in muriatic acid and cold blued them. Skip that and it won't hurt a thing. Another point: the end of the thumbscrew at the threaded end won't come to you flat. Grind or file this flat, because that will bear against the back side of the cutter.
IMPORTANT.First assembly time. Slip the nut up from the bottom and run the thumbscrew in and start the threads. Slide the cutter up from the bottom and tighten the screw to hold it in place. Admire your work. You're almost there.

There was a 3/8" roundover bit set up in the router table already, so I ran it around the top. Breaking edges with sandpaper works.
The bottom of your cutter is concave and not even close to parellel with the sole, right? Set the cutter just proud of the sole and take the whole thing to the belt sander and slowly, carefully sand/grind until everything is flat. You may have to reset the cutter a time or three to get there.
Now polish up the sole of the cutter and sharpen the bevel. You did remove it from the body for this, didn't you. Put the cutter back into the body, but don't tighten it up yet. Set it sole down on your bench. Shim up both sides of the sole with scraps of paper or business cards and let the cutter rest on the benchtop. Tighten the thumbscrew and try it. You may find that tightening the screw cocked the cutter so that it raised or lowered the cutting edge, so you may have to fiddle with the shims to get the right set. Once you have that figured out, use the same procedure every time you have to reset.
If you find yourself having to get into tight places where the length of the cutter on the bottom just won't fit, get another Allen wrench and make another cutter, but grind/cut back the short leg of the wrench to make a close-quarters tool. If you need to do some really fine work, just make up some more cutters from smaller Allen wrenches--maybe 3/16 or 1/8 would be nice. You can also heat the Allen wrench at the bend and open up the angle a VERY little bit if you find the bottom of the cutter riding on the wood is a problem for you. That's usually not an issue if you keep your cuts light.
Carve your initials and the date in it if you want. I finish with wax, but oil works too. Proceed with caution. Making your own planes is addicting, and once you figure out how cost effective it is and that you can get exactly what you need, there's no turning back.
I hope this helps,
Kermit Chamberlin
Addendum, sharpening video:
http://blip.tv/file/3984190


