Author Topic: 18th century drilling HDTDT  (Read 26842 times)

Offline James Wilson Everett

  • Hero Member
  • *****
  • Posts: 1094
18th century drilling HDTDT
« on: November 02, 2011, 03:06:17 PM »
Guys,

In the topic of the flashpan grinder the great discussion questions wandered off to the topic of drilling holes in metal in the 18th century.  Here is some information on the topic.  It is really fabulous to hear from people who really are gunmakers and who wish to understand how guns were made way back then.  Twist drill were not used prior 1860.

This discussion will be limited only to metal cutting drill bits that were used with a hand brace.  Of course, bow drills were used and the bits were significantly different, but let's save that for a later topic.  The bits were spade shaped with a definite fishtail outline.  Starting the hole at a punch mark a bit not over 0.1 inch diameter was used.  You really cannot use a larger bit for the starting hole as the effort becomes very much to high on a larger bit.  Once the initial hole is through, it is followed by one or more larger bits to bring the hole closer to size.  In my handmade locks the final hole is 0.147 diameter for a tap to thread 0.174 - 30.  Finally a tapered square reamer is used, usually cutting from both top and bottom sides to bring the hole to final size.  I use a hand made pin gauge with go - nogo diameters to check the size.

Here are some original metal cutting bits of small diameters with a closeup of the cutting edge, notice the fishtail.


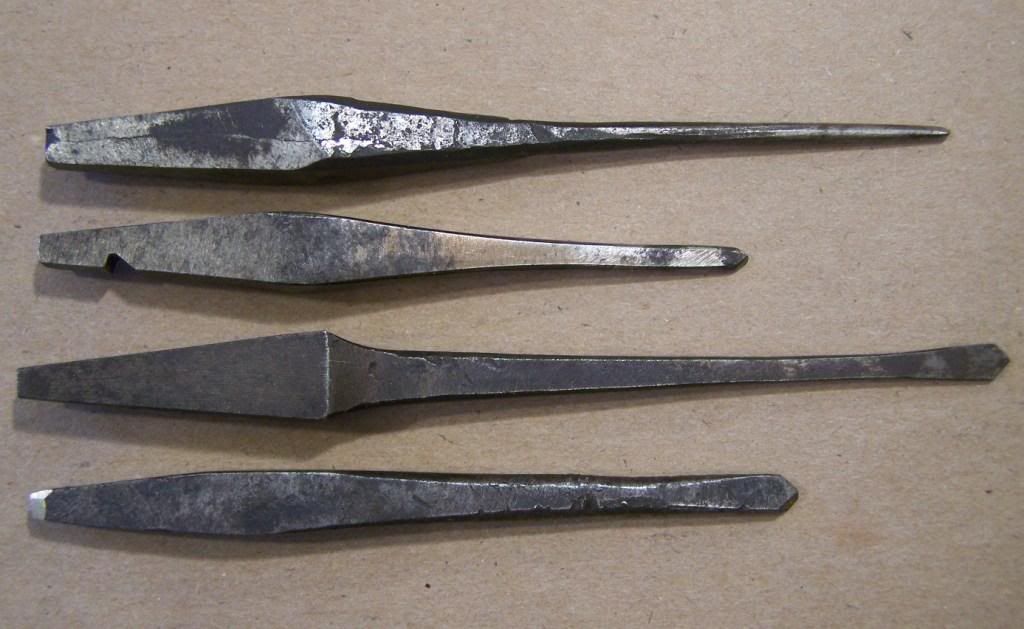
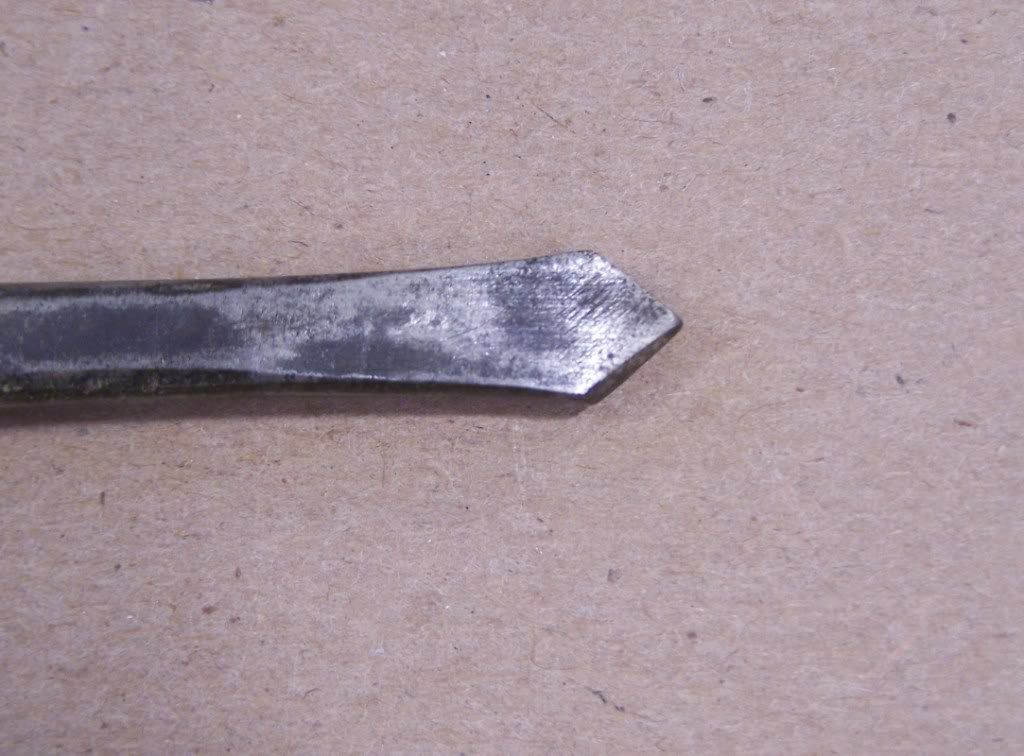
The fishtail shape is important since allowance must be made for the driller to "wobble" the brace during drilling.  When I drill, the palm end of the brace probably wobbles by 1/2 inch.  This is not on purpose, just I am imperfect - definitely.  If the drill bit were to be made with parallel sides, the bit would bind and break.

Here are some slightly larger bits.


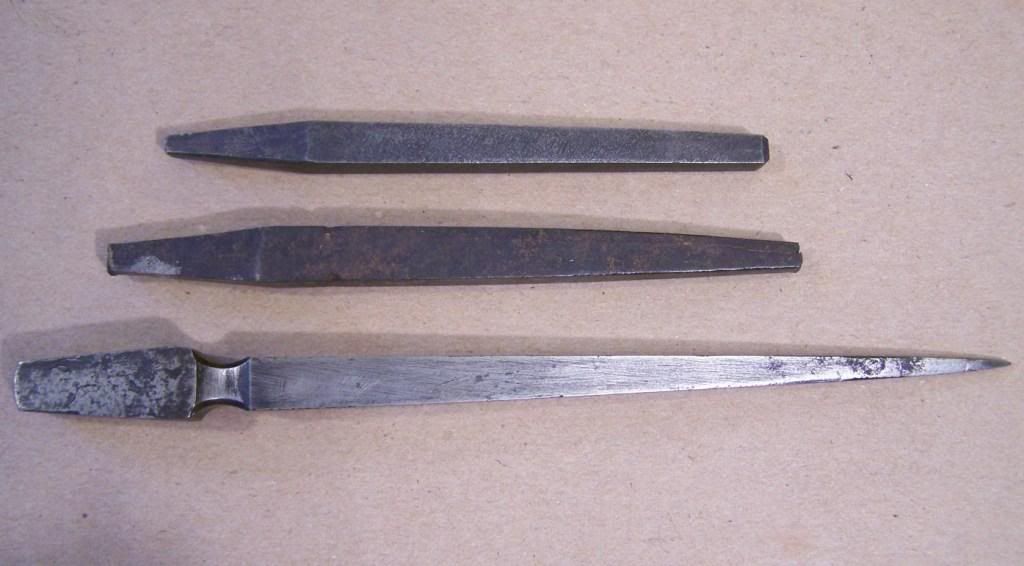
Here are some original tapered square reamers for use in a brace.  Actually I use a tapered square reamer mounted in a handle like a turnscrew handle for the small holes.


Jim Everett
« Last Edit: November 29, 2019, 10:00:36 PM by James Wilson Everett »

Offline James Wilson Everett

  • Hero Member
  • *****
  • Posts: 1094
Re: 18th century drilling HDTDT
« Reply #1 on: November 02, 2011, 03:07:12 PM »
HDTDT = How Did They Do That

Offline DutchGramps

  • Sr. Member
  • ****
  • Posts: 259
Re: 18th century drilling HDTDT
« Reply #2 on: November 02, 2011, 04:05:43 PM »
What about the taps you use Jim? I see 0.174 x 30, is that a 'modern' thread ? Or is this an old, non-standard size? As far as I know, there are very few standard threads with 30tpi.
Hans
Real bikes are kick-started....

Steve-In

  • Guest
Re: 18th century drilling HDTDT
« Reply #3 on: November 02, 2011, 04:26:12 PM »
Code: [Select]
the final hole is 0.147 diameter for a tap to thread 0.174 - 30That would be about an 8-32 right?  Also how do you do a blind hole such as on a tumbler?  Seems like with your method it would need to be deep and tapered.  That would not be a problem if your tap and screw were tapered the same.
Interesting.

Offline James Wilson Everett

  • Hero Member
  • *****
  • Posts: 1094
Re: 18th century drilling HDTDT
« Reply #4 on: November 03, 2011, 12:13:12 AM »
Guys,

The threads I use for the gunlocks - see the discussion for "scratch built locks"  is a 0.174 - 30 thread that is from an original 18th c or early 19th c screw plate.  It is certainly not any modern standard thread either in pitch or form.  The threads look a lot like light bulb threads.  Of course I have to make my own taps from the same screw plate.  The finished threads, both male & female are straignt, not tapered.  The tumbler hole is drilled much deeper than a lock plate hole and is threaded in the same way.  The threads end up straight even though the hole is tapered.  The taper is slight as seen from the photos of the reamers.  The threading process is significantly different than modern taps & dies as there is no cutting and no chips are formed.  All the threading is done by cold swaging.  For instance, the male shank for the 0.174 - 30 thread starts at a diameter of 0.156 and grows outwards to 0.174 in the process.

Thanks for the questions, I really appreciate the interest.  maybe sometime soon I can post photos of the threading process and tools as they are much different than what is used today.

Jim Everett

Offline rich pierce

  • Administrator
  • Hero Member
  • *
  • Posts: 18940
Re: 18th century drilling HDTDT
« Reply #5 on: November 03, 2011, 01:07:48 AM »
Jim, this is great info.  How would (or do) you approach making "same as original" screws for an existing antique lock?  No screw plate, no tap available, just the hole in the plate.  I can figure out the minor diameter, I guess, and maybe count threads more or less using a piece of hardwood screwed in there.

I just have no idea.  I could propose crazy stuff for making a tap, like taking a stab at major diameter, tapering a piece of steel from just below minor diameter to above major diameter, getting it yellow hot and twisting it in there, but I think it would just twist above the hole when it started to bind.  Showing off my ignorance here!
Andover, Vermont

Offline Glenn

  • Hero Member
  • *****
  • Posts: 507
Re: 18th century drilling HDTDT
« Reply #6 on: November 03, 2011, 01:12:50 AM »
Thanks for posting this information.   ;D

A lot of us find this very interesting indeed.  Please keep going with presentations such as this as I have wondered about these methods and procedures for years on end. 
Many of them cried; "Me no Alamo - Me no Goliad", and for most of them these were the last words they spoke.

alsask

  • Guest
Re: 18th century drilling HDTDT
« Reply #7 on: November 03, 2011, 04:33:37 AM »
I find this sort of information very interesting.  Thanks for posting.

Offline bgf

  • Hero Member
  • *****
  • Posts: 1403
Re: 18th century drilling HDTDT
« Reply #8 on: November 03, 2011, 04:48:30 AM »
Jim, this is great info.  How would (or do) you approach making "same as original" screws for an existing antique lock?  No screw plate, no tap available, just the hole in the plate.  I can figure out the minor diameter, I guess, and maybe count threads more or less using a piece of hardwood screwed in there.

I just have no idea.  I could propose crazy stuff for making a tap, like taking a stab at major diameter, tapering a piece of steel from just below minor diameter to above major diameter, getting it yellow hot and twisting it in there, but I think it would just twist above the hole when it started to bind.  Showing off my ignorance here!

Rich,
I've always wanted to play with this stuff -- I think it would work great for what you are asking about:
https://www.trackofthewolf.com/Categories/partDetail.aspx?catId=2&subId=204&styleId=1074&partNum=CERROSAFE
« Last Edit: July 13, 2022, 03:30:32 PM by Dennis Glazener »

Offline James Wilson Everett

  • Hero Member
  • *****
  • Posts: 1094
Re: 18th century drilling HDTDT
« Reply #9 on: November 03, 2011, 05:35:49 AM »
Rich,

Now you have asked a really good question that gunsmiths in the 18th c often had to answer.  How to make a replacement screw when there are no interchangeable threads and the original screw is missing? 

The short answer is to send the lock to me and I can make the screw and send it back to you. 

The long answer is to screw a piece of wood into the hole to form a wooden thread, then measure the thread diameter and pitch.  I have a collection  of several screw plates and adjustable split die screw plates that will probably give a very close match to the original screw.  From there the new screw is installed and removed multiple times in the threaded hole to the point that it begins to fit properly.  Remember that the wrought iron used for the new screw will be very much softer and ductile than modern steel and will conform to the original hole.  This works especially well when the lockplate has been case hardened.  Occasionally I have to use some very fine lapping compound (like 800 - 1000 grit) to accomplish the fit.

I have often done this at 18th c trades fairs out in the field while the customer watches.  Folks are at times amazed at what can be accomplished using only original tools and materials where the modern stuff fails miserably.

Jim Everett

dannybb55

  • Guest
Re: 18th century drilling HDTDT
« Reply #10 on: November 04, 2011, 03:54:59 AM »
Jim, Making these bits is really simple. I have taken a worn rat tail file and drawn the end down to a diameter about 1/2 of the hole that I need. With the second heat I flatten the end into a spatula shape and finish by tapering the brace shank. Bring it passed magnetic and anneal in sand or whatever. The next day file the point to the width of the hole and file both cutting edges. I quench mine in the slack tub and draw them out to a straw color.
 By the way, the drill press came back to Europe with the Crusades and is a simple, mostly wooden affair called the Beam Drill. Thread plates and taps were for sale at hardware dealers in any major port because Birmingham was selling them all over the Empire in the 18 th Century. Thread sizes and pitch were proprietary to the company producing the Iron wares until the 19th century and even then they were not SAE.
 https://www.davistownmuseum.org/BioPics/stubs3.jpg This is from SMITH'S kEY, Circa 1801.
                                     Danny
« Last Edit: July 13, 2022, 03:30:58 PM by Dennis Glazener »

Offline James Wilson Everett

  • Hero Member
  • *****
  • Posts: 1094
Re: 18th century drilling HDTDT
« Reply #11 on: November 04, 2011, 04:17:12 AM »
Danny,

Thanks for the response.  I am glad to hear from somebody else who makes their own bits.  It would be nice to see some of you tools and your work.  I have made bits for shop use in several ways.

1.  Forging 1095 until it looks just as these original examples.  I have done this enough to know that there must be an easier way. 

2.  Get some of the very common auger bits, cut off the twist part, and grind the shank to form the bit.  Harden & temper.  This method allows the use of the existing tapered square shank to fit the brace.

3.  Most often I use what is known as a "lantern" chuck which takes round shank bits that are rather small (like 3/16 dia).  Examples of the lantern chuck can be see in the mid-18th c. John Wyke catalog of tools, plate 3 and plate 4.  The shanks of the drill bits are exactly like the much later Yankee push drill bits.

Jim Everett

Offline FALout

  • Hero Member
  • *****
  • Posts: 875
Re: 18th century drilling HDTDT
« Reply #12 on: November 04, 2011, 04:28:14 AM »
Thanks guys, this has been a really neat history lesson.
Bob

Offline James Wilson Everett

  • Hero Member
  • *****
  • Posts: 1094
Re: 18th century drilling HDTDT
« Reply #13 on: November 04, 2011, 02:34:45 PM »
Danny and everyone,

In your response of November 3 you included a link to the Davistown machine tool museum the shows 18th c screw plates and taps.  Thanks for the input, everyone should check this link out to see what we are discussing.  The link is a reprint of a page from an 18th c tool catalog by John Wyke.

You know that essentially all published works on antique tools deal only with wood working tools, never on antique metal working tools. Unfortunately this is an area of historical research that is virtually unknown. One great exception is the John Wyke tool catalog, originally from the third quarter of the 18th century. This reference is:

A Catalogue of Tools for Watch and Clock Makers by John Wyke of Liverpool, Published for the Henry Francis du Pont Winterthur Museum by the University Press of Virginia, Charlottesville. 1978 ISBN 0-8139-0751-9

The good news is that ths document is available today.

The Wyke reprint catalogs from the Henry Francis du Pont Winterthur Museum $9.99 plus sh around $6.00.

For anyone interested in the original tooling to make guns, this reference is an absolute must.  Certainly, much of the tooling is specific to making clocks, but most is directly applicable to making gunlocks and may other metal parts for guns.  The book contains hundreds of illustrations of 18th c metal working tools and their descriptions and functions.

Jim Everett

hoochiepapa

  • Guest
Re: 18th century drilling HDTDT
« Reply #14 on: November 04, 2011, 08:44:49 PM »
WOW, thanks for all of this, I never knew.

Offline KNeilson

  • Sr. Member
  • ****
  • Posts: 330
Re: 18th century drilling HDTDT
« Reply #15 on: November 05, 2011, 07:19:56 AM »
Great information, thx for posting. One of my oldest most sentimental tools is a brace that I was told belonged to my GGG. He was a constable who became a shipwright.  I have just one spoon bit for it, and now this info motivated me to construct a couple spade bits. Also drilled a hole with the one pictured. thx again....  one question, how much of a margin should I have?...          Kerry
« Last Edit: July 13, 2022, 03:31:33 PM by Dennis Glazener »

Offline James Wilson Everett

  • Hero Member
  • *****
  • Posts: 1094
Re: 18th century drilling HDTDT
« Reply #16 on: November 05, 2011, 01:58:43 PM »
Kerry,

Thanks for your interest in the old gunsmithing tooling.  Your bits look a lot nicer than the ones I make.  It is really great to see your smithing skills.  As for the margin, I really don't know how to answer that.

Try drilling a hole through a piece of iron or brass.  After the hole is complete get your set of number drills (I hope you have these).  Use the drills to gauge the actual size of the hole. You pass a small bit through then keep increasing the size of the bit until one does not pass through.  Now you have a go - nogo with the difference being just a few thousanths of an inch.  Compare this to the diameter of the bit that you made.

Actually, this method is a lot more dependent upon how close the bit is on center than the actual bit diameter.  If the point is off center the bit will cut a significantly larger hole than otherwise.  This is why it is good practice to drill an undersized hole folllowed by the correct size bit or reamer to bring the hole up to the correct size.  This is true for both modern and 18th c bit.

Jim Everett

doug

  • Guest
Re: 18th century drilling HDTDT
« Reply #17 on: November 06, 2011, 07:34:08 PM »
     Perhaps worth mentioning that 30 tpi cannot be cut on most lathes unless I am mistaken; they usually do not have that gear ratio.  I am thinking here in terms of someone making their own tap and screw plate.  Screw bodies and heads can be cut quickly and easily with hollow end mills in a brace and bit

cheers Doug

Offline DutchGramps

  • Sr. Member
  • ****
  • Posts: 259
Re: 18th century drilling HDTDT
« Reply #18 on: November 06, 2011, 09:04:27 PM »
     Perhaps worth mentioning that 30 tpi cannot be cut on most lathes unless I am mistaken; they usually do not have that gear ratio.  ...

I am the happy owner of a 1957 Myford lathe, and 30 tpi is no problem ;D
Real bikes are kick-started....

Offline James Wilson Everett

  • Hero Member
  • *****
  • Posts: 1094
Re: 18th century drilling HDTDT
« Reply #19 on: November 06, 2011, 10:09:50 PM »
Guys,

Don't try to make your own screw plate.  They are easily available on e-bay in the antique tools.  I have bought several there from $5 to $22 and they are original, probably early to mid 19th c.  The screw plates have paired thread holes.  One hole is a few thousanths larger than the other in the pair.  You make the tap in the larger hole and the screw in the smaller hole.  Actually the tap has to be slightly larger than the screw thread or the screw just won't fit the tapped hole.  There has to be a tiny little slop here.

Maybe later I can post how to make the lock screws with a screw plate.

Jim Everett

doug

  • Guest
Re: 18th century drilling HDTDT
« Reply #20 on: November 07, 2011, 02:13:33 AM »

I am the happy owner of a 1957 Myford lathe, and 30 tpi is no problem ;D

     Do you have a quick change gear box?  Mine is a Myford super 7 of unknown age and it does not have 30 tpi.  Partially sticks out in my mind because some Stevens rifles use a 30 tpi screw to secure the barrel and it is one that I cannot make.  Just checked and I can cut 28 and 32 tpi but no 30 unless there is some way of changing the gear ratios.

cheers Doug
« Last Edit: November 07, 2011, 05:05:54 AM by doug »

Offline DutchGramps

  • Sr. Member
  • ****
  • Posts: 259
Re: 18th century drilling HDTDT
« Reply #21 on: November 07, 2011, 11:30:46 AM »
When I bought that lathe, I had to choose between a gearbox, or several nice and useful accessories like a four-jaw chuck , collets, vertical slide etc..
So I use gear trains, to get the desired pitch; for 30tpi I mount 20,  50/40, idle, and 60 on the leadscrew.
I have all the gears, also the 21 and 127 gears for metric threads. The Myford is, as far as I know, still being made, and it is one of the most useful lathes I know. Besides thread cutting, I can mill gears and have even rifled a pistol barrel on it. The only drawback is the headstock hole, only 14 mm, not enough to mount a gun barrel over .22 :(
Real bikes are kick-started....

Offline KNeilson

  • Sr. Member
  • ****
  • Posts: 330
Re: 18th century drilling HDTDT
« Reply #22 on: November 15, 2011, 07:59:37 AM »
Jim, thx for the comment. Sorry to be late with my reply but have been away from my computer for a week. I experimented a bit with margin, a lesser one centers itself easier and cuts faster but is more fragile and dulls rapidly.   I have a few tapered reamers up to about .250, mostly smaller. Also for me this thread explains some of the smaller ( real small ) bits that were in the box with my gramps Archimedes drills... he dabbled in watch repair... Ive been told these may be a couple hundred years old...   Kerry

« Last Edit: November 15, 2011, 08:06:08 AM by KNeilson »

Offline James Wilson Everett

  • Hero Member
  • *****
  • Posts: 1094
Re: 18th century drilling HDTDT
« Reply #23 on: December 04, 2011, 02:12:37 AM »
Guys,

Here is another tool that the 18th c gunsmith would use for drilling holes in small parts, like lock parts.  It is a bow drill that looks deceptively simple.  It was used in conjunction with a bench vise and a bow.  The first photos shows the drill stock with a brass lantern chuck on the left, the bow thimble and pivot on the right.


The drill points that fit the lantern chuck are shown next.  All the drill points have the same shank diameter, but different cutting edge diameters.


[i

The bench vise will have several pivot recesses in the side to mount the bow drill.  This one is for a right hander.  The gunsmith would punch these to suit himself.


The last photo shows the bow drill, vise and lockplate as they would be positioned for drilling.  I did not show the bow as it would not fit into the photo, just imagine that it is there.


Jim Everett
« Last Edit: November 29, 2019, 10:05:10 PM by James Wilson Everett »

greybeard

  • Guest
Re: 18th century drilling HDTDT
« Reply #24 on: December 04, 2011, 04:28:39 AM »
This has been most enlightening.  Mzkes me wish I wrer 50 years younger so I could try out all of the skills and how tos that are available on this great site.    Bob