Author Topic: Making a gunlock  (Read 117371 times)

Offline James Wilson Everett

  • Hero Member
  • *****
  • Posts: 1091
Re: Making a gunlock
« Reply #50 on: September 29, 2014, 06:19:28 PM »
Guys,

Now, the next step is to make the blank bridal plate look pretty.  It really does nothing to change the function, but original bridal plates were quite nice looking.  One of my weaknesses is that my stuff looks rather clunky compared to really beautiful originals.  Anyway, after just a few minutes with a bitstock, hacksaw, file - here is what it looks like.

[


You can see clearly the wrought iron slag lines, the bridal started as a piece of buggy wheel rim.  Here is what it looks like on the lock, so far.


The next step is the sear.

Jim
« Last Edit: November 28, 2019, 03:39:24 PM by James Wilson Everett »

Offline Bob Roller

  • Hero Member
  • *****
  • Posts: 9335
Re: Making a gunlock
« Reply #51 on: September 29, 2014, 06:36:17 PM »
Looks nice. I am currently winding down my lock work and will try to
finish current work.If I can't then I will send their parts back to the owners.
I am having a problem with my right wrist and the filing and bench work
is not helping.Same goes for triggers.Never liked to make them so I won't
miss them.
Enough is enough.

Bob Roller

Offline D. Taylor Sapergia

  • Member 3
  • Hero Member
  • *
  • Posts: 12547
Re: Making a gunlock
« Reply #52 on: September 29, 2014, 06:42:24 PM »
Bob, I'm delighted to have several examples of your fine work.

James, what a pleasure it is to see hand work.  May I suggest though, that you buy a set of gunsmith screw drivers from Brownell's ...it'll preserve the clean slots in your screws.
D. Taylor Sapergia
www.sapergia.blogspot.com

Art is not an object.  It is the excitement inspired by the object.

Offline Ben Quearry

  • Starting Member
  • *
  • Posts: 38
Re: Making a gunlock
« Reply #53 on: September 29, 2014, 07:50:23 PM »
James that is wonderful work, you are a true master. I learn something everytime you post! How do you get such good close up photos?
Rob, your masterful work will be sorely missed, I hope you get to feeling better. I also hope you will continue to post, your advice is priceless.

Ben

Offline WadePatton

  • Hero Member
  • *****
  • Posts: 5274
  • Tennessee
Re: Making a gunlock
« Reply #54 on: September 30, 2014, 12:45:48 AM »
James that is wonderful work, you are a true master. I learn something everytime you post! How do you get such good close up photos?
...

There's a setting on nearly all photo-making devices that used to be called "macro".  These days there are usually two icons (and no words): one is a mountain(s), the other a flower.  The flower setting is "macro" and will allow proper focus of things very close to the lens.  Try it!

Hold to the Wind

Offline Jim Kibler

  • Hero Member
  • *****
  • Posts: 4296
    • Personal Website
Re: Making a gunlock
« Reply #55 on: September 30, 2014, 03:15:33 PM »
That seems to be some pretty coarse iron.  Most if not all of the original locks I've studied had material with much finer and well distributed silicate inclusions.  Maybe high quality material is a bit hard to find.

Offline Bob Roller

  • Hero Member
  • *****
  • Posts: 9335
Re: Making a gunlock
« Reply #56 on: September 30, 2014, 05:08:31 PM »
High quality material is easy to find today.I have used 0-1 for sears and "flys" plus 1144 "Stressproof" for tumblers for decades and sent many of the locks I have made with these materials to Germany where they are still in use in competition.I have a "Bailes" I made about 30 years ago setting on the mantle that needs the frizzen reconditioned but the mechanism is still like new and unaltered.Any industrial supply house can furnish 0-1 and the 1144 I recently got to finish some orders with came from OnLine metals.

Bob Roller

Offline Jim Kibler

  • Hero Member
  • *****
  • Posts: 4296
    • Personal Website
Re: Making a gunlock
« Reply #57 on: September 30, 2014, 05:50:16 PM »
High quality material is easy to find today.I have used 0-1 for sears and "flys" plus 1144 "Stressproof" for tumblers for decades and sent many of the locks I have made with these materials to Germany where they are still in use in competition.I have a "Bailes" I made about 30 years ago setting on the mantle that needs the frizzen reconditioned but the mechanism is still like new and unaltered.Any industrial supply house can furnish 0-1 and the 1144 I recently got to finish some orders with came from OnLine metals.

Bob Roller

Yes Bob.  Of course.  I was referring to high quality traditional materials.  Thought that clear given the context of my post.

Offline James Wilson Everett

  • Hero Member
  • *****
  • Posts: 1091
Re: Making a gunlock
« Reply #58 on: October 02, 2014, 10:51:30 PM »
Guys,

Good questions.  I really do have a nice set of gunsmith screwdrivers that I bought quite a while ago from Brownells, very well made tools.  However, for the crowd show-n-tells I use 18th c style turn screws, with a tapered blade, not modern hollow ground bits.  I guess the damage to the screw slots comes from using original type tools.  Also, those screw head slots are just cut with an 18th c hacksaw guided by my thumb and are rarely on perfect center.

Also,  wrought iron is fairly easy to obtain, and often free.  However, well refined wrought iron is quite a bit more difficult to find.  I wish that all of my W.I. supply was triple refined, but I use what I have found.  I am rather selective when I forge barrels from W.I., then the quality must be higher, but for this lock it is barn hinge and buggy wheel rim iron.  Thanks for the comment, I always look for more of the good stuff.

Jim

Offline James Wilson Everett

  • Hero Member
  • *****
  • Posts: 1091
Re: Making a gunlock
« Reply #59 on: October 16, 2014, 03:41:14 PM »
Guys,

Now for the sear.  This is one of the more simple pieces to make.  I start with 1/4 steel square rod, W1 or 1095 steel.  Using an existing sear as a pattern I hot forge the end of the rod to a taper and make the right angle bend.  I try to get the outside of the bend to be sharp and square, but I never seem to get it right.  After the bend is made, determine where the pivot hole will be located.  Hot bend the rod at this point to give the proper downward bend of the sear nose.  Cut the forging off the rod and smooth the surface that will contact the lockplate.  Then drill the pivot hole to fit the size of the lock sear screw shank.  Here is the finished forging ready for the file work.


The sear forging is attached to the lockplate with the tumbler in place.  The sear bar will be located much higher than the proper location.  The first filing is to shape the upper surface of the sear nose to match the curve of the tumbler.  In doing this shaping the sear bar will be rotated downwards to the proper location.

I hope this makes sense.

Jim
« Last Edit: November 28, 2019, 03:42:57 PM by James Wilson Everett »

Offline gunmaker

  • Hero Member
  • *****
  • Posts: 691
  • the old dog gunmaker
Re: Making a gunlock
« Reply #60 on: October 16, 2014, 07:23:36 PM »
Have you tried "upsetting" it ?  Heat only the bend red, hold sear on anvil with its nose up. tap it with a small hammer to drive metal down to a sharp 90 angle.  Oh, and don't do any shaping before you whack it, leave it bulky.   Make sense ?   Tom

Offline James Wilson Everett

  • Hero Member
  • *****
  • Posts: 1091
Re: Making a gunlock
« Reply #61 on: November 07, 2014, 04:40:35 AM »
Guys,

Rough shaping the sear is simple. File the upper edge of the sear to match the curve of the tumbler.  As you do this the sear tail will rotate downwards to the proper position in the lower part of the lockplate.  Then finish shaping the rest of the part.  Later, when you cut the tumbler notches, the sear tail will rotate downwards a bit more, so for now it is left just a tad too high.

Jim


« Last Edit: November 28, 2019, 03:46:43 PM by James Wilson Everett »

Offline Acer Saccharum

  • Administrator
  • Hero Member
  • *
  • Posts: 19311
    • Thomas  A Curran
Re: Making a gunlock
« Reply #62 on: November 07, 2014, 05:03:35 AM »
James, you don't have your notches filed in yet.

As the sear drops into a notch, its tail will be lower on the plate than it shows in your photo. That you left the sear tail position a bit high is a good thing, it will drop once the half and full notches are in.

I like this puzzle. You work out one piece at a time until the mechanism is complete. At first glance one might be overwhelmed by the complexity. But piece by piece, the lock comestogether in perfect function. But woe to one who get his horse ahead of his cart!
« Last Edit: November 07, 2014, 05:06:59 AM by Acer Saccharum »
Tom Curran's web site : http://monstermachineshop.net
Ramrod scrapers are all sold out.

Offline Jerry V Lape

  • Hero Member
  • *****
  • Posts: 3021
Re: Making a gunlock
« Reply #63 on: November 07, 2014, 06:28:27 AM »
Acer, I think you mean the one who gets his cart before the horse.  The horse belongs in front of the cart to pull it if you want to be historically correct. ;D
« Last Edit: November 07, 2014, 06:30:37 AM by Jerry V Lape »

Offline David R. Pennington

  • Hero Member
  • *****
  • Posts: 2886
Re: Making a gunlock
« Reply #64 on: November 08, 2014, 06:22:09 AM »
Thanks again for sharing this. Like tom says, make your 90 degree bend first and bring it to high yellow heat, (the wrought iron will stand it) and upset and you will get a good sharp bend, then you can draw the taper.
I just finished putting the lock I am building together. I forged the bridle blank this way from a piece of wrought. I haven't tackled a completely hand forged lock yet but I hope to. This inspired me. The lock I made was from a set of castings I found that only included the plate, frizzen, cock, and top jaw. I made the tumbler, found a mainspring and frizzen spring that would work. Made the stirrup, pin, bridle, fly and screws. I used a Siler sear and sear spring.
Like Acer says it is step by step figuring out each part and where it must go. The tough part was cutting the mortise for the fly in the tumbler. I cut it with engravers and homemade chisels. I don't have a mill.
 It is all assembled and it works! I now need to do some final polishing and finishing, harden and temper and fine tune. Hopefully the frizzen is good stuff and will harden ok.
VITA BREVIS- ARS LONGA

Offline James Wilson Everett

  • Hero Member
  • *****
  • Posts: 1091
Re: Making a gunlock
« Reply #65 on: November 08, 2014, 06:45:51 AM »
Guys,

Thanks for the comments.  I certainly do need to improve making an outside square corner.  Maybe next time I will get it better!  I normally do not put a fly into the tumbler, only when making a lock that will be used with a set trigger, a rare thing for me.  I can say that to put a Siler type fly into the tumbler it is a very good idea to drill the pivot pinhole first and then later cut out the pie shaped section.  If you try to cut the pie shaped section first the chip cut by your chisel will have no place to break free at the end of the cut.  If you drill the pivot hole first then as you drive the chisel towards the hole the chip will break or release as the cutting edge intersects the hole.  I hope that this description makes sense.

Jim

Offline David R. Pennington

  • Hero Member
  • *****
  • Posts: 2886
Re: Making a gunlock
« Reply #66 on: November 09, 2014, 05:23:06 AM »
Yes James that makes sense. That is what I did. I turned the fly blank out on the lathe, then drilled the pin hole in the tumbler. I scribed the guide lines from the pin hole to the tumbler edge and started the cuts with the square graver laid on the side and then chiseled out the remainder with home made chisels made from files. Even annealed the tool steel stock I used for the tumbler was hard to cut and required a lot of sharpening of chisels.
VITA BREVIS- ARS LONGA

Offline James Wilson Everett

  • Hero Member
  • *****
  • Posts: 1091
Re: Making a gunlock
« Reply #67 on: November 10, 2014, 03:55:58 PM »
David,

Thanks for the input and the information of how you made and installed the fly in the tumbler, good job!  I think that few of us really know how difficult this tiny job is especially the first time you do it.  Sometimes I think that it is just as easy to make the entire set trigger mechanism than it is to fiddle with making and installing the fly.  Not using any machine tools, another "interesting" aspect in making a fly is just holding the tiny thing as you shape it with jewelers files.  Anyway, here are photos of a hand made wrought iron gunlock with a fly.  I made the lock to go with an early Brandenberg style German rifle with set triggers.  I will not be using a fly with the lock being made in this topic.

Jim


« Last Edit: November 28, 2019, 03:50:13 PM by James Wilson Everett »

Offline rick landes

  • Sr. Member
  • ****
  • Posts: 399
Re: Making a gunlock
« Reply #68 on: January 16, 2015, 11:53:08 PM »
Many thanks for taking the time to share this process!
“No free man shall ever be de-barred the use of arms. The strongest reason for the people to retain their right to keep and bear arms is as a last resort to protect themselves against tyranny in government." Thomas Jefferson

Offline James Wilson Everett

  • Hero Member
  • *****
  • Posts: 1091
Re: Making a gunlock
« Reply #69 on: May 20, 2015, 02:32:10 AM »
Guys,

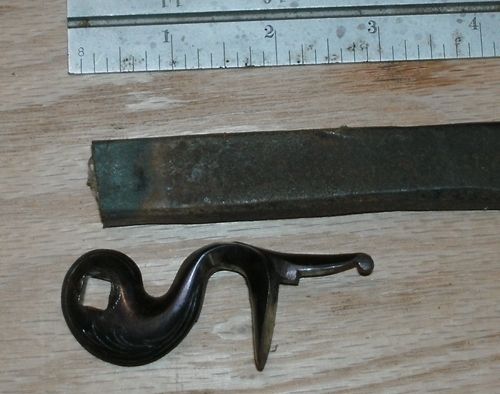
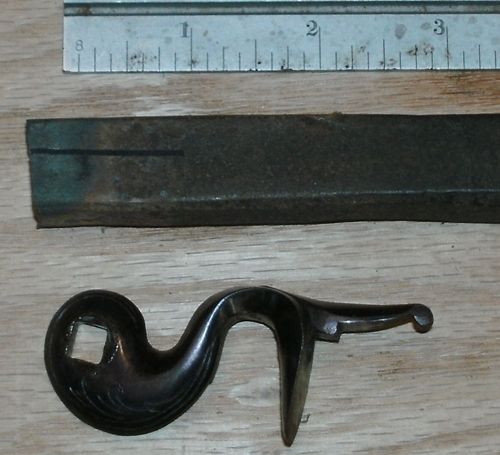
Now that I am back in the USA, it is time to do a bit more work on this gunlock.  This is forging the flintlock cock, a fun or a frustrating job depending on one's point of view.  We start with an existing cock that is artistically what we want as a finished piece.  The raw material is some nicely refined wrought iron from a set of blacksmith tongs.  Here is the iron and the cock pattern.


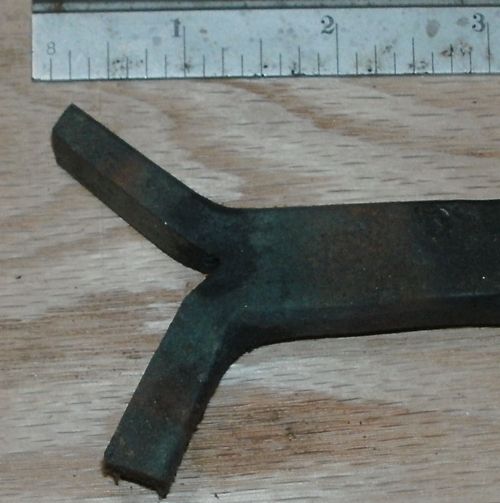
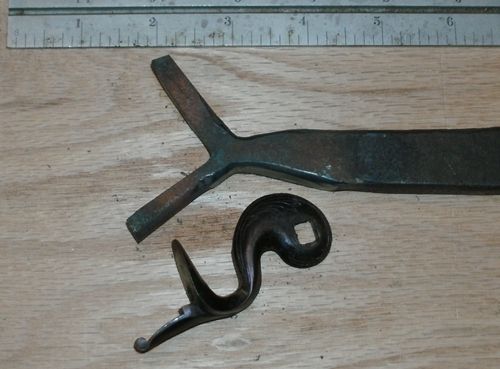
Using a hacksaw, split the iron as shown.


Heat the iron orange hot at the end of the split and open to about a right angle.  Generally this results in a tear at the end of the split.  The tear is closed using a punch that looks a lot like a very dull cold chisel.  Also, this tool is very handy for making the major bend for a mainspring.  Hammer the punch down into the split until the tear disappears.


Next, hot forge the piece to thin and widen the two leaves and to thin the shank just below the split.  Forge at orange heat.


Forge the leaf that will be the lower cock jaw to a "duck foot" shape and turn the part until the lower jaw leaf is at a right angle to the shank.


Now, do a lot of rough shaping with a coarse file to bring both the lower jaw and the thumb piece to near final dimensions.


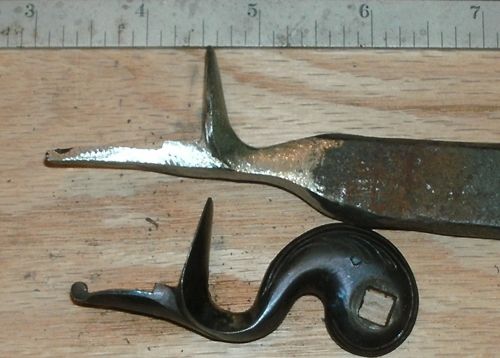
Next, make the initial or top bend to match the pattern cock.


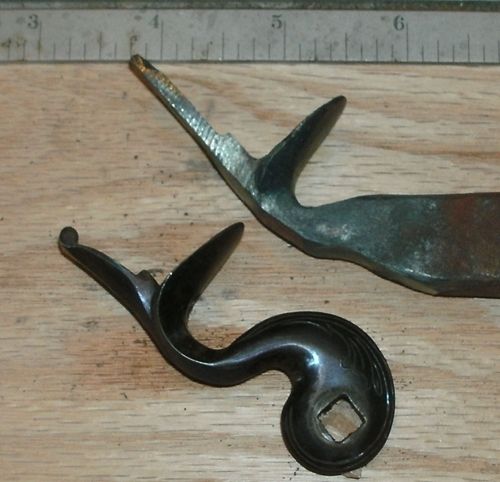
Now for a tricky part, the second or bottom bend.  You will find that this is difficult to do without some sort of special tool. 


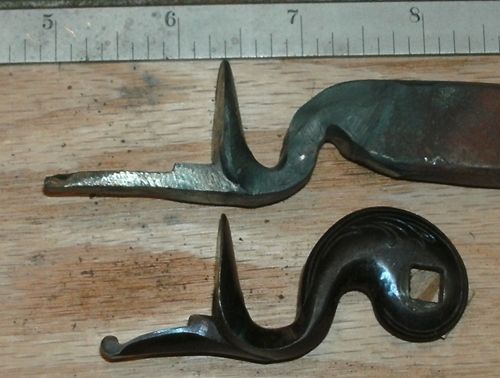
This is necessary so that the grain of the wrought iron will follow the curve of the cock.  I will end this post here and add to it later as it may be too large a file with all these photos.

Jim

« Last Edit: November 28, 2019, 03:58:55 PM by James Wilson Everett »

Offline smallpatch

  • Hero Member
  • *****
  • Posts: 4037
  • Dane Lund
Re: Making a gunlock
« Reply #70 on: May 20, 2015, 04:34:51 AM »
Jim,
You have WAY more energy and time, than I ever thought of having.
I think you also must have stock in Nicholson or some other file company.
Nice job and quite an undertaking.
In His grip,

Dane

Offline James Wilson Everett

  • Hero Member
  • *****
  • Posts: 1091
Re: Making a gunlock
« Reply #71 on: May 20, 2015, 01:48:35 PM »
Guys,

Here is the jig tooling that I use to perform that difficult second bend in making the cock.  It consists of two iron blocks with 1/4 inch diameter pins at the corners.  You can clamp the blocks together in a vise so as to locate the pins at a variety of locations.  This allows the jig to be used to make a lot of different style cocks.


Here is the jig set up to make a cock similar to the pattern I am using.  Pretend that the blocks are being held in the vise jaws.


Here is the jig with the rough forging.  Again, pretend that the jig is secure in the vise jaws and that the rough forging is orange hot.  Now the second bend is made without straightening out the first bend.  If you try to forge a wrought iron cock without such a jig, it can be frustrating.


After the second bend is completed, cut the rough forging from the original bar.


Now forge the lower part to make it a lot wider.  Hammer from the exterior side of the cock only and you will form the inside shoulder of the cock at the same time as you widen the piece.


Now line up the rough forging and the pattern on a square edge, like an open vise jaw.  The inner corner of the pattern and the rough forging should be tight against the edge.  Scribe a mark through the pattern tumbler hole onto the rough forging.  Don't trust your eyes here, use a pattern to locate the tumbler hole.  Now drill a pilot hole at the scribe mark.  Even though the location may look a bit weird, it is in the proper place.


Now cut the forging outline as you wish with the pilot hole on center.


Later, I will show the artistic (I hope) final shaping of the cock.

Jim
« Last Edit: November 28, 2019, 04:05:11 PM by James Wilson Everett »

kaintuck

  • Guest
Re: Making a gunlock
« Reply #72 on: May 21, 2015, 03:48:04 AM »
Tomtom said this lock is the kats meow!!

Marc

Offline David R. Pennington

  • Hero Member
  • *****
  • Posts: 2886
Re: Making a gunlock
« Reply #73 on: May 21, 2015, 04:37:17 AM »
Thanks again for sharing.
VITA BREVIS- ARS LONGA

Offline James Wilson Everett

  • Hero Member
  • *****
  • Posts: 1091
Re: Making a gunlock
« Reply #74 on: May 21, 2015, 06:08:21 AM »
Guys,

Here are some photos of the nearly finished cock.  It helps to have a good example to copy and compare to get the artistic part looking attractive.


Looking at the photo of the back side of the cock you can see that the shoulder or step is closer to the tumbler hole than it will be when finished.  The cock is installed and the shoulder filed back until the cock rotates down to the proper position.  Looking at the pattern cock, you can see the area that was filed back to let this one rotate to the proper position when it was installed.  Also, on the new cock you can see a slag streak running through the center portion of the piece.  This shows that the wrought iron grain is correctly curving around to follow the bend outline of the cock.  No cross grain here.

This is really a fun part to make.

Jim
« Last Edit: November 28, 2019, 04:53:16 PM by James Wilson Everett »