Author Topic: Making a gunlock  (Read 117389 times)

Offline Acer Saccharum

  • Administrator
  • Hero Member
  • *
  • Posts: 19311
    • Thomas  A Curran
Re: Making a gunlock
« Reply #75 on: May 21, 2015, 07:10:55 AM »
This is great stuff, James! Thanks for sharing.
Tom Curran's web site : http://monstermachineshop.net
Ramrod scrapers are all sold out.

CHARLY

  • Guest
Re: Making a gunlock
« Reply #76 on: May 24, 2015, 08:38:29 PM »
Thankyou  James -----I,m blown away --- really learnt a whole lot more--

now I have to start all over again ----as I see how the cockhammer is forged    via your brilliant method!
amazing ---inspiring---
but that square hole----not for me --gave up long ago--
mine is now woodruff key --works for me--- no bridal needed now -
tumbler shaft &hammer fit together nicely --non crooked diamond shaped nightmare square hole/shaft

(someone told me it was done long ago --ie slotting a keyway on tumbler shaft )
so that was much easier ---no backlash --or wear at all ---just my way of improvising in the bush

regards  C

Offline Mark Elliott

  • Hero Member
  • *****
  • Posts: 5191
    • Mark Elliott  Artist & Craftsman
Re: Making a gunlock
« Reply #77 on: May 25, 2015, 08:48:44 AM »
Carl,

A drill bit and a couple needle files can do the square hole just fine.   However,  I am going to make a square broach the next time I have to cut one.   That is the way it was done through the 19th century.   I do admit getting the hole oriented correctly can be a pain. 

CHARLY

  • Guest
Re: Making a gunlock
« Reply #78 on: May 25, 2015, 10:56:04 PM »
Thanks  Mark ---

if I can see how its done by professionals /experts ---
ie  the techniques employed ---maybe I will gather the courage to file another
dozen cockhammer /tumbler shafts squares---all skew ---messed up so many ---I gave up

there is no u tube I can find showing the correct method --trial & error /blistered hands
-no luck ----as you say --I have never seen a needle file ----that's probably the cause
of crooked corners---but I live in the backwoods ----got to improvise --need ideas

 thankyou for your kind words of wisdom --- I DRILLED my landrover steering shaft from 12 .5 pitted rusty  ID --- TO  13 .2 mm --- using your technique---
and it worked ----very well indeed ---
I now have a 34 inch heavy steel 7 mm thick walled barrel --
test fired a 12 .8 mm crude lead slug ---today --- WOW ! what a difference in accuracy !

 I could not drill the solid mild steel12l14  bar I bought from the supplier ---it had no guide hole to
 ream /drill out ---that's why I opted fpr the trusty old steering rod ---no idea what carbon
steel it is ---but its relatively soft---welded a  small flat plate -- on breech to  press up against the bolster flash pan---drilled a 3 mm touchhole --- tapped a 5/8 breech plug thread hole-----separate tang ----copied your  wolf--catalog illustrations as close as possible

much more robust /heavier than the dangerous thin walled water pipe I experimented with-

 now it looks more like a Pennsylvania long rifle ---very heavy --& no brass fittings yet -
an original long rifle must weigh a ton with all the hardware /ramrod /brass fittings!

ok ---keep well -- c--will send a foto when stock is  sanded etc


  --

Offline James Wilson Everett

  • Hero Member
  • *****
  • Posts: 1091
Re: Making a gunlock
« Reply #79 on: September 08, 2015, 06:39:39 PM »
Guys,

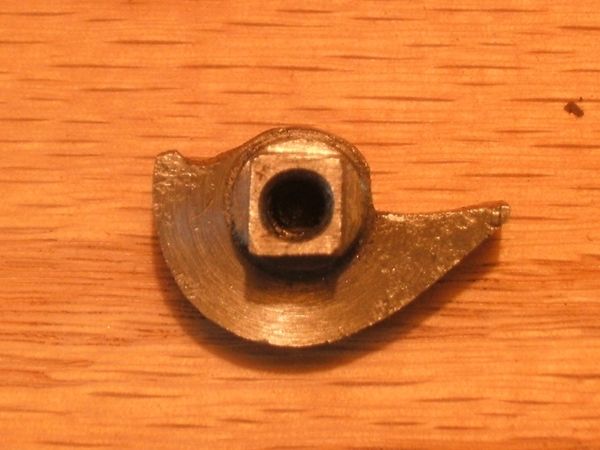
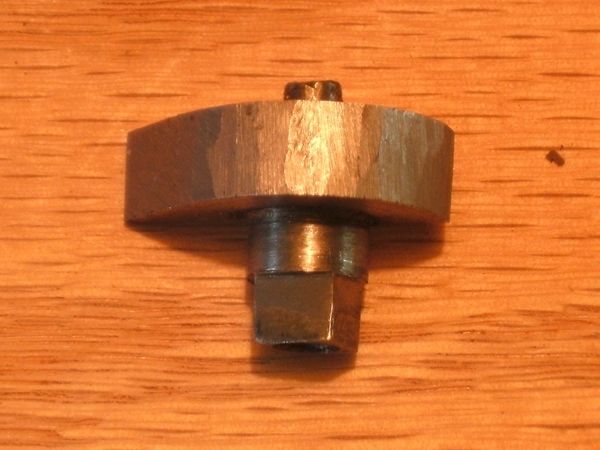
Now to mount the newly forged cock onto the tumbler.  This can be a frustrating job, but here is the way I do it.  First, file a nice square onto the round tumbler shaft so that only a tiny part of the round shaft shows on the outside of the lockplate when the tumbler is assembled.  This gives a tiny gap between the lockplate outside and the cock inside, so it is very close, but does not rub.

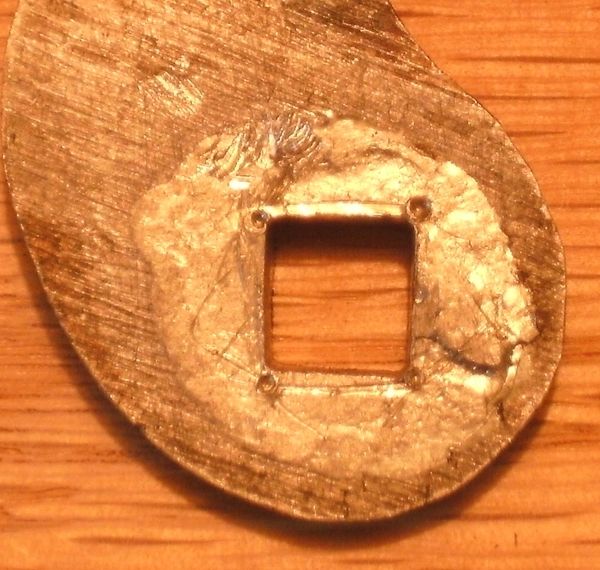
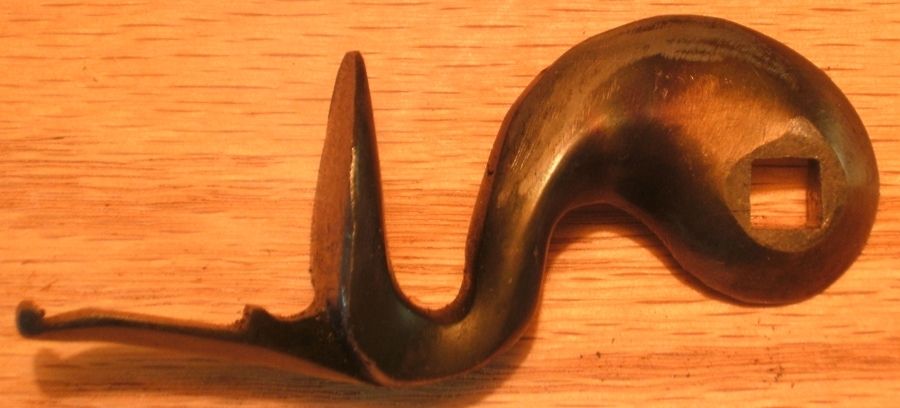
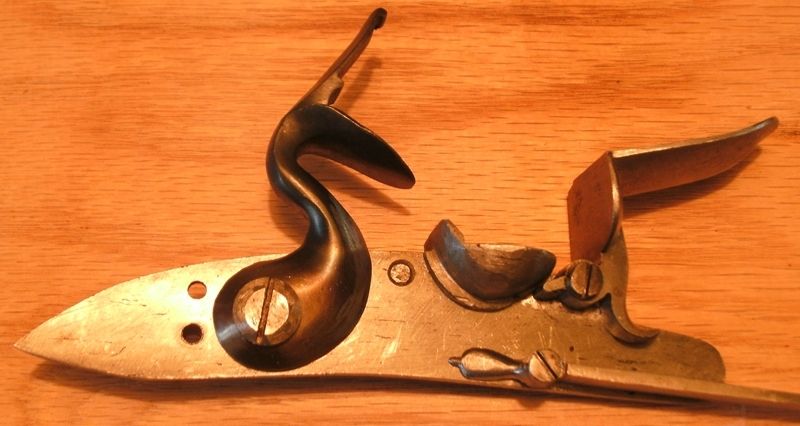
Next, how to get the hammer on in the proper orientation?  The hole in the cock shows the center, but at what angle?  I put a small spot of soft solder on the inside surface of the cock around the pivot hole.  Next I "mount" the cock onto the assembled lockplate & tumbler.   I am sure that you understand that the cock will be way far from the lockplate by about 3/16 inch or so.  Now turn the cock to what will be the proper orientation.  I like the cock lower jaw tip to be about 3/16 inch away from the pan fence when the tumbler is in the fully down or fired position.  Reach behind the cock with a sharp pointed tool and make scratches in the soft solder all around the square of the tumbler.

Next, remove the cock and punch mark the four corners of the scratch marks.  There you have the guide for the proper orientation of the square hole in the cock.  Now that old familiar file-n-fit, file-n-fit, file-n-fit until the cock mates tightly with the tumbler square.

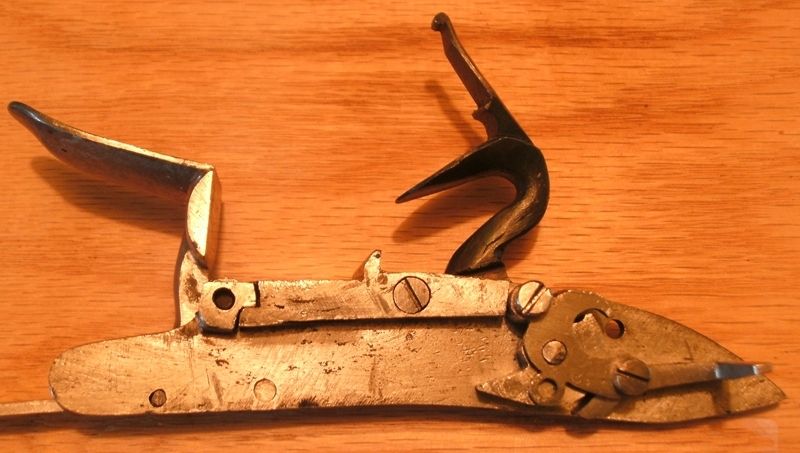
As you can see in the photo of the lock interior, I still must file back the cock inside shoulder so that the shoulder hits the lockplate top edge at the same time as the tumbler shoulder hits the bridal.  Next time for that.

Jim


« Last Edit: November 28, 2019, 05:02:50 PM by James Wilson Everett »

Offline jerrywh

  • Hero Member
  • *****
  • Posts: 8885
    • Jerrywh-gunmaker- Master  Engraver FEGA.
Re: Making a gunlock
« Reply #80 on: September 09, 2015, 03:39:02 AM »
 When building a lock the best way to get the hammer hone positioned correctly is to do the tumbler hole and fit the hammer before the tumbler blank is cut to shape on the inside.
Nobody is always correct, Not even me.

Offline Mark Elliott

  • Hero Member
  • *****
  • Posts: 5191
    • Mark Elliott  Artist & Craftsman
Re: Making a gunlock
« Reply #81 on: September 09, 2015, 04:15:04 AM »
I hate trying to fit a cock to a tumbler.    If what  Jerry means is to cut the notches in the tumbler after the cock is fit, then I agree that is best.   Unfortunately,  you can't always do that with repair work.   The next time I have to fit a cock, I am going to make a square broach.  I feel that would make the job so much easier in a number of ways.   

Offline Bob Roller

  • Hero Member
  • *****
  • Posts: 9335
Re: Making a gunlock
« Reply #82 on: September 09, 2015, 02:17:06 PM »
When building a lock the best way to get the hammer hone positioned correctly is to do the tumbler hole and fit the hammer before the tumbler blank is cut to shape on the inside.

YES,that is the way I do it and most if not all the hammers I use have a square hole in them as part of the casting process. Saves a lot of time and I use a milling machine with a carbide burr cylindrical shape to square the tumbler shank.My tumblers are all 1144 Stressproof which machines like 12L14 and hardens like drill rod in oil.ALL my tumblers start as a disc of 1-1/4" diameter with .310-.312 main shank and a .235 thickness and a .140 diameter support shaft thru the bridle. The diameter of the disc and main shank vary with the lock I am working on.The thickness usually finishes slightly narrower and the .140 remains the same.Oil hardening 0-1 is used for the sear and "fly" and screws are 12L14.

Bob Roller

Offline Chris Treichel

  • Hero Member
  • *****
  • Posts: 916
Re: Making a gunlock
« Reply #83 on: September 09, 2015, 05:05:42 PM »
This is such an awsom discussion. Need to put all of this into a book. I started copy pasting all the pictures and descriptions into a word document from this and several other disscussions but it ended up too large. I need to get a better program that can deal with pictures and text better.

Offline JLBSparks

  • Starting Member
  • *
  • Posts: 39
Re: Making a gunlock
« Reply #84 on: September 10, 2015, 05:16:28 AM »
Kudos, Mr. Everett. I would NEVER consider this project without access to a milling machine. I'm still a newbie.

   -Joe

Offline James Wilson Everett

  • Hero Member
  • *****
  • Posts: 1091
Re: Making a gunlock
« Reply #85 on: September 15, 2015, 06:00:36 PM »
Guys,

Now to finish the mounting of the cock onto the tumbler.  In the above photos you can see that the interior shoulder of the cock is not in the final position.  It needs to be reduced so that the cock will rotate to the proper down or fired position.  This is done by filing the shoulder back until the shoulder will contact the top of the lockplate at the same time as the tumbler contacts the bridal plate lump.  The tumbler and the cock should contact at the same time. Also, notice that the lower jaw of the cock is just about at the right place, too.  This is why it is so very important to get the square hole orientation right.

Jim


« Last Edit: November 28, 2019, 05:05:29 PM by James Wilson Everett »

Offline James Wilson Everett

  • Hero Member
  • *****
  • Posts: 1091
Re: Making a gunlock
« Reply #86 on: September 22, 2015, 09:43:37 PM »
Guys,

Now to start with the top jaw & screw.  If you want more details of the way in which machine screws were made in the 18th century, check out the topic "18th c Screw Plate Use".  Before making the top jaw screw we must make the screw tap from the18th c screwplate.  Here is a photo of the tap and the screwplate, 0.216 - 23 size.  The tap is hardened 1095 rod.


And, here is the top jaw and the screwplate.


The hole in the cock lower jaw was drilled at a public show-n-tell, it took a total of 4 sizes of 18th c fishtail bits followed by a tapered square reamer to bring it to the correct size.  Here is the tap & cock.


And, finally the top jaw screw.  On this one the threads were too tight, it took a bit of file-n-fit with a tiny triangular file until the fit was good.


Jim
« Last Edit: November 28, 2019, 05:10:02 PM by James Wilson Everett »

Offline David R. Pennington

  • Hero Member
  • *****
  • Posts: 2886
Re: Making a gunlock
« Reply #87 on: September 23, 2015, 05:12:21 AM »
Thanks again, I always appreciate you sharing.
VITA BREVIS- ARS LONGA

Offline James Wilson Everett

  • Hero Member
  • *****
  • Posts: 1091
Re: Making a gunlock
« Reply #88 on: October 03, 2015, 01:44:12 PM »
Guys,

The next piece to make can be rather surprisingly challenging, the top jaw.  Really, the only challenge is how to hold the thing while you shape it.  The way I do this is to cut a rectangular piece of wrought iron, and do quite a bit of work on it before tapering and rounding the shape, so it is easy to clamp in a vise. I start with a piece of barn hinge that is just a bit thicker than the finished jaw.  Next I drill a hole for the top jaw screw in a location that requires a bit of the "heel" metal to be removed before the jaw can be assembled onto the cock.  There should be a rather close fit between the "heel" of the top jaw and the cock thumb piece extension so there is little slop here.  Does this make sense?  Anyway, here are a couple of photos of the rough rectangular piece and the initial drilled hole for the top jaw screw.  More work later after the Schoenbrunn Village trades Fair.

Jim


« Last Edit: November 28, 2019, 05:11:48 PM by James Wilson Everett »

Offline James Wilson Everett

  • Hero Member
  • *****
  • Posts: 1091
Re: Making a gunlock
« Reply #89 on: October 20, 2015, 03:06:00 PM »
Guys,

The next step is rather simple.  Smooth the lower face of the top jaw, you will find that sometimes the rust pits in original iron go a bit deep, but file until all the surface is clean metal.


Next file the rear of the top jaw until the piece just allows the top jaw screw to fit into the threaded hole in the cock.  You do not want much of a gap between the back of the top jaw and the cock thumb piece.


Notice that the rough top jaw is still rectangular, so it is still easy to hold in a vise.  This will change later and be a lot more difficult to hold.

Jim
« Last Edit: November 28, 2019, 05:14:14 PM by James Wilson Everett »

Offline Mark Elliott

  • Hero Member
  • *****
  • Posts: 5191
    • Mark Elliott  Artist & Craftsman
Re: Making a gunlock
« Reply #90 on: October 20, 2015, 06:46:33 PM »
At CW, they use a die to make the top jaw.   It might seem like a lot of trouble for such a small part, but as you said,  it is hard to hold while you file it. I believe the die also includes a post for the hole.   I plan to make a set of forging dies, including the top jaw and bottom of the cock.  I fully intend to cheat on the die and use a rotary grinder.   ;)

Offline James Wilson Everett

  • Hero Member
  • *****
  • Posts: 1091
Re: Making a gunlock
« Reply #91 on: November 03, 2015, 04:26:32 PM »
Guys,

I started making the sear spring at the Schoenbrunn Village Colonial Trades Fair.  This is a fun part to make when you make it in the same way as originals.  This part is not just a thin piece of sheet steel bent around the mounting screw, no.  The proper sear spring is a solid piece all the way around the mounting screw.  I cut the part from a square rod of 1095 spring steel.  First I drill the clearance hole for the sear spring mounting screw.  Next I cut away the metal leaving only a thin leaf for the actual working part of the spring.  Then I cut the rough part from the bar.  Next time, shaping the spring.

Jim


« Last Edit: November 28, 2019, 05:15:37 PM by James Wilson Everett »

Offline Acer Saccharum

  • Administrator
  • Hero Member
  • *
  • Posts: 19311
    • Thomas  A Curran
Re: Making a gunlock
« Reply #92 on: November 03, 2015, 05:07:35 PM »
Wouldn't it be a lot easier to buy a Chambers lock?
Tom Curran's web site : http://monstermachineshop.net
Ramrod scrapers are all sold out.

Offline b bogart

  • Hero Member
  • *****
  • Posts: 693
Re: Making a gunlock
« Reply #93 on: November 03, 2015, 05:10:00 PM »
I was fortunate enough to see the beginnings of this frizzen spring at Schoenbrunn and the opportunity to meet Jim too. Nice work.

Offline Bob Roller

  • Hero Member
  • *****
  • Posts: 9335
Re: Making a gunlock
« Reply #94 on: November 03, 2015, 06:39:53 PM »
Guys,

I started making the sear spring at the Schoenbrunn Village Colonial Trades Fair.  This is a fun part to make when you make it in the same way as originals.  This part is not just a thin piece of sheet steel bent around the mounting screw, no.  The proper sear spring is a solid piece all the way around the mounting screw.  I cut the part from a square rod of 1095 spring steel.  First I drill the clearance hole for the sear spring mounting screw.  Next I cut away the metal leaving only a thin leaf for the actual working part of the spring.  Then I cut the rough part from the bar.  Next time, shaping the spring.

Jim


This sort of thing sounds similar to what the long deceased Lucian Cary wrote about an old man in
a place called Hildalgo,Ky who forged mainsprings from cold chisels. Cary commented the old guy probably couldn't read and wouldn't know what to do with a steel company catalog. I thin the old fellow's name was Wyatt Atkinson. Anyone ever hear of such a man??

Bob Roller

Offline JBJ

  • Hero Member
  • *****
  • Posts: 584
Re: Making a gunlock
« Reply #95 on: November 04, 2015, 03:18:05 AM »
You are correct - his name was Wyatt Atkinson. I recall reading an article about his work many years ago. I also remember that he said he used old hay fork tines as another source of spring steel (the big old curved tines from  a horse drawn hay rake).
J.B.

Offline James Wilson Everett

  • Hero Member
  • *****
  • Posts: 1091
Re: Making a gunlock
« Reply #96 on: November 16, 2015, 03:34:33 PM »
Next the sear spring must be filed to the proper contour.  It is best to drill the screw hole in the spring first, and then file the outside edges to align with the existing hole.  I find it rather difficult to drill a hole exactly on center, but easy to file the outside to match the hole.  Does this make sense?  The spring edge is filed away leaving the rough mounting tab in place.  The tab remains a bit too big at this point, and the spring remains a bit to long and too thick.  Later all will be reduced to the proper dimensions for a good spring.  Remember, it is easy to make things a bit smaller, but tough to make them a bit larger!

Jim


« Last Edit: November 28, 2019, 05:17:46 PM by James Wilson Everett »

Offline Bob Roller

  • Hero Member
  • *****
  • Posts: 9335
Re: Making a gunlock
« Reply #97 on: November 16, 2015, 04:09:05 PM »
Next the sear spring must be filed to the proper contour.  It is best to drill the screw hole in the spring first, and then file the outside edges to align with the existing hole.  I find it rather difficult to drill a hole exactly on center, but easy to file the outside to match the hole.  Does this make sense?  The spring edge is filed away leaving the rough mounting tab in place.  The tab remains a bit too big at this point, and the spring remains a bit to long and too thick.  Later all will be reduced to the proper dimensions for a good spring.  Remember, it is easy to make things a bit smaller, but tough to make them a bit larger!

Jim


That's a universal left and right side sear spring blank. Looks like a good job to me.

Bob Roller

Offline Mark Elliott

  • Hero Member
  • *****
  • Posts: 5191
    • Mark Elliott  Artist & Craftsman
Re: Making a gunlock
« Reply #98 on: November 16, 2015, 07:09:55 PM »
Wouldn't it be a lot easier to buy a Chambers lock?

It would also be a lot easier to go buy an inline at Walmart.  ;)
« Last Edit: November 17, 2015, 02:51:11 AM by Mark Elliott »

Offline RAT

  • Hero Member
  • *****
  • Posts: 697
Re: Making a gunlock
« Reply #99 on: November 16, 2015, 07:32:34 PM »
I made a couple of these. I made the spring to the right thickness, but bending it was difficult. After heating it was so easy to bend I had a hard time getting it where I wanted it. It was like bending a rubber band. The next time I thought I'd reduce the inside flat to finished size, but leave the outside alone. This would leave the spring thick for bending, then I could thin the spring by filing the outside afterwards.

Jim... you're the expert. Would this work? Have you had this problem? How do you handle it?

P.S.
I think this kind of spring makes for a better trigger pull. I think the flat springs are a bit stiff and don't bend exactly right for a good smooth rotation of the sear.
Bob