American Long Rifles Welcome, Guest. Please login or register.
July 30, 2010, 11:17:13 AM
Home Help Login Register
News:

** View the Most Recent Posts **

+  AmericanLongRifles Forums
|-+  General discussion
| |-+  Tutorials
| | |-+  Making a single phase double set trigger - TN style
« previous next »
Pages: [1] 2 Go Down Print
Author Topic: Making a single phase double set trigger - TN style  (Read 2695 times)
Ken Guy
Administrator
Hero Member
*
Posts: 4530


F & AM #758


WWW
« on: May 01, 2009, 07:09:48 PM »

Several members have ask about a short tutorial for making a TN trigger and I said as soon as I had enough pics I would do one.  I don't have every single step in the tutorial. I'll add to it as I have more pics.  This is not the only way to build a trigger.  There's a lot to building a trigger from scratch and even more when you consider the differnt spring arrangements and trigger configurations.
I hope with my pictures, a store bought trigger, and Mr. Webbs new book you'll be able to make a proper TN trigger that will make and serve you proud.  If you only need one, then modifying a store trigger will get you visually there.  Before I start, special thanks to Steve Bookout who spend considerable time teaching me the finner points of trigger building.

Building a single phase, double set trigger.   
To build a proper trigger for a TN rifle you must first know why you need to.  I hate to admite it but went a long time before realizing there is a difference.  Double trigger is a double trigger right?  If you look closely at Southern guns you will see lots of different style set triggers.  I'm going to build a set appropriate for a upper E. TN rifle. 

Here is a standard store bought double trigger.


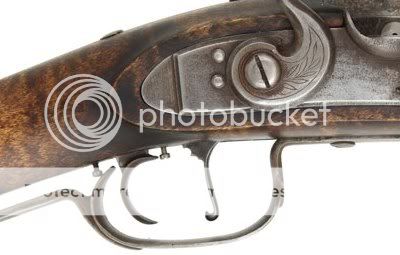
Here's an original TN trigger.


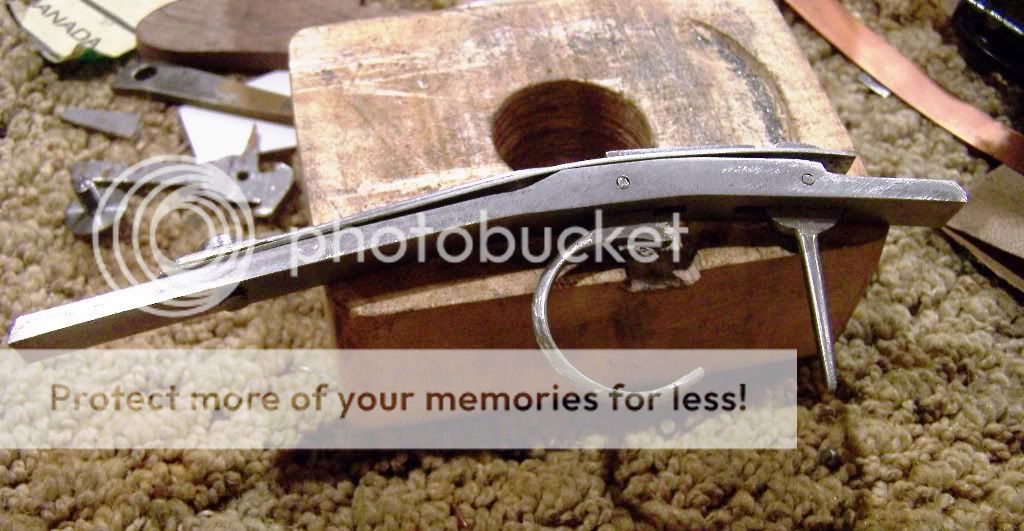
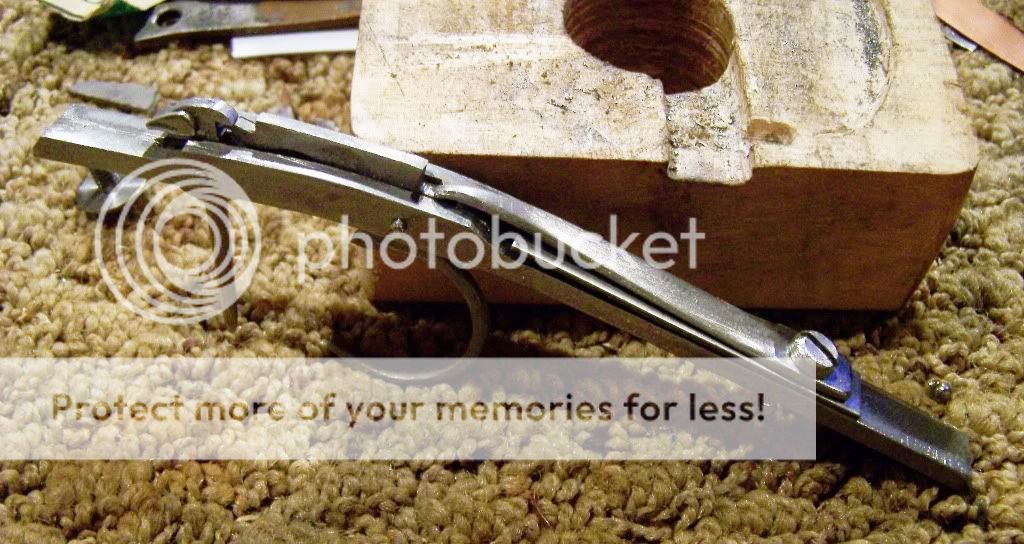
Here's one of my hand made triggers.  Closer to an original?  


Ok, where to start?  Your best and easiest route is to buy a store bought trigger to use as a pattern to get the basic size and deminsions.  Chambers sells a very good start.  A single phase double trigger made by Bud Siler.  Draw the parts out.  Make the modifications to make it look like a TN trigger and go to town with your hacksaw and files. 


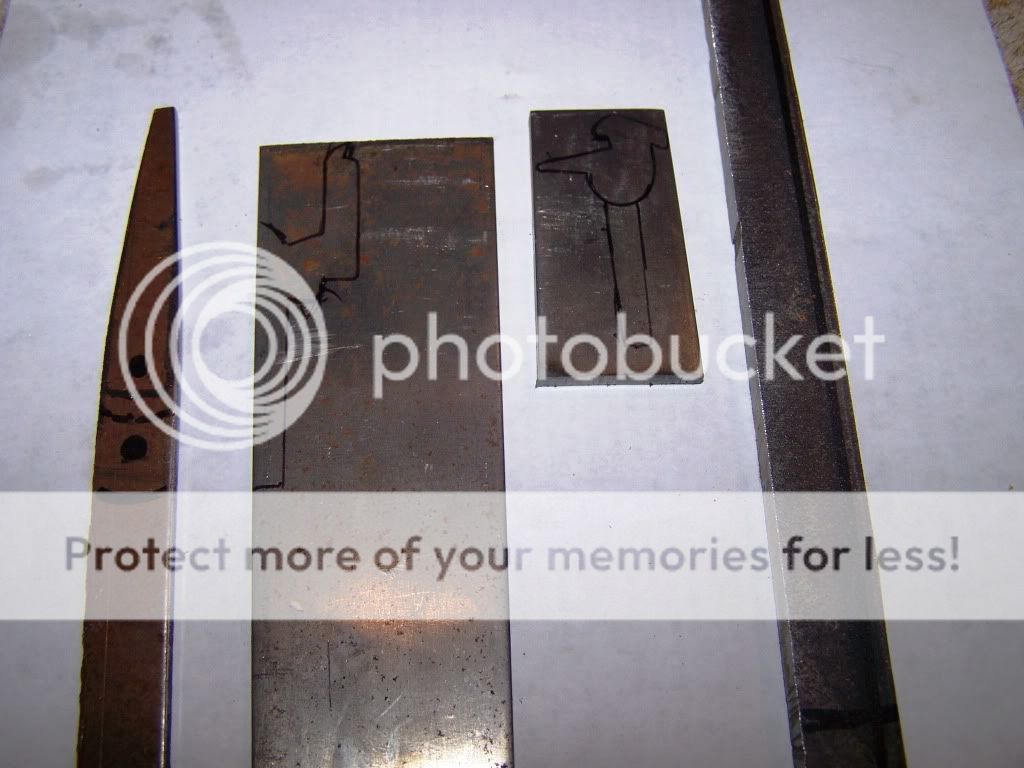
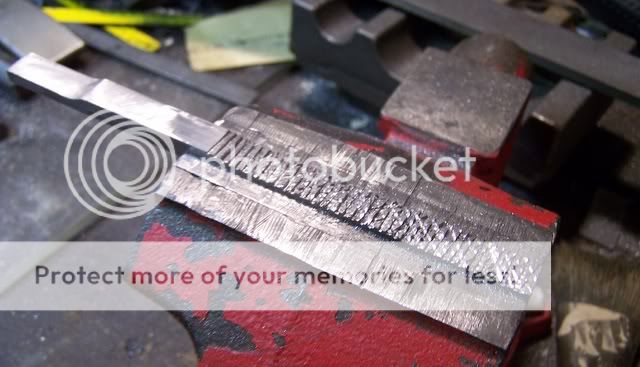
You will notice the rear trigger is drawn out with the curve straight.  There's a reason for that.  You need to turn it on end before you cut it out and beat a flange on the metal so it ends up being widder than the piece of metal you are using. 


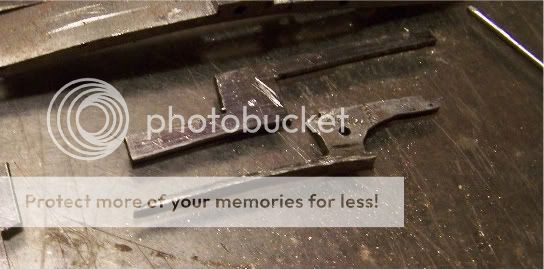
Now you can proceed with cutting it out with a hacksaw and rough shaping them with a file.


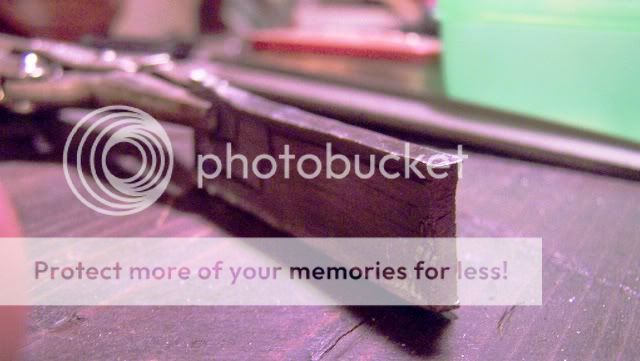
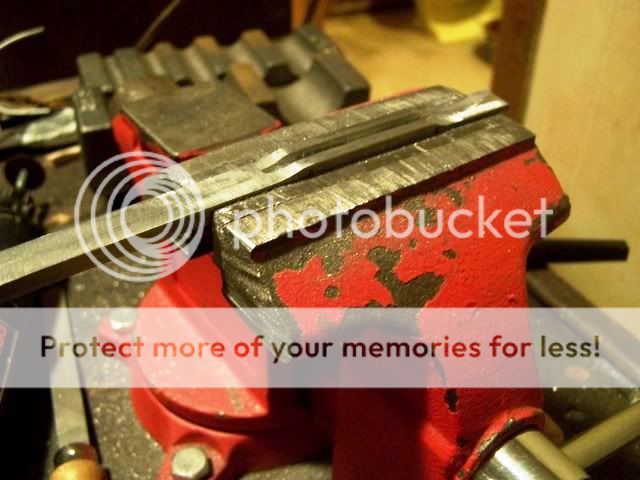
Now to bend the rear trigger.  I use a vice and round piece of pipe to get a nice round curve. 


Now the part I hate.  There are many ways to accomplish this.  I'll show how I started out doing it which is the hardest but requires the least amount of special tools.  Get yourself a piece of mild steel.  Crank her down in the vice and start hack sawing grooves about 1/2 the thinkness on the front and rear of the trigger plate just like you were doing a dovetail in a barrel.   Yes, it is a pain and labor to do it this way.  MUCH easier to put in the forge and shape with a hammer.  I'm sure easier to grind off and for sure easier to mill off.  The absolute easiest way........Use the trigger plate from the triggers you bought to use as a pattern so it doesn't go to waste.

Punch a set of holes and drill out for the triggers to go through.  Use a small file to connect the dot and progress with a larger file till you get everything to the right size.


Flip thr plate over and cut a slot right down the middle. 


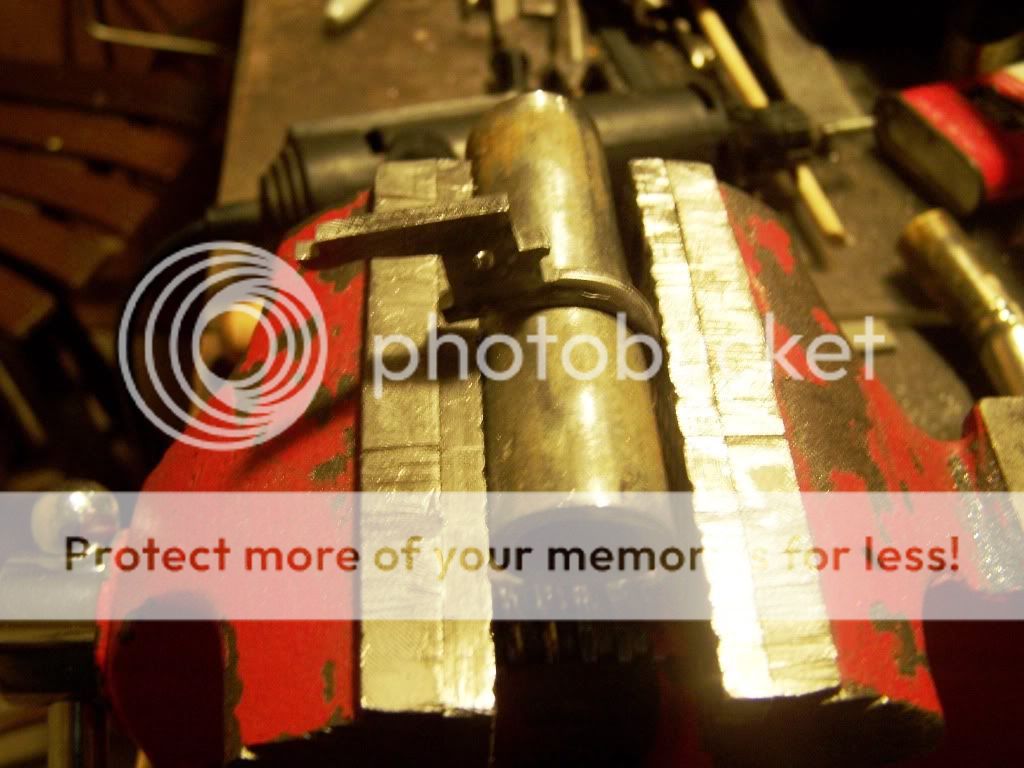
Now you are ready to fit it all together.  Well, you have to make the main spring also but that's pretty straight forward and by now you may have decided to use the store bought one. 


A little tweeking and you should be done. 


Logged

http://tennesseehogrifle.com/
Failure only comes when you stop trying.
melsdad
Sr. Member
****
Posts: 309


Brian Jordan


« Reply #1 on: May 01, 2009, 09:36:40 PM »

Very nice explanation Ken, Thanks for sharing!
Logged

"No free man shall ever be debarred the use of arms"...Thomas Jefferson
Ben Voss
Full Member
***
Posts: 196


« Reply #2 on: May 01, 2009, 10:35:28 PM »

Thanks, Ken, for the much needed inspiration to get others to build their own set triggers. One of my biggest pet peeves is seeing a top notch rifle someone has built that has "straight from the box" factory made double set triggers! It is pretty easy to at least modify the store bought ones to have a little bit of individuality, if one doesn't scratch build their own. Thanks again- your triggers are cool!
Logged
Hoot AL
Jr. Member
**
Posts: 95


WWW
« Reply #3 on: May 02, 2009, 01:34:53 AM »

Bookie taught you well Pack Dog. I like your rear set triggers.  Nice work.

Hoot AL
Logged

Ken Guy
Administrator
Hero Member
*
Posts: 4530


F & AM #758


WWW
« Reply #4 on: May 02, 2009, 08:13:25 AM »

Thanks guys,  It's nice to know if it was worth the time to take and load all the pictures.  If it helps anyone it was worth it. 
Hoot,
Bookie has done his part in my Southern gun education.  The problem has been getting my abilities to catch up with the information he gave me. 
Ken
Logged

http://tennesseehogrifle.com/
Failure only comes when you stop trying.
longcruise
Hero Member
*****
Posts: 1005


« Reply #5 on: May 02, 2009, 09:10:02 AM »

Ken, There always has to be at least one guy like me with a comprehension problem.  Why did you cross cut with the hacksaw.  I can't figure out why that part was done.

I have patterns that were generously provided to me by Mr. TC Albert and Have gathered some materials together for the project.  Between his instructions and your tutorial a working trigger could be in the offing!!
Logged

Mike Lee

A fine is a tax for doing wrong.
A tax is a fine for doing well.
Ken Guy
Administrator
Hero Member
*
Posts: 4530


F & AM #758


WWW
« Reply #6 on: May 02, 2009, 09:41:37 AM »

Hi Longcruise,
I start with a piece of steel bar that is around 3/8 wide and 1/4 tall.  You need the front and back of the plate down to around 1/8 tall.  This leaves a section of steel in the middle taller then the rest of the plate.  The removal of metal in the front of the plate allows for the Front trigger sprint to have room to work.  The removal of metal in the rear gets your mainspring down to a point where it works good. 
If you pin your rear trigger higher than your front trigger and have your main spring down low your trigger will work smoother and you will not need as much of a bend on the mainspring.  The less bend, the less wood you need to remove.  Wood removal is a big issue when your talking about a slender TN wrist.
Hope that helps.  If not fore away and I'll to answer what I can.  Mr. Webs book shows a lot of different configurations and is a real help if you are going to build one from scratch. 
Ken
Logged

http://tennesseehogrifle.com/
Failure only comes when you stop trying.
longcruise
Hero Member
*****
Posts: 1005


« Reply #7 on: May 02, 2009, 10:20:38 AM »

Ken, thanks!  I get it now.  Was obvious from the pics that the plate had front and rear reduction but I did not realize you were doing it the hard way.<g>
Logged

Mike Lee

A fine is a tax for doing wrong.
A tax is a fine for doing well.
Ken Guy
Administrator
Hero Member
*
Posts: 4530


F & AM #758


WWW
« Reply #8 on: May 02, 2009, 10:32:25 AM »

And that is the HARD way.  For me it is far easier to heat and flatten in the forge but I wanted to show a way that did not require a forge, grinder or mill to accomplish the task. 
Ken
Logged

http://tennesseehogrifle.com/
Failure only comes when you stop trying.
Brian Dancey
Global Moderator
Hero Member
*
Posts: 3513


« Reply #9 on: May 02, 2009, 11:23:29 AM »

For me the way you showed it would be the best way to go Ken.  Thanks for illustrating that.  I don't have a forge or the skill to use one, nor do I have a mill.  I have a grinder, but one mistake with that and you'd be starting all over.  The way you show would (for me) be the most appropriate if I wanted a predictable outcome.

Good tutorial.  Thank you.  As you know, I will have need of it.
Logged

Brian K. Dancey

"I do not consider myself subject to much at all"
Leatherbelly
Hero Member
*****
Posts: 2123


« Reply #10 on: May 02, 2009, 11:40:37 AM »

 WOW!!  Packdog,you do amazing work. Makes me extra proud to own one of your rifles! Maybe another down the road.(hopefully)
Logged

Leatherbelly
David Rase
Hero Member
*****
Posts: 1600


« Reply #11 on: May 04, 2009, 07:31:26 PM »

Very nice tutorial Ken.  Right timely.   A great companion to Jim Webb's book. 
DMR
Logged
RobertS
Full Member
***
Posts: 247


« Reply #12 on: May 05, 2009, 06:30:11 AM »

Great tutorial, pictures and content are excellent.  A couple of questions, did you harden any of the parts before assembly?  Also, I am thinking that adjustment screws are a relatively modern innovation, and they always looked out of place to me anyway.  I suspect that you make your adjustments with a file as you are fitting the parts together?  Thanks again!

Robert
Logged
Ken Guy
Administrator
Hero Member
*
Posts: 4530


F & AM #758


WWW
« Reply #13 on: May 05, 2009, 06:57:58 AM »

RobertS,
Yes, I harden all the parts before final assembly.  They are file fitted as I put everything together.  After everything is 99% finished, they are heated cherry red, quenched and then tempered back.  I do the triggers and springs at the same time and the same way. 
The adjustment screws are very common.  In fact you will see a trigger with 2 every now and then. The second being for the rear trigger main spring.  The second picture in the tutorial is a original rifle with adjustment screw. 

If you are going to build your own triggers I would like to second Jim Webb's book.  It has some great drawings of original triggers and what geographic location they came from.
Ken
Logged

http://tennesseehogrifle.com/
Failure only comes when you stop trying.
jim m
Sr. Member
****
Posts: 374


« Reply #14 on: May 05, 2009, 10:45:19 PM »

great tutorial Ken, thanks. what steel are you using for the triggers and what temp are you drawing them back too
Logged
Pages: [1] 2 Go Up Print 
« previous next »
Jump to:  


Login with username, password and session length

Powered by MySQL Powered by PHP Powered by SMF 1.1.11 | SMF © 2006-2009, Simple Machines LLC Valid XHTML 1.0! Valid CSS!