Author Topic: Wire inlay tutorial questions  (Read 8537 times)

Offline Squirrel pizza

  • Sr. Member
  • ****
  • Posts: 481
Wire inlay tutorial questions
« on: September 01, 2016, 11:14:06 AM »
Mr. Sapergia, I found your tutorial on wire inlay and the tools you made very interesting and helpful. A couple questions if you don't mind. First, the hacksaw blade tool is beveled like a chisel, and you also file a bevel on the wire, when you install the wire is the bevel on the same side as the chisel was facing or does it matter? And when you cross from a soft grain to the harder grain in the wood does this affect how the small edge of the hacksaw tool goes into the wood? Does it want to drift to one side or the other? For a first timer, besides the obvious answer of practice on different types of scrap wood, what type of wood is best for a newbie to wire inlay to learn some chops on?
  I welcome input from anyone with the knowhow, thanks for your time.
« Last Edit: September 01, 2016, 11:18:10 AM by Squirrel pizza »

Offline elkhorne

  • Hero Member
  • *****
  • Posts: 529
Re: Wire inlay tutorial questions
« Reply #1 on: September 01, 2016, 06:39:57 PM »
Squirrel pizza,
I am also trying teach myself wire inlay and have made a half dozen "chisels" from hacksaw blades about 2 1/2 inches. I plan to shape them incrementally from about 1/16 up to maybe 1/4 inch and make several concave to work around curves. First, I am wondering if the flat chisels need to be sharpened with the bevel on one side like a plane blade or beveled on both sides to keep the cut symmetrical. The same question goes for the curved ones. Secondly, I am planning, unless Mr. Sapergia or someone else can help, to heat the ones to be curved with a torch to red hot and put a curved rod on them on a piece of soft pine and whack it a couple of times to get the slight curve and then swish it in oil to harden it and let it cool. Once cool, polish it bright and then heat it with a propane torch until you see the straw color running. After than I plan to polish with a fine diamond stone on the outside like a gouge until sharp.hope this makes since and we are looking for fine points to expedite our tool making and get to inlaying. Thanks for all the help everyone is always sharing so us newbies can learn.
elkhorne

Offline Squirrel pizza

  • Sr. Member
  • ****
  • Posts: 481
Re: Wire inlay tutorial questions
« Reply #2 on: September 01, 2016, 06:57:01 PM »
Elkhorn, I believe I read a file was used, like a rat tail or chain saw blade file to do the blades for curves. As to both sides being filed, like the profile of a common screw driver I'm not sure. That's one reason I asked about matching the bevel on the wire to the bevel on the tool. Let's hope for both our sakes someone with the answers jumps in.

Offline Ed Wenger

  • Global Moderator
  • Hero Member
  • *
  • Posts: 2457
Re: Wire inlay tutorial questions
« Reply #3 on: September 02, 2016, 01:53:36 AM »
I don't mean to step on Taylor's toes, but since you asked for others input as well, hopefully my two cents may be of help...

Taylor's tutorial is excellent, and I've referred to it many times myself, and have found it to be very helpful.  However, like most techniques and methods, most of us do somethings slightly differently.  If you ask ten people what the best finish for a stock is for example, chances are you'll get ten different answers.  Soooo, in that vein, I'll give you a slightly different aspect relative to how I was taught, and what I've found to work well for me.  It's certainly not THE way, but a different way.

I know a few people who use hack saw blades for stamping in a design, and do very nice work, but I always had trouble with them for one reason or another.  Due to that, and also because of the instruction I've received, I've gone to small stabbing tools.  They are made from various sources, such as those small eye glasses screw drivers, old small screw drivers picked up at flea markets, wood awls that have been filed or ground to shape, or old ice picks treated the same way.  Below is a photo of the types of tools I'm talking about that should give you an idea as to what I mean...
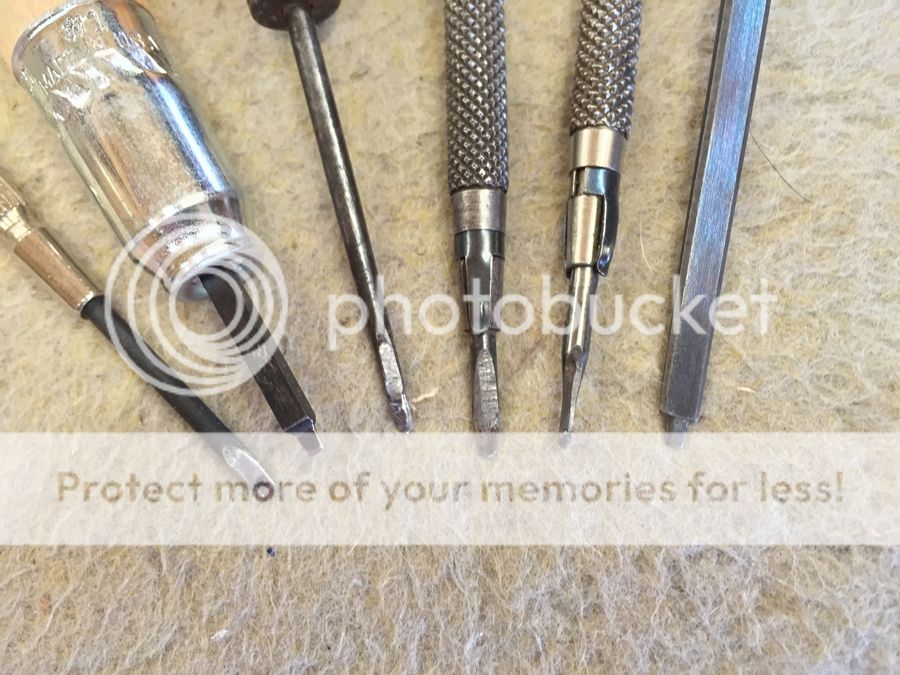


I've found that the screw drivers, awls, and ice picks are typically tempered enough so that you don't have to heat treat them.  After they are ground, cold forged, or filed, they are filed to shape with a bevel on both sides.  I try to make them as thin at the tip as I can get away with, and as sharp as I can make them.  They gradually get thicker as they go up the shaft.  You have to be careful not to make them too thick, just thick enough so the ribbon will fit in fairly easily.

The tool second from the left was made from square tool steel, probably 3/32".  It was ground to shape on a grinding wheel to create the shape seen.  The tool on the far right was also made from tool steel and has a "shoulder" to gauge depth.  I think the "tab" is about an 1/8".  That ones a little thicker and is used to widen a stab if needed.  The tool on the far left is one of those small eye glass screw drivers.

I don't use any tools that are curved.  I've found that if you "choke up" on the cuts, and use small tools, it's not necessary, and you can cut tight circles just as well.  I've also found that using tools such as these allows me to make cuts without using a hammer to tap them, simply stabbing  by hand works well, and they're easier for me to control.

As far as "best" woods to practice on, I'd go with maple, simply because that's probably what you'll stock most of your pieces in.  Maple is a great wood for wire inlay, although in my opinion, English walnut is even better.

Anyway, sorry for the dissertation, and again, just another way of doing things.  Hope it helps.....


          Ed


« Last Edit: December 14, 2023, 04:36:36 PM by Tim Crosby »
Ed Wenger

Offline Squirrel pizza

  • Sr. Member
  • ****
  • Posts: 481
Re: Wire inlay tutorial questions
« Reply #4 on: September 02, 2016, 03:47:26 AM »
Thank you Ed. Always more than one way to get the cat skinned, combining different techniques can only help. I appreciate your time, Mike

Offline dogcatcher

  • Sr. Member
  • ****
  • Posts: 385
Re: Wire inlay tutorial questions
« Reply #5 on: September 02, 2016, 05:02:08 AM »
I use Xacto baldes that I grind to shape and I made handles for the Xacto handles.


I got that idea from here http://americanlongrifles.org/forum/index.php?topic=5639.0

and here.  http://www.cascity.com/forumhall/index.php?topic=31167.125

I tried the hacksaw blades, the metal in the Xacto blades hold an edge longer.  Both of the above links are well worth reading. 

Offline M. E. Pering

  • Sr. Member
  • ****
  • Posts: 273
Re: Wire inlay tutorial questions
« Reply #6 on: September 02, 2016, 06:25:35 AM »
I agree with Ed totally on this... You don't really need a curved chisel.  But you should have a very short straight chisel.  My shortest in width is about 3/64th".  This allows you to cut some pretty tight curves.   I actually only have 3 chisels, all straight, with the widest being 1/8th", and the midrange being 3/32nd".  But I have never found that the hacksaw blades have worked that well.  I modify jeweler's screwdrivers for my wire inletting chisels.  I just grind them down and then hone them until as sharp as I can get them.  They are beveled on both sides.  But it is important to keep them thin.

 If you have a knife edge on your wire, it will do the rest of the work.  I only go down about 3/4 of the way into my wood, and let the silver ore brass wire do the rest.  I also run 60 grit sandpaper over both sides of the wire lengthwise before I bend and insert it.  This, of course, is to increase it's grip on the wood.  Once the wire is in to the proper depth, I then wet the wood and let it swell around the wire, and when dry, I carefully trim that which is standing proud.  I usually use a wood chisel for this work.  Once it is flush, it can be sanded, but if you are scraping, remember to sharpen your scraper often.

Matt

pushboater

  • Guest
Re: Wire inlay tutorial questions
« Reply #7 on: September 02, 2016, 03:28:10 PM »
When I started building Longrifles 35 years ago I could only afford one book. I decided on "Recreating the American Longrifle" by Wm. Buchele. Still use that book for reference all the time. About 10 years ago I decided to build a Little Lehigh rifle taking inspiration from Herman Rupp's beautiful rifles. I'd never done any wire inlay work before so I turned to Mr. Buchele's book, made some inlay chisels out of hacksaw blades, both straight and curved, and went to work. I don't remember ever heat treating them, but finding a hacksaw blade that was both strong and flexable was the challenge. And grinding and shaping them without losing the original temper was another challenge. They worked great for me and didn't cost anything as I just recycled some used blades I had lying around. The key for me was to go over my design with an exacto knife and make a shallow cut so that the chisel had a path to follow, and to work slow taking small nibbles. The beauty of these chisels is that if one does happen to break off in the wood, no problem. You just drive it down far enough into the wood to lay your wire over it and you'll never be able to tell it ever happened! Fortunately that never happened to me and I was quite pleased with my first, and so far only, attempt at wire inlay. You do need to polish them though so that they're smooth and will withdraw from the wood with as little friction as possible in order to keep from breaking out a chip in some of your tight curls. Ask me how I know this!


« Last Edit: December 14, 2023, 04:35:23 PM by Tim Crosby »

Mikecooper

  • Guest
Re: Wire inlay tutorial questions
« Reply #8 on: September 02, 2016, 03:38:03 PM »
Hacksaw blades have worked well for me.  They are quick and easy to make chisels and are just the right thickness for storebought brass wire.  I've never used silver or homemade wire but I think it would work for that also, depends on thickness of the wire I guess.   

Offline Squirrel pizza

  • Sr. Member
  • ****
  • Posts: 481
Re: Wire inlay tutorial questions
« Reply #9 on: September 02, 2016, 03:54:06 PM »
It never ceases to amaze me how many truely talented people freely share their knowledge on this sight. It can get confusing at times. In reading the thread started by Smart Dog some say anneal, some say don't. Some say sand or drag the wire over a file, some say polish the wire. I guess it's a matter of what works for you,and I'll have to experiment with the different methods. Maybe one way works better than the other for different applications. It's rather humbling to find out how many things you don't know. Please keep the info coming as this freshman needs all the help he can get, and by all means keep posting pictures of your beautiful work! And if by chance some of you have pictures of the "oopses" and mistakes, maybe you could share a few to see what NOT to do and why. Thanks again all, Mike

Offline Ed Wenger

  • Global Moderator
  • Hero Member
  • *
  • Posts: 2457
Re: Wire inlay tutorial questions
« Reply #10 on: September 02, 2016, 04:15:55 PM »
Mike, you're welcome....

Pretty gun, pushboater.

Another method that can be utilized to anchor wire in the stock is to gently tap the bottom of the wire with a straight chisel.  This will cause a series of "teeth" to be formed, much like a saw blade.  The "teeth" are not intended to bite into the wood, rather they are off set (like a hacksaw blade), and this also bulges the wire slightly on the bottom, forming a very positive "anchor", once the wood is swelled.  I've found this method to be particularly effective to anchor wire, especially brass.


         Ed
Ed Wenger

pushboater

  • Guest
Re: Wire inlay tutorial questions
« Reply #11 on: September 02, 2016, 04:18:56 PM »
 Mike, I also pulled the wire across the edge of a file. It creates longitudinal grooves in the wire which helps to hold the wire in the groove. And this might not be historically correct, but I took a toothpick and put some white carpenters glue in the grove just before I tapped the wire in. Didn't want a piece popping out down the road. The glue will flow into the small longitudinal grooves and help hold the wire in. It dries clear and then it's just a matter of filing the wood and wire down flush. You won't see it once you're finished.

Offline Squirrel pizza

  • Sr. Member
  • ****
  • Posts: 481
Re: Wire inlay tutorial questions
« Reply #12 on: September 02, 2016, 04:26:38 PM »
Since brass is cheaper than silver it seems it would make economic sense to practice with brass, but do they work differently? If I get a feel for the process, will changing to silver surprise me or can I expect it to handle in a like fashion? Also, Smart Dog mentioned getting some of his designs from a French pattern book. I'm inspired by all the magnificent rifles , both antique and contemporary, and I know what I like when I see it. But having a book with patterns I could trace or copy while I start the learning process would have to be a help. Any suggestions? Thanks again some more, Mike

Offline elkhorne

  • Hero Member
  • *****
  • Posts: 529
Re: Wire inlay tutorial questions
« Reply #13 on: September 02, 2016, 05:25:44 PM »
Squirrel pizza,
Thanks for bringing up this topic as I have recently been trying to make some wire inlay chisels out of hacksaw blades as per Mr. Buchele's directions and also some of the modified Xacto knives with handles added. I am like you in that any of us with questions can just throw them out on this forum and get multiple solutions from those much more experienced than we. Ed thank you for your new ideas as you always have great tool ideas and I'm still using your tool for locating pins that you shared with us at WKU several years ago and have shared it with several others. That is the neatest thing about our hobby is that people are so willing to share and help others. A really refreshing change from most things in this world today. Push oater, that is a beautiful Lehigh and I love your wire inlay and carving behind the tang. Thanks Mike and others for all the comments and new ideas to add to Taylor's tutorial. Lots of new things to try and tools to make. Thanks again.
elkhorne

Offline dogcatcher

  • Sr. Member
  • ****
  • Posts: 385
Re: Wire inlay tutorial questions
« Reply #14 on: September 02, 2016, 06:37:22 PM »
I practiced using brass bezel wire.  To me there was very little difference between the copper, brass or silver.  All 3 are just punch your hole in the wood, stick in the wire.  The thicker wire was tougher to work with than the thinner wire.     https://www.sfjssantafe.com/baseitems.php?Gid=MB025&ItemSet=Red

It was and still is cheaper.  The down side, it is only available in 32 gauge, generally thinner than the regular flat wire that most people use.  10 foot coil for about $2 and shipping. 

The silver source I used is    https://www.muzzleloaderbuilderssupply.com/mbs3cart/agora.cgi?&product=Tools  The cost is about $3 for about 3 foot.  On the silver I used to get all 3 thicknesses.   

Offline Squirrel pizza

  • Sr. Member
  • ****
  • Posts: 481
Re: Wire inlay tutorial questions
« Reply #15 on: September 02, 2016, 09:15:52 PM »
Thanks Dogcatcher, very helpful. I'm generally a Southern Mountain plain Jane kinda guy, but I do appreciate the artistry that goes into the more ornate rifles, especially with engraved patchboxes and inlays, usually on the cheek piece. Some are a bit over the top and frankly a little gaudy for my tastes. A little embellishment goes a long way. IMHO. Trying to use the silver wire inlay to hi-lite rather than be the focal point of the rifle. Finding that balance is something else for me to learn.

Offline Ed Wenger

  • Global Moderator
  • Hero Member
  • *
  • Posts: 2457
Re: Wire inlay tutorial questions
« Reply #16 on: September 02, 2016, 11:03:59 PM »
Mike..., I don't see a big difference in working with brass or silver.  If anything, silver is easier, and I typically use dead soft fine silver, as it won't tarnish as badly as sterling.

The reason we score the sides of the wire is to create grooves that the wood swells into when wetted, thus acting as an anchor.  An even better anchor (I think) is nicking the bottom of the wire with a straight chisel as I mentioned above.  Creating these anchors is especially important when using brass.  Brass has a tendency to react with the tannic acid in the wood, creating that green, soapy substance we've all seen on very tarnished brass.  If you don't have good, positive anchors in the wire, that soapy stuff will act like grease and over time, the wire will pop out.

There are numerous books available on various designs for boroque and rococo style.  If you're recreating American pieces, and concerned about historical accuracy, just remember what is found on American pieces is typically fairly simple.  Internet searches are a great source for examples of original work.


          Ed
Ed Wenger

Offline Squirrel pizza

  • Sr. Member
  • ****
  • Posts: 481
Re: Wire inlay tutorial questions
« Reply #17 on: September 02, 2016, 11:26:03 PM »
Ed your dissertation is very much appreciated, and as it happens was exactly the kind of information I was hoping for. I have read various books but unless you are familiar with the author or their work it is just some guys opinion, and we all know what their like. Dr. Seuss has written many books but sometimes I doubt their validity, and he's a doctor! Ive worked with wood and tools enough to know what makes sense or sounds like a good idea. I know enough about wire inlay to be dangerous, but I hope to fix that. With a site like this the good ideas usually stand out by concensous. Enough folks will chime in and say "yeh, I do it like so and so said and it works great". Others you can see their work and have to agree they know what they're talking about. One more reason to love this site. Any advice you have is appreciated, and if enough talented folks keep sharing the knowledge I will be a wire inlay god in a week or two!

Offline elkhorne

  • Hero Member
  • *****
  • Posts: 529
Re: Wire inlay tutorial questions
« Reply #18 on: September 04, 2016, 04:44:27 AM »
Ed and Matt,
When you all use the jeweler's screwdrivers for your chisel, what do you all use for a handle on your palm as you stab the design in? GRS makes some mushroom handles with thermolock (I think that is what they call it) that when heated, the graver or other tool can be sunk into it and when it hardens back up, it is one unit. Thanks for all the ideas.
elkhorne

Offline Squirrel pizza

  • Sr. Member
  • ****
  • Posts: 481
Re: Wire inlay tutorial questions
« Reply #19 on: September 04, 2016, 08:22:56 AM »
After making a couple chisels of hachsaw blades, an ice pick, and several used to be screw drivers I think for me the use of a small hammer will work best. As a carpenter I already have a feel for hammers, how hard to hit, and not really having to look at the"head" of the chisel but watching my lines and the depth of cut. It just feels more natural to me.

Offline smart dog

  • Global Moderator
  • Hero Member
  • *
  • Posts: 7038
Re: Wire inlay tutorial questions
« Reply #20 on: September 04, 2016, 05:57:38 PM »
Since brass is cheaper than silver it seems it would make economic sense to practice with brass, but do they work differently? If I get a feel for the process, will changing to silver surprise me or can I expect it to handle in a like fashion? Also, Smart Dog mentioned getting some of his designs from a French pattern book. I'm inspired by all the magnificent rifles , both antique and contemporary, and I know what I like when I see it. But having a book with patterns I could trace or copy while I start the learning process would have to be a help. Any suggestions? Thanks again some more, Mike
Hi SP,
Thought I might chime in here.  I mentioned the French pattern books because they provide inspiration but I copy nothing.  All of my work is my own sometimes building on the inspiration of others.  The pattern books provide examples of designs that fill varied spaces.  They also give me historical insight into what type of art is appropriate for my projects.  For example, on my current English rifle project, the gun represents work that might have been done during the 1730s-1750s.  The wire work is inspired by designs drawn by Claude Simonin and published in 1684.  In those days, French and other European pattern books percolated slowly through the trades and even more slowly  in England.  My designs represent a mix of older designs from the Baroque period and newer burgeoning rococo, a composition proper for an English gun from the 1740s.  Some English makers at the time would have used much more "modern" French rococo and others, more conservative, held on to older and familiar styles.  Florid and intricate wire work copied from a French pattern book can look beautiful on an American longrifle but it is out of character, historically.  I doubt many American gun makers ever saw a French pattern book and with a few exceptions, the wire work on American guns was greatly simplified and coarse.  You can build a very inexpensive library of patterns and designs by buying or downloading Dover Publications' Pictorial Archive Series.  The books are inexpensive but of high quality and they cover the entire history of decorative arts.  You can also occasionally find copies of "Master French Gunsmith Designs" edited by Stephen Grancsay.  They are expensive.

dave   
"The main accomplishment of modern economics is to make astrology look good."

Offline Squirrel pizza

  • Sr. Member
  • ****
  • Posts: 481
Re: Wire inlay tutorial questions
« Reply #21 on: September 04, 2016, 06:34:56 PM »
Than you Dave. Design books of what fits where are always fun to look at, and seem to always generate new ideas. This may cause some purists to throw rocks at me but I'm not looking to emulate a certain time period, or nessicarily be historically correct. Like I said before I know what I like when I see it, and if its on my rifle I'm the only one who has to like it. I'm mostly looking for ideas, and as I learn and skills progress maybe try more intricate designs. I can build you any kind of house you desire, but don 't ask me what colors to paint the rooms. It's kinda the same with my rifles. While I'm no Fred Riley I can make a rifle I'm happy with, when it comes time to pic a stain or embellish I'm at a loss. I guess it's that right brain/left brain thing. More anylitical than artistic.

Offline M. E. Pering

  • Sr. Member
  • ****
  • Posts: 273
Re: Wire inlay tutorial questions
« Reply #22 on: September 06, 2016, 01:36:36 AM »
Elkhorne,

I don't put a handle on at all.  It the wood is too hard for me to push it in, though, and I know my chisels are sharp, I will tap it in with the chasing hammer I use when engraving.  But in most cases, I can push it in with my palm on the back of the screwdriver.

Offline Ed Wenger

  • Global Moderator
  • Hero Member
  • *
  • Posts: 2457
Re: Wire inlay tutorial questions
« Reply #23 on: September 06, 2016, 12:41:05 PM »
Same with me, no handles.....


           Ed
Ed Wenger