I don't mean to step on Taylor's toes, but since you asked for others input as well, hopefully my two cents may be of help...
Taylor's tutorial is excellent, and I've referred to it many times myself, and have found it to be very helpful. However, like most techniques and methods, most of us do somethings slightly differently. If you ask ten people what the best finish for a stock is for example, chances are you'll get ten different answers. Soooo, in that vein, I'll give you a slightly different aspect relative to how I was taught, and what I've found to work well for me. It's certainly not THE way, but a different way.
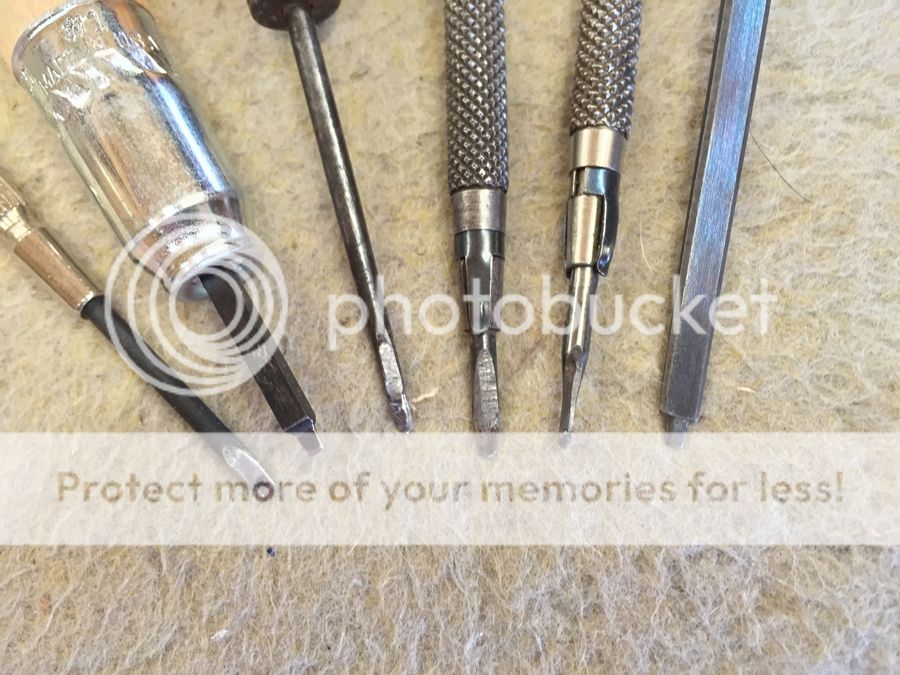
I know a few people who use hack saw blades for stamping in a design, and do very nice work, but I always had trouble with them for one reason or another. Due to that, and also because of the instruction I've received, I've gone to small stabbing tools. They are made from various sources, such as those small eye glasses screw drivers, old small screw drivers picked up at flea markets, wood awls that have been filed or ground to shape, or old ice picks treated the same way. Below is a photo of the types of tools I'm talking about that should give you an idea as to what I mean...

I've found that the screw drivers, awls, and ice picks are typically tempered enough so that you don't have to heat treat them. After they are ground, cold forged, or filed, they are filed to shape with a bevel on both sides. I try to make them as thin at the tip as I can get away with, and as sharp as I can make them. They gradually get thicker as they go up the shaft. You have to be careful not to make them too thick, just thick enough so the ribbon will fit in fairly easily.
The tool second from the left was made from square tool steel, probably 3/32". It was ground to shape on a grinding wheel to create the shape seen. The tool on the far right was also made from tool steel and has a "shoulder" to gauge depth. I think the "tab" is about an 1/8". That ones a little thicker and is used to widen a stab if needed. The tool on the far left is one of those small eye glass screw drivers.
I don't use any tools that are curved. I've found that if you "choke up" on the cuts, and use small tools, it's not necessary, and you can cut tight circles just as well. I've also found that using tools such as these allows me to make cuts without using a hammer to tap them, simply stabbing by hand works well, and they're easier for me to control.
As far as "best" woods to practice on, I'd go with maple, simply because that's probably what you'll stock most of your pieces in. Maple is a great wood for wire inlay, although in my opinion, English walnut is even better.
Anyway, sorry for the dissertation, and again, just another way of doing things. Hope it helps.....
Ed

