Author Topic: wire inlay. what now  (Read 3982 times)

tbailey

  • Guest
wire inlay. what now
« on: June 14, 2010, 05:43:58 AM »
OK friends just put some wire inlay in front of the toe plate.  Went in good, filed off smooth look real good to me.  I came back later and, well it's popping out.  should i use some type of glue? Or should i go with a bigger piece of wire and stabb in a little deeper?

Thanks.

T.Bailey.


Offline stuart cee dub

  • Sr. Member
  • ****
  • Posts: 461
Re: wire inlay. what now
« Reply #1 on: June 14, 2010, 06:25:45 AM »
Was it really a round wire or was/is it a thin flat ribbon of metal ?.
( I've not had the best helps from friends expertise sometimes so forgive my questioning I am not trying to smart or cynical )

Of course it should not be popping out . Did you watch this being done by the way?

There are some tricks I was taught... to take a file and rough up the ribbon so the metal surface would have some purchase
in the groove .I was also taught and have since always used white wood glue in the groove before tapping the ribbon in ,not so much as a glue but more to swell and seal the bare wood to help grip the ribbon .

How wide and think is the ribbon in there currently? Please tell us a bit more if you know .

Offline Waksupi

  • Sr. Member
  • ****
  • Posts: 358
  • Ric Carter, Somers, Montana
Re: wire inlay. what now
« Reply #2 on: June 14, 2010, 08:15:33 AM »
Did you wet it after insertion?
Ric Carter
Somers, Montana

Offline Acer Saccharum

  • Hero Member
  • *****
  • Posts: 19311
    • Thomas  A Curran
Re: wire inlay. what now
« Reply #3 on: June 14, 2010, 02:17:41 PM »
I thought Taylor did a instructional on this in the Tutorial section. I've searched, but do not find. ....yet.

I did do a search, and there is a ton of info, scattered throughout the forum, in bits and pieces.

Taylor scores his wire lengthwise to make grooves on the sides of the wire. this holds the metal in place, like barbs. wet the wood after installation, and the wood closes up on the wire.

Tom
« Last Edit: June 14, 2010, 02:25:58 PM by Acer Saccharum »
Tom Curran's web site : http://monstermachineshop.net
Ramrod scrapers are all sold out.

Offline D. Taylor Sapergia

  • Member 3
  • Hero Member
  • *
  • Posts: 12671
Re: wire inlay. what now
« Reply #4 on: June 14, 2010, 07:06:13 PM »
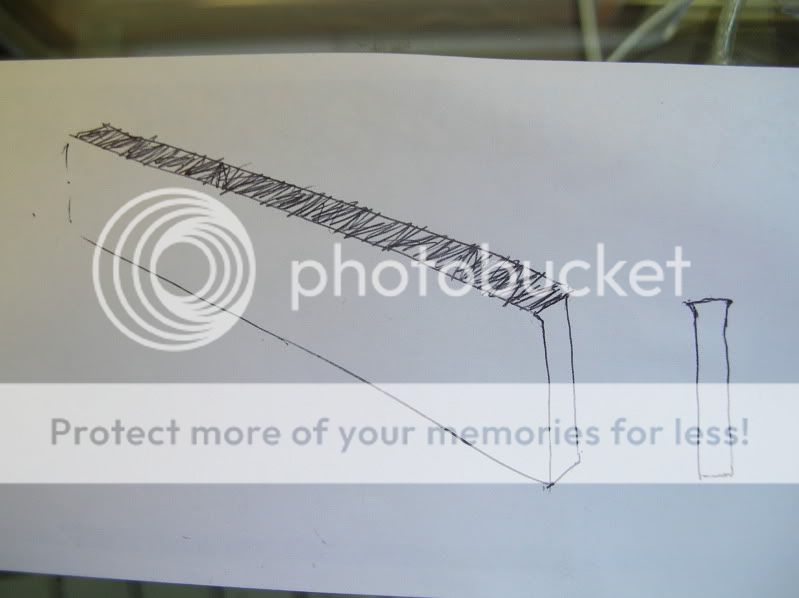
I have always done my wire inlay as Tom has described, until I had a problem with some .005" pure silver ribbon popping up after twenty years, in the cross grain of an ebony pistol grip.  Going into a cut across the grain, and around a curve is the most challenging I've found thus far.  I remembered an e-mail conversation I had about this topic, and I think it was from Gary Brumfield.  He told be to take the ribbon and stand it on its edge on a hard surface, and tap the edge with a not too sharp knife, many times.  This puts little cuts across the thin edge of the ribbon, but more importantly, creates a little burr on both sides of the ribbon.  My sketch is exaggerated but shows the idea.  This burred edge then goes into the cut, and when the wood is wetted, it closes on the ribbon and locks it in the slot. 
So, I carefully pulled that offending "wire" out of it's place in the grip, gave it this treatment, and put it back.  I had to snip off a little at the end of the inlay, as the wire had lengthened.  The fix is permanent.
« Last Edit: December 14, 2023, 04:41:47 PM by Tim Crosby »
D. Taylor Sapergia
www.sapergia.blogspot.com

Art is not an object.  It is the excitement inspired by the object.

Offline rsells

  • Hero Member
  • *****
  • Posts: 681
Re: wire inlay. what now
« Reply #5 on: June 14, 2010, 10:47:10 PM »
I use a process that Frank Bartlet showed me many years ago, and it has worked well.  I use a rectangular cross section silver wire for the inlay.  I use a course file or course sand paper to scuff up both sides of the wire before shaping it to go into the slot.  I made a small tool with a shoulder for reference on how deep to cut into the wood deep enough to leave a short section of the wire inlay sticking out of the slot when it is put into the wool.  Before installing the wire into the slot, I take my finger and rub Elmers glue into the cut.  I then install the wire into the slot using a small engraving hammer leaving a small section sticking up above the wood.  The glue has moisture in it.  I take a small hand held soldering iron and run it back and forth across the portion of the wire sticking up above the wood.  The heat from the iron and the moisture in the glue will cause the wood to swell and close up the gap between the wood and wire inlay.  Unless I have an issue with some fancy curl flaking during the cutting process or some error on my part, there is no visible gap between the wood and wire inlay.  The wood holds the wire firm in the slot as well as the glue process.  I then file the top of the wire flush with the wood and polish with different grades of sand paper.  I have not had any issues since I started using Frank's process in the late 70's.

                                                                   Roger Sells
« Last Edit: June 14, 2010, 10:48:39 PM by rsells »

tbailey

  • Guest
Re: wire inlay. what now
« Reply #6 on: June 14, 2010, 11:36:37 PM »
thanks friends good advice.