The parting tool is a most useful tool. Alas, if is not sharp, it's going to tear the wood, and skitter across your stockwork when you least expect it. This little tutorial may help you out. It takes me a long time to get my parting tools sharpened properly, but man, what a difference in the carving it makes! Maybe you already know how to do this, or know a better way. Please add to this tutorial if you have any cool tricks for sharpening.

All tools require this operation once in a while; surprisingly right out of the box, they need to be formed to your style of carving. Grind the face with a 5 to 10 degree back angle. This keeps the 'wings' from diving into the wood ahead of your intended cuts, especially cutting curved lines. In this step, you want to generate a bright flat face on the end of the tool. The face should be square across the end of the tool when you look straight down on it. Stone away any burrs. These burrs are very misleading when sharpening tools. If not removed, you will end up with a mis-shapen tool, one wing ahead of the other, the wings not meeting properly at the bottom of the Vee, etc.
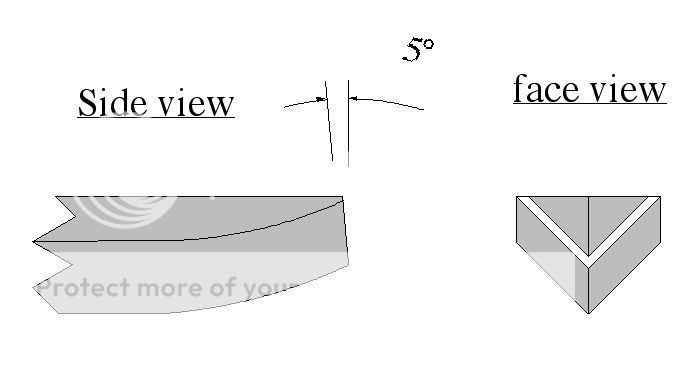
Grind both wings to even thickness, by grinding the outside of the tool to become parallel with the inside Vee of the parting tool. Very important: De-burr as you go. Get the bright face width down to about .01 to .02 in width. This is thin, and grinding will generate enough heat to ruin the temper of the tool. I like to use a piece of Toilet Paper (TP) soaked in water to hold the tool on the grindstone. The wheel won't grab paper...but it will pull cloth right into the machine and anything else near it. How do I know?
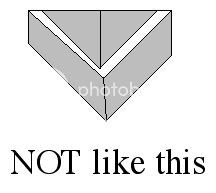
If you get a face grind like the above, you will have to straighten it out by grinding off the outside. You might even have to grind the face back a bit more if there isn't enough face material.
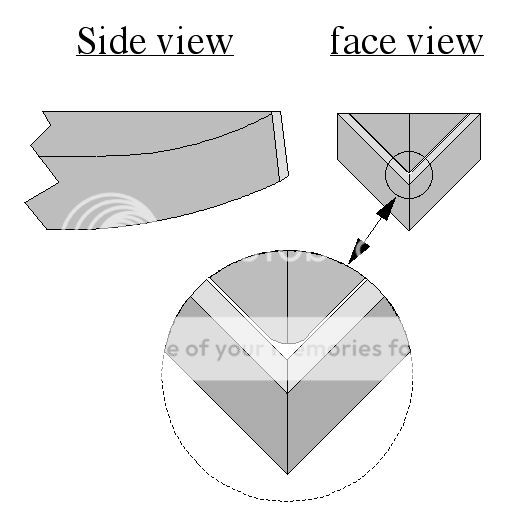
Next, a bevel must be stoned, on the outside only, to reduce the bright face width and produce the 'heel'. Note that to stone the bevel, the tool is tipped up higher to make this 'heel' effect. This heel is what the tool rides on when cutting. When you lower the handle while cutting forward, the heel is what steers the cutting edge up out of the wood. This bevel, or heel, should only be .01 to .04 wide, depending on the size of the parting tool. For fine lines and detailing, go for the small tools with short heels; for larger work, driven by a mallet, go longer on the heel. Note in the enlarged view, down at the bottom of the vee, there is a small triangle area of flat bright steel.
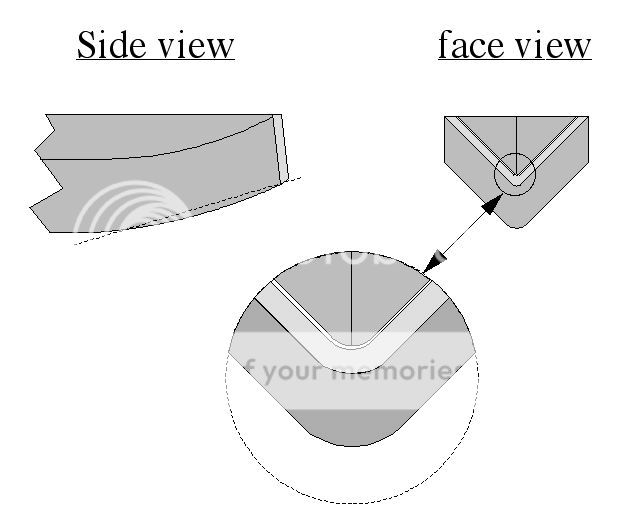
Look at the side view with the dotted line running across the 'belly'. The belly must be taken down so that you can go around curves. Grind almost up to the cutting edge. If left on, the belly will rub on the outside of the turns, making skidmarks and scuffing. Round off any corners on the belly.
On the right is the end view, with the bevels stoned in, and just the tiniest bright flat face visible. At the very bottom of the Vee, there is usually a small radius(refer to enarged view). You must stone to outside of the tool around this radius, by rolling the tool while you stone. Do not leave that small triangle of bright face here. Roll the tool left to right, back and forth while stoning, keeping the handle elevated at the angle you will want to be cutting at, between 20 to 30 degrees. De-burr if neccessary. Make sure you can really see the developing edge, free of burrs, straight across when viewed from above, wings meeting at the point. The cutting edge should be in a single plane. If you place the tool cutting face down on a flat surface, you should see no gaps.
Now is the time to break out the finer stones. Maintain the geometry you worked so hard at developing. Once stoned with hard Arkansas, switch to strops.
STROPS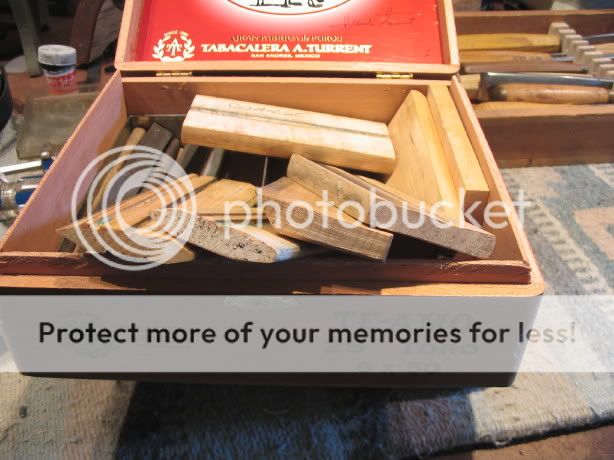
I make these from maple, birch, or any tight grained hardwood. Make one to fit the inside Vee of the parting tool. Cut a groove on the side of the strop
with the parting tool, to polish the outside cutting edges. When the strop is fitted to the parting tool, it's time to charge it with lapping compound, rouge, or any fine abrasive. I use 1200 grit moldmaker's lapping compound. You can make a coarse strop and a fine strop, just by using different compounds. Just keep them separated. Don't get any coarse on your fine strop.
My set above is for all my gouges and veiners. Once stoned, the tools only need an occasional stropping to maintain the edge. I will sometimes use a felt buffing wheel for a final polish. But please be careful not to round the edge over! Polish lightly, holding the tool tangentially to the wheel.
[/font=Stencil][/font=Times New Roman]
