Author Topic: Stabbing techniques (eventual tutorial)  (Read 17119 times)

Offline Acer Saccharum

  • Administrator
  • Hero Member
  • *
  • Posts: 19311
    • Thomas  A Curran
Stabbing techniques (eventual tutorial)
« on: December 07, 2013, 11:57:16 PM »
This is a trial posting for a tutorial on stabbing and background relieving. Post whatever you feel appropriate for the topic, as I have found that the comments that go along with the thread are full of good ideas. This will eventually be edited and posted in the tutorial section. Thanks, Tom


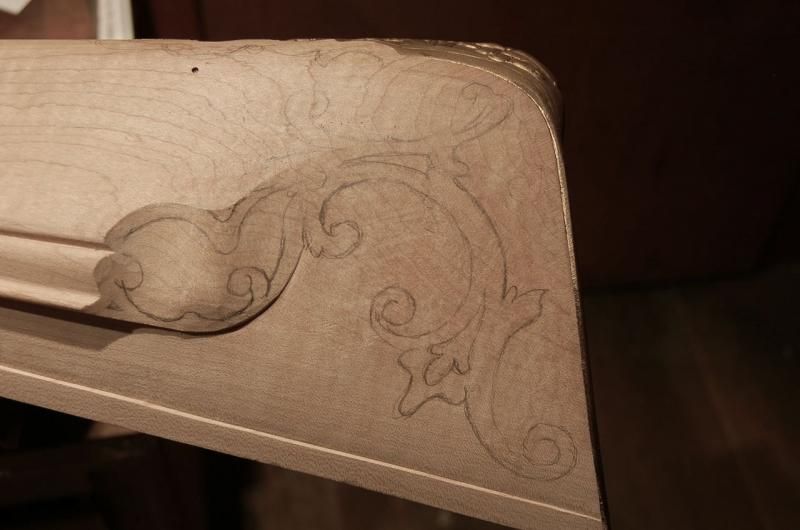
Draw your sketch on the wood with pencil. Second best tool is a big pink eraser.


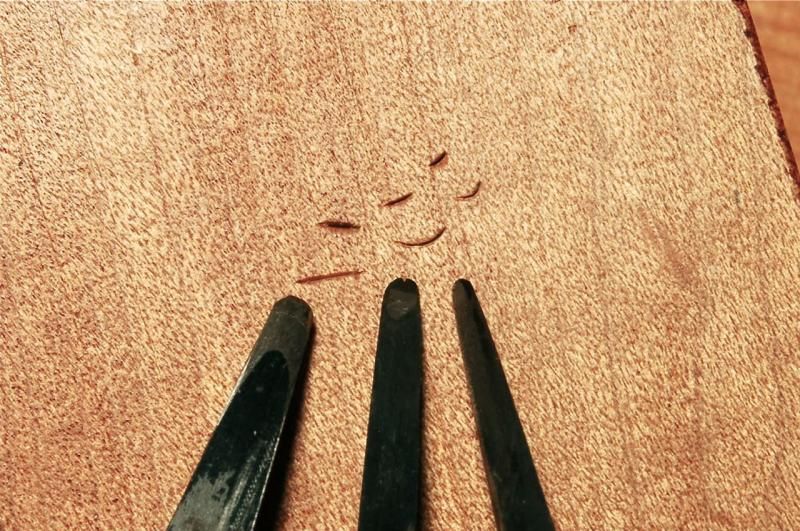
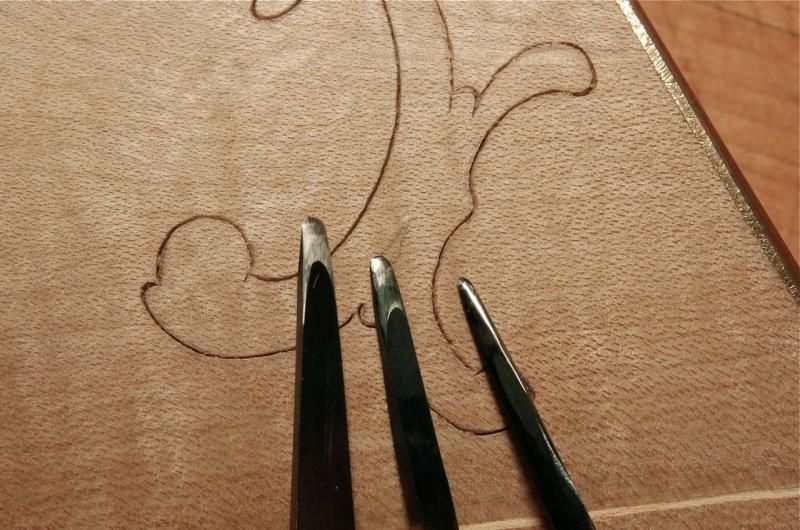
Tiny tools note the ends are rounded. The two on the right have flat backs, rounded fronts. The one on the left is rounded on both sides. Same tools in same order in the phot below.
Top row across is the tool plunged straight into the wood.
Second row is the tools plunged and then rocked right to left. This 'rolling' of the point causes the tool to creep along the wood. The flat backed tools can go around a tighter curve, flat toward the inside of the curve.


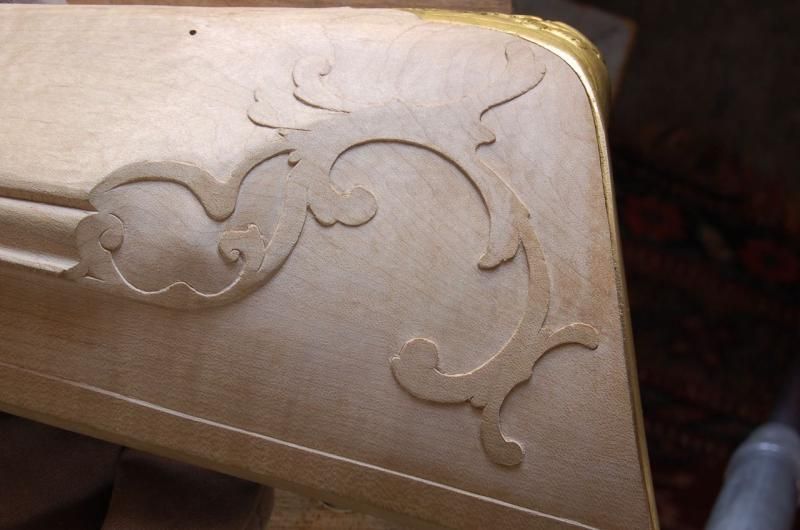
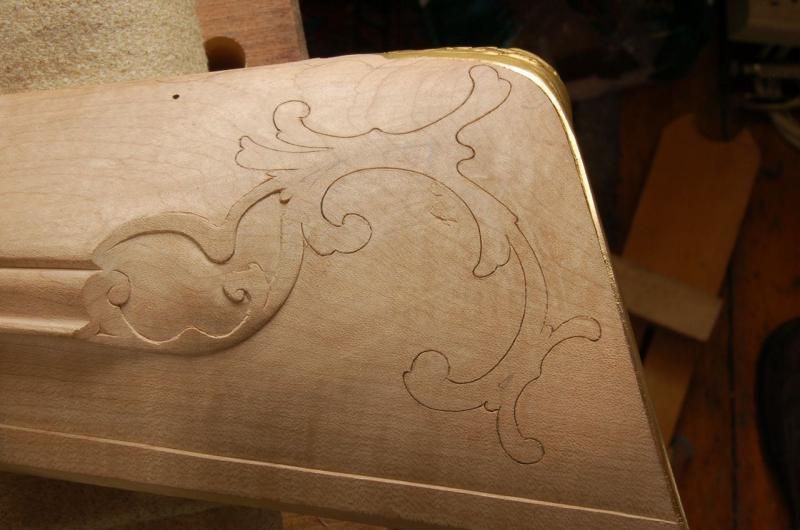
Design stabbed in, but not very deeply. As I cut the background away and come up to the stabbed line, the waste wood pops off. If I haven't stabbed deep enough, the waste wood hangs on. So I can take the stab tools and cut a touch deeper wherever I need to.


Sketch completely stabbed. For a few inside and outside radii, I use a gouge that fits the drawing.


(image  of background cutting tools and techniques still needs to be created)


Background is all cut down, and faired back enough so that the surface doesn't look like it's 'diving in'.
« Last Edit: November 02, 2022, 07:37:03 PM by Tim Crosby »
Tom Curran's web site : http://monstermachineshop.net
Ramrod scrapers are all sold out.

Whaleman

  • Guest
Re: Stabbing technique
« Reply #1 on: December 08, 2013, 12:12:16 AM »
Thank You. Could you please explain your tools and methods for leveling off the low area so evenly and smoothly? Dan

Offline Acer Saccharum

  • Administrator
  • Hero Member
  • *
  • Posts: 19311
    • Thomas  A Curran
Re: Stabbing technique
« Reply #2 on: December 08, 2013, 12:16:21 AM »
Thank You. Could you please explain your tools and methods for leveling off the low area so evenly and smoothly? Dan

Yes, Dan, will do. That is one photo I don't have, but will be sure to capture it next piece of backgrounding I do.
Tom Curran's web site : http://monstermachineshop.net
Ramrod scrapers are all sold out.

Offline Frank

  • Hero Member
  • *****
  • Posts: 968
Re: Stabbing techniques (eventual tutorial)
« Reply #3 on: December 08, 2013, 01:18:36 AM »
This will be a very helpful tutorial. Could you also cover incised carving? thanks

Offline smylee grouch

  • Hero Member
  • *****
  • Posts: 7866
Re: Stabbing techniques (eventual tutorial)
« Reply #4 on: December 08, 2013, 01:28:23 AM »
Tom, when you have all the wood removed from around the design is there still the stabbed in cut along the design, lower into the wood than the surounding area that you carved away?  Hope I explained that so you know what I was wondering about.   Smylee

necchi

  • Guest
Re: Stabbing techniques (eventual tutorial)
« Reply #5 on: December 08, 2013, 02:25:27 AM »
This will be a very helpful tutorial. Could you also cover incised carving? thanks
This is an incised carving technique.

Offline David R. Pennington

  • Hero Member
  • *****
  • Posts: 2919
Re: Stabbing techniques (eventual tutorial)
« Reply #6 on: December 08, 2013, 03:41:12 AM »
I would also like to see some detail on the tools. How do you shape them?
VITA BREVIS- ARS LONGA

Offline Acer Saccharum

  • Administrator
  • Hero Member
  • *
  • Posts: 19311
    • Thomas  A Curran
Re: Stabbing techniques (eventual tutorial)
« Reply #7 on: December 08, 2013, 06:56:03 AM »
At some point, I would cover incised, once I feel I know enough about it.

Eric Kettenburg is one master of that technique.

See some incised examples of work on his website at:
http://www.erickettenburg.com/Site/1750s_Rifle.html
http://www.erickettenburg.com/Site/John_Rupp.html#5
http://www.erickettenburg.com/Site/More_Allentown_Rifles.html#2
Tom Curran's web site : http://monstermachineshop.net
Ramrod scrapers are all sold out.

DaveP (UK)

  • Guest
Re: Stabbing techniques (eventual tutorial)
« Reply #8 on: December 09, 2013, 07:21:05 PM »
Acer, your presentation so far has been an eye opener for me. Without knowing too much about it I had previously felt that stabbing in was a more primitive approach than using a veiner. Now that I've seen it in action, so to speak, I'm just seeing a different way to the same end. I shall be interested to see which approach I end up favouring.

Could you include the whole tools in a future photo? I'd like to see how small they are and what type of handle you used.
I'm also curious about the same point as smylee grouch. I think I can actually see little cut marks around the figure after the background has been relieved. I realise they will close up quite a bit after a wetting, such as staining, but wont the cut fibres still tend to pick up extra stain and produce a dark outline?

« Last Edit: December 09, 2013, 07:22:33 PM by DaveP (UK) »

Offline Acer Saccharum

  • Administrator
  • Hero Member
  • *
  • Posts: 19311
    • Thomas  A Curran
Re: Stabbing techniques (eventual tutorial)
« Reply #9 on: December 09, 2013, 07:28:47 PM »
The stabbed lines will indeed close up during the finishing process, and they will also show up as dark lines, having absorbed more stain and finish. This can be an asset or an annoyance, depending on the style of carving you're doing. I think for shallow-carved rifle work, the dark line enhances the outline of the carving, and will help make it look more dimensional than it really is.

Tom Curran's web site : http://monstermachineshop.net
Ramrod scrapers are all sold out.

Offline Acer Saccharum

  • Administrator
  • Hero Member
  • *
  • Posts: 19311
    • Thomas  A Curran
Re: Stabbing techniques (eventual tutorial)
« Reply #10 on: December 09, 2013, 07:31:57 PM »
DaveP, for years I was totally resistant to stabbing, because I like the freedom of the parting tool for tweaking the design.

So with stabbing, you need to do your tweaking with the pencil and eraser. Once you've stabbed that line in, you're committed to the design.
Tom Curran's web site : http://monstermachineshop.net
Ramrod scrapers are all sold out.

whetrock

  • Guest
Re: Stabbing techniques (eventual tutorial)
« Reply #11 on: December 09, 2013, 08:20:54 PM »
Acer,
We all look forward to your tutorial. (You are a great teacher!)

The guys may also want to see Gary Brumfield's powerpoint slides on a similar topic.

[oops!. Let me try again. Here's another link. I think this will take you to Gary' own opening link.]
http://flintriflesmith.com/ToolsandTechniques/tools_and_techniques.htm

Whet
« Last Edit: December 09, 2013, 08:29:15 PM by Whetrock (PLB) »

Offline Acer Saccharum

  • Administrator
  • Hero Member
  • *
  • Posts: 19311
    • Thomas  A Curran
Re: Stabbing techniques (eventual tutorial)
« Reply #12 on: December 09, 2013, 08:27:42 PM »
Whet, I'll include that link in the tutorial, thanks!
Tom Curran's web site : http://monstermachineshop.net
Ramrod scrapers are all sold out.

necchi

  • Guest
Re: Stabbing techniques (eventual tutorial)
« Reply #13 on: December 10, 2013, 03:14:11 AM »
I've seen Mr. Brumfield's powerpoint slides before and they are an aid, but what's really missing from just about everything I've been able to find in tutorials is the sculpting.

You can find many sources of the design outlined, but what really makes the carving is the minute sculpting that lends the depth to it all.

Offline Acer Saccharum

  • Administrator
  • Hero Member
  • *
  • Posts: 19311
    • Thomas  A Curran
Re: Stabbing techniques (eventual tutorial)
« Reply #14 on: December 10, 2013, 03:41:40 AM »
This particular rifle is FLAT carved, with some incised. At least  that's the concept at this point.

Here's a little tutorial I did years ago about scuplted carving: http://americanlongrifles.org/forum/index.php?topic=12.0

It's a bit dated, but I hope you find it helpful.

Tom


Time to think about 18the Century Artisan's Show, eh.
Tom Curran's web site : http://monstermachineshop.net
Ramrod scrapers are all sold out.

Offline moleeyes36

  • Hero Member
  • *****
  • Posts: 1443
Re: Stabbing techniques (eventual tutorial)
« Reply #15 on: December 13, 2013, 05:31:11 PM »
I would also like to see some detail on the tools. How do you shape them?

Acer,

As David suggested, I think some detail on the tools (what they're made from, how you made them, size of the tips, etc.) would be extremely helpful since many of us will have to make the tools before we attempt this technique.  I'm really looking forward to your finished tutorial and taking a crack at this.  Thanks.

Mole Eyes

Don Richards
NMLRA Field Rep, Instructor, Field Range Officer
NRA Chief Range Safety Officer

Offline Acer Saccharum

  • Administrator
  • Hero Member
  • *
  • Posts: 19311
    • Thomas  A Curran
Re: Stabbing techniques (eventual tutorial)
« Reply #16 on: December 13, 2013, 05:40:45 PM »
Tool description in the tutorial:

I make a lot of these tools, designing what I think might work really well, only to find that they aren't what I was hoping. Other tools turn out to be a slam-dunk, and those I want to emulate on the tutorial.

So much of this hand tool business relates to the individual hand size, strength, method of use.

Long story short, the tool dimensions may be useful to some people, and not to others.


As always, look at all the info, and pick out what works for you.
Tom Curran's web site : http://monstermachineshop.net
Ramrod scrapers are all sold out.

Offline Jim Kibler

  • Hero Member
  • *****
  • Posts: 4456
    • Personal Website
Re: Stabbing techniques (eventual tutorial)
« Reply #17 on: December 13, 2013, 06:26:54 PM »
A few thoughts that might be worth mentioning...  The most common method for outlining carving using a stab in approach involves using flats and gouges of the appropriate shape.  There are trade-offs to everything and that's the case here.  Using these gouges usually requires a fairly extensive set of tools.  This involves more outlay of money and there are also more tools to maintain.  The good aspects of using gouges is that very clean curves can be produced and there is less chance of deviations since a larger length is produced from one stab-in as compared to the tools shown here.  The tools Acer has shown are very versatile, cheap and can obviously produce good results, however.

Jim

Offline Acer Saccharum

  • Administrator
  • Hero Member
  • *
  • Posts: 19311
    • Thomas  A Curran
Re: Stabbing techniques (eventual tutorial)
« Reply #18 on: December 13, 2013, 07:02:32 PM »
Thanks for that perspective, Jim.

I tried some of what you speak with gouges of appropriate curvature. I have a pretty good selection of radii, twenty five tools ranging from 1/16" radius to about 1" radius, but sadly I found that most of my tools had too deep a gouge. For this technique to be successful, I need gouges with only a partial 'U'. I need almost a whole new set, if I were to go this route.

For the professional furniture carver, the big tool set would be a real time saver. For the occasional gun carver, such as myself, that investment is not practical.
Tom Curran's web site : http://monstermachineshop.net
Ramrod scrapers are all sold out.

Offline Jim Kibler

  • Hero Member
  • *****
  • Posts: 4456
    • Personal Website
Re: Stabbing techniques (eventual tutorial)
« Reply #19 on: December 13, 2013, 07:20:21 PM »
I just did a quick count and I use about twelve different gouges on a regular basis when carving a gun stock.  So, you're looking at an investment of around $400.  But it doesn't take too many guns to pay for this when looking at added efficiency and the consistent good results.  So, I agree that for the person who builds just a few guns and isn't looking to make money, this may not be the best approach, but for others, it very well may be.  When you look at the time involved, and selling price of a good longrifle this is nothing, especially spread over many rifles.

Offline Jim Kibler

  • Hero Member
  • *****
  • Posts: 4456
    • Personal Website
Re: Stabbing techniques (eventual tutorial)
« Reply #20 on: December 13, 2013, 08:15:07 PM »
If anyone should be interested, here's a list of the gouges I use most often and would pretty much be fine for the stab-in technique in carving on just about any longrifle.   

2/3
2/5
2/8
3/3
3/5
3/8
5/3
5/5
5/8
7/4
7/6
8/2
8/3
8/4

I have a few odd tools I've made up too.  Some with a pronounced nose for ending a scroll or making chip cuts etc.  I will also add that these can be sharpened wit a bit of a rounded face or nose to make each of the tools a little more versatile.  There might occasionally be a small spot where nothing seems to fit and I find a knife works well in these cases.

One thing worth mentioning is that these tools won't necessarily make good carving.  It's just like engraving with pneumatics etc.  Design is super important and execution needs to be adequate as well.

So, my view is this option might be appropriate for some.  It's a technique perfectly at home for longrifle carving and not just restricted to furniture carving etc.

Offline Jay Close

  • Full Member
  • ***
  • Posts: 104
Re: Stabbing techniques (eventual tutorial)
« Reply #21 on: December 14, 2013, 12:10:41 AM »
Jim:

In your gouge list is the first number the width in millimeters and the second the sweep number? Or is it the reverse? Or am I way off?

Thanks,

Jay

Offline Jim Kibler

  • Hero Member
  • *****
  • Posts: 4456
    • Personal Website
Re: Stabbing techniques (eventual tutorial)
« Reply #22 on: December 14, 2013, 12:41:28 AM »
Jim:

In your gouge list is the first number the width in millimeters and the second the sweep number? Or is it the reverse? Or am I way off?

Thanks,

Jay

First number is the sweep and second is width in mm.  For example 2/3 is a #2 sweep and has a width of 3mm.  Sorry I didn't clarify previously.

Thanks,
Jim

Offline Acer Saccharum

  • Administrator
  • Hero Member
  • *
  • Posts: 19311
    • Thomas  A Curran
Re: Stabbing techniques (eventual tutorial)
« Reply #23 on: December 14, 2013, 02:00:30 AM »
I think the gouges I have are way too wide for the sweep.
Tom Curran's web site : http://monstermachineshop.net
Ramrod scrapers are all sold out.

Offline Tom Currie

  • Hero Member
  • *****
  • Posts: 1294
Re: Stabbing techniques (eventual tutorial)
« Reply #24 on: December 14, 2013, 04:34:05 AM »
Jim, Thanks for posting your list. I have several of those that I use often.

I have a 9/2, 9/3 and 9/4 they all sweep a bit too far. The  8/2 , 8/3 and 8/4 you list would be better for stabbing.

You helped reinforce my thoughts on my tools.