Author Topic: tumbler mill  (Read 49820 times)

Offline James Wilson Everett

  • Hero Member
  • *****
  • Posts: 1097
Re: tumbler mill
« Reply #75 on: July 02, 2014, 05:13:24 AM »
Guys,

Now for the next step.  The tool seems to work very well, as long as I do not get too agressive with it.  Here you see the tool cutting the tumbler surfaces about halfway through the process.  Notice that the cutting chips are drawn to the outside of the cutters, I think that Hank's suggestion for the angle of the cutter teeth works really well.  There appears to be no chips drawn into the center shaft, they all move to the outside and drop off the cutter outside diameter.


These photos show the tumbler surfaces, the large axle cutter seems to be more agressive, probably because I did a better job of sharpening this one.  Also, notice the small galling area near the axle, I should clear the chips more often to prevent this.  The small axle cutter is less agressive and you can see that it has not yet cut the entire surface, you can still see the coarse file marks from the rough shaping of this side.


So far, a fun tool to use.

Jim
« Last Edit: December 02, 2019, 10:58:21 PM by James Wilson Everett »

Offline Steve Bookout

  • Sr. Member
  • ****
  • Posts: 333
  • AF & AM, #59
    • Toad Hall Rifleshop
Re: tumbler mill
« Reply #76 on: July 02, 2014, 07:48:20 AM »
Hmmm.  Scoundrels and lowlifes.....I seem to resemble that remark!
Steve Bookout, PhD, CM, BSM
University of South Viet Nam
Class of 1969
Class of 1970
Class of 1971

Offline James Wilson Everett

  • Hero Member
  • *****
  • Posts: 1097
Re: tumbler mill
« Reply #77 on: July 03, 2014, 05:23:22 PM »
Guys,

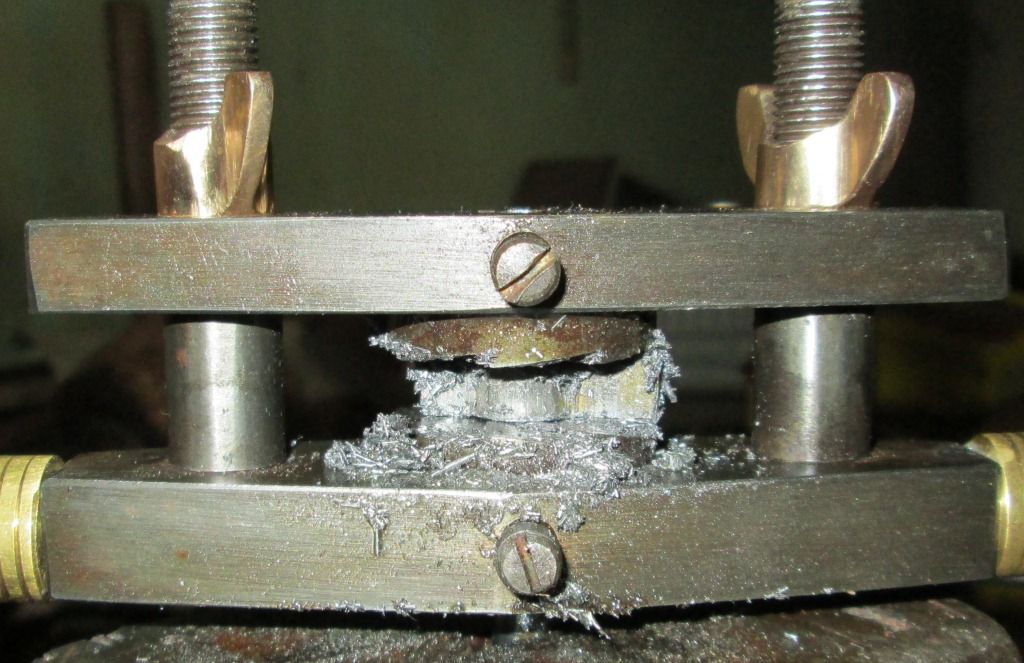
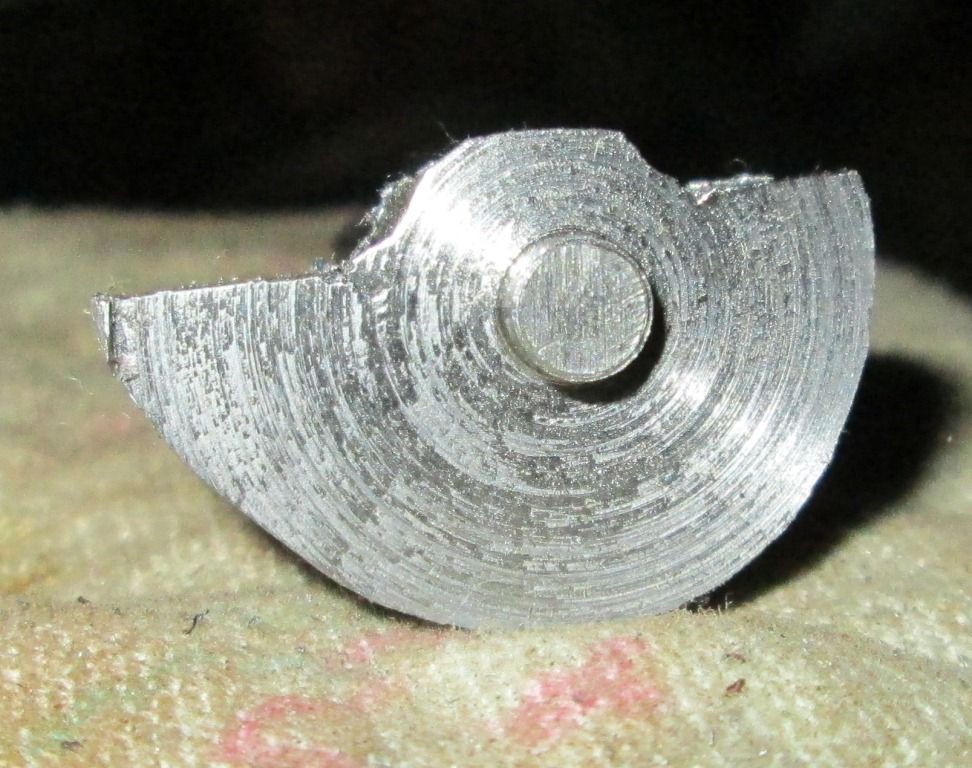
Now for the end of the process.  My first guess as to the size of the cutter stops gave a tumbler that was 0.298", a bit too thick for a rifle size gunlock.  I cut back the stops a bit and got the tumbler thickness to 0.262", just about right.  The larger axle is 0.327" and the small axle is 0.179", again just about right.  The photos show the tumbler as the cutters bottomed out tightly against the stops, and the tumbler after the mill work is completed.


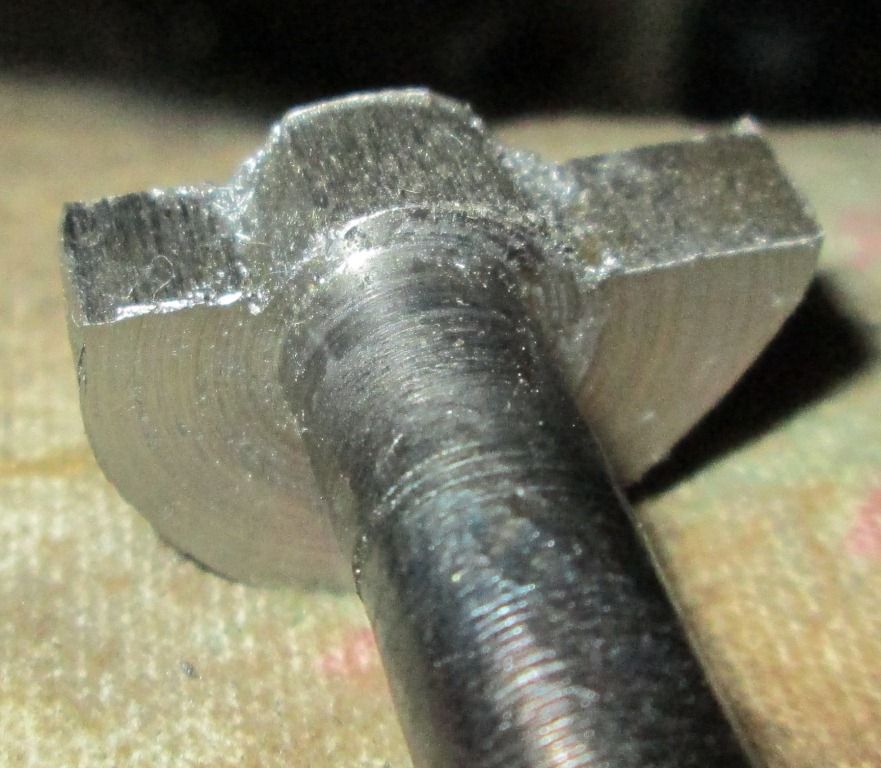
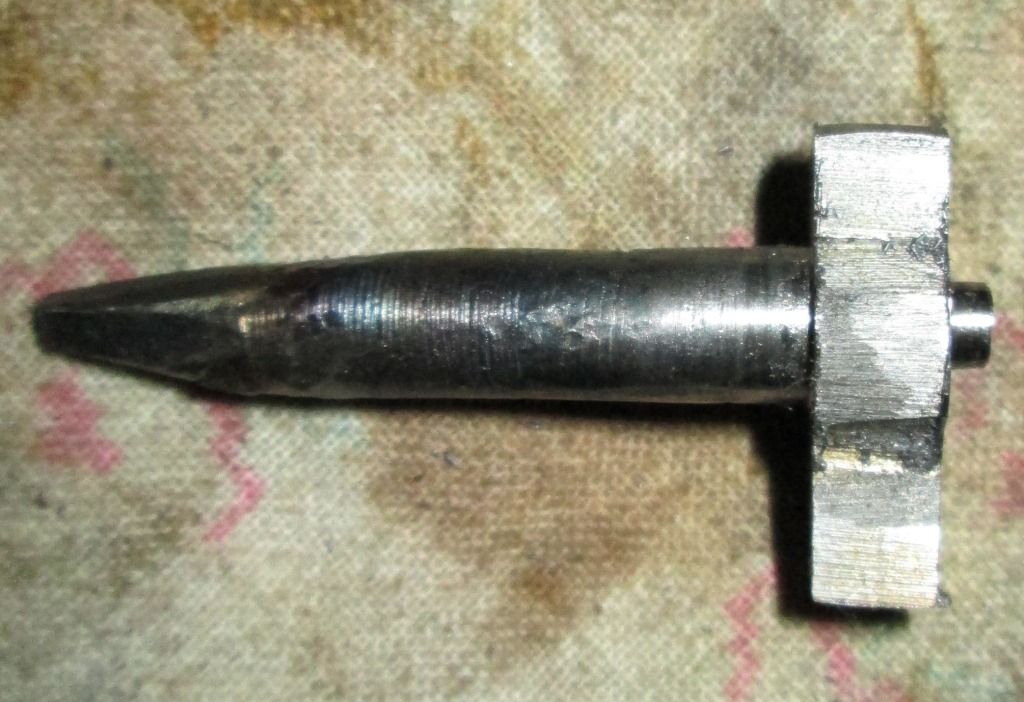
These photos show the new made tumbler from the "pretty" tumbler mill beside the older tumbler made from the "file" tumbler mill.  As you can see, the older one has a nicer surface finish.  The difference is not as great as the photos show, the flash of the camera accentuated the difference.  The surface finish of the new one is certainly adequate for the use, but as expected the finer tool cutter made from a file yielded a finer surface finish, but it sure took a longer time to cut the tumbler surfaces.


After all, this has been an interesting experience, thanks to you all for the great input and for finding for me the round tuit.

Jim
« Last Edit: December 02, 2019, 10:52:37 PM by James Wilson Everett »

Offline Bob Roller

  • Hero Member
  • *****
  • Posts: 9646
Re: tumbler mill
« Reply #78 on: July 03, 2014, 06:21:07 PM »
Interesting but too labor intensive for me.How do you cut a full cock notch with a positive
engagement for the sear using tools available only "in the day"?

Bob Roller

Offline heinz

  • Hero Member
  • *****
  • Posts: 1158
Re: tumbler mill
« Reply #79 on: July 03, 2014, 11:54:37 PM »
I cut the full cock notch with a file and fine tune it with layout dye and a scraper. Then you can stone or lap it smooth
Probably other ways
kind regards, heinz

Offline Mark Elliott

  • Hero Member
  • *****
  • Posts: 5191
    • Mark Elliott  Artist & Craftsman
Re: tumbler mill
« Reply #80 on: July 04, 2014, 01:25:55 AM »
I use a file and diamond hones, but I try to make the full cock notch rather neutral.    I want the sear to just stay in place.   For set triggers,  I use a flat flat sear fit to the full cock notch and for single triggers,  I round the nose of the sear.   Should I be dong something different?    You are the expert,  Bob.   How do you cut a full cock notch?    Actually,  I find cutting a half cock notch much more troublesome with just a file.    I have to use a knife edge jewelers file for that and it still isn't ideal.   

Offline Steve Bookout

  • Sr. Member
  • ****
  • Posts: 333
  • AF & AM, #59
    • Toad Hall Rifleshop
Re: tumbler mill
« Reply #81 on: July 04, 2014, 05:29:17 AM »
Mark, you have any photos of your work?
Steve Bookout, PhD, CM, BSM
University of South Viet Nam
Class of 1969
Class of 1970
Class of 1971

Offline Bob Roller

  • Hero Member
  • *****
  • Posts: 9646
Re: tumbler mill
« Reply #82 on: July 04, 2014, 05:38:38 AM »
To cut the full cock notch I use my milling machine at 1000RPM with a 3/16"carbide 4 flute end mill.
The half cock is done the same way at a more acute angle and the I start a cut with a small hack saw
and finish it with a knife shaped file.I have a nice collection of miniature files I have accumulated over
the last 50 years and they make that job a bit easier. It is,as you say,a bit of a task and the late Bill Roberts was also of that opinion.What you are doing is OK.The main thing is to have enough engagement at full cock so the lock can't be fired by pushing on the back of the cock with your thumb.The half cock should be able to withstand the thrust of the main spring.None of these "half cock" postions will withstand a hard pull or a constant strike of a double set trigger with a good main spring. Half cock is NOT a safety but only a convenience for loading a caplock and a way to keep the flint away from the frizzen when the rifle is being carried.

Bob Roller

Offline Mark Elliott

  • Hero Member
  • *****
  • Posts: 5191
    • Mark Elliott  Artist & Craftsman
Re: tumbler mill
« Reply #83 on: July 04, 2014, 06:05:11 AM »
Steve,  To what work are you referring.   If it is tumblers,  I am afraid that all I have made were put in locks I repaired and are now with their owners.  The only part I have of the handmade lock I am working on is the blank for the plate.   The tumbler blank I had made for that lock,  I ended up using to repair a lock for a customer.   I need to do some forge work next week.   Maybe I will take some time to make a new tumbler mill and a tumbler.   I am just going to make a tumbler mill of the file variety though.    I can't finish the tumbler, though, without having the bridle and sear made so that I can fit it all up together. 

Offline Long Ears

  • Hero Member
  • *****
  • Posts: 720
Re: tumbler mill
« Reply #84 on: July 04, 2014, 06:34:44 AM »
Extremely interesting thread. Thanks to everyone. Bob, do you have a special jig and clamping system to cut these tiny notches with the mill? Thanks.

Offline Bob Roller

  • Hero Member
  • *****
  • Posts: 9646
Re: tumbler mill
« Reply #85 on: July 04, 2014, 03:51:11 PM »
I have a clamping fixture to hold the tumbler but seldom use it. I mark off a slightly
angled line and use the milling machine vise as a reference. Works fine.That establishes the full cock
position which in turn goes to the half cock.As I said several times,I use 1144 "Stressproof" which is
ideal for tumblers. It machines as easily as 12L14 and oil hardens like drill rod.It's not cheap but that's not important.All my tumblers start with 1.250 diameter material.The tumbler shank to mount the cock or hammer is .311-.312 and .375 in length.Then I modify the dimensions as needed for the locks I am making at the time.
All of them use a small diameter axle thru the bridle of .140 thru a hole in the bridle of .1406,reamed.
   On another subject,I get inquiries about my Hawken locks asking if they are cut for a bolster. NO,they are not because there is no way I can do it accurately unless I am making the gun.
   I am still not taking in any new work until I get the work out that has been here too long now due to a bad winter.After this I MIGHT start again but am not sure about that. My wife says do 3 to 5 jobs a month if I feel like it and I think she has the right idea.
 
  Bob Roller

Offline Chris Treichel

  • Hero Member
  • *****
  • Posts: 916
Re: tumbler mill
« Reply #86 on: September 08, 2014, 08:23:25 PM »
I was just looking through Diderot's 1762 encyclopedie and look whats on the right side about half way down among the tools...

http://artflx.uchicago.edu/images/encyclopedie/V18/plate_18_9_4.jpeg

Offline James Wilson Everett

  • Hero Member
  • *****
  • Posts: 1097
Re: tumbler mill
« Reply #87 on: January 08, 2015, 03:22:33 PM »
Guys,

Just an update on this older topic.  Here are some photos of a really beautiful original tumbler mill from the 18th c.  It looks a lot like the example in Diderot.  It is not made from a file, but is a purpose built mill that can make several different sizes of tumblers.  The cutting teeth appear to be straight grooves, like those that could be cut with a triangular file.  There is no directional bias to the teeth as you would see in a file.  Also, the teeth appear to be very coarse when compared to any type of hand file teeth.

Jim


« Last Edit: December 02, 2019, 02:56:24 PM by James Wilson Everett »

Sawatis

  • Guest
Re: tumbler mill
« Reply #88 on: January 08, 2015, 08:21:27 PM »
interesting that the grinder teeth are nondirectional...I imaging it just abrades instead of slices the material.  I could see where if the teeth were cut straight across like a float (tooth pattern more like a rip saw) they would be constantly cutting on a bias making it smooth...the cutting action would be on 3/4 of the surface of the tumbler as oppose to the file approach.  Interesting
John

Offline Mark Elliott

  • Hero Member
  • *****
  • Posts: 5191
    • Mark Elliott  Artist & Craftsman
Re: tumbler mill
« Reply #89 on: January 09, 2015, 04:09:53 AM »
So,  who is going to make one of these and try it out?   It really is different from the ones made of files.   The teeth could have been filed any number of different ways, but they were filled straight across with the teeth forming a perfect "V".    I am assuming they were done this way because that worked best, not because they couldn't be bothered to file them another way. 

Also,  as I examine the Diderot cut closely,  the picture also shows the teeth going straight across, not like a file.   

It definitely makes me want to make one and try it out. 

Offline James Wilson Everett

  • Hero Member
  • *****
  • Posts: 1097
Re: tumbler mill
« Reply #90 on: January 09, 2015, 03:52:11 PM »
Mark,

As Nathan said to David, "You are the man!".  2 Samuel 12:7.  Hey, I made the last one, so now it is your turn to make a nice tumbler mill and see how well it works.  A suggestion, instead of those very plain wing nuts on the original, make some really fancy ones!  Also, that simple stick of a handle could use a bit of dressing up to make it look nice.

 ;D

Jim

Offline Mark Elliott

  • Hero Member
  • *****
  • Posts: 5191
    • Mark Elliott  Artist & Craftsman
Re: tumbler mill
« Reply #91 on: January 09, 2015, 08:22:44 PM »
Jim,

I already put it on my list of things to do.   I do have a question about those wing nuts.   Is that scroll work, the wings, welded on or soldered on?   I just can't imagine how you forge weld that delicate thing on to a cylinder, unless just sticking it together is sufficient.   Any thought on that would be appreciated.   If I am going to make one from scratch,  I might as well go all the way.    The fancy turned handle is the easiest part.    I think I will make the whole thing out of 1/4" 1095.   

Best,

Mark

Offline James Wilson Everett

  • Hero Member
  • *****
  • Posts: 1097
Re: tumbler mill
« Reply #92 on: January 09, 2015, 10:05:25 PM »
Mark,

I have no idea how the wing nuts were made, except to say that they are certainly well beyond my skill level.  I do not think that they are soldered on as that would be far too weak for the use.  I think that a soldered joint would not survive the first use of the tool.  I think that this is truly one of the most beautiful tools.  I do hope that you make a nice one.  Maybe some solid silver inlays and nice engraving????

Jim

Offline Jim Kibler

  • Hero Member
  • *****
  • Posts: 4451
    • Personal Website
Re: tumbler mill
« Reply #93 on: January 09, 2015, 10:26:15 PM »
That's a pretty tool.  I would think 17th century to be likely.

Offline David R. Pennington

  • Hero Member
  • *****
  • Posts: 2919
Re: tumbler mill
« Reply #94 on: January 09, 2015, 11:40:30 PM »
Here is my speculation on the wing nuts. I would probably braze them on, which would probably be strong enough although I see no evidence of that in the photo. I can't imagine how you could forge weld them on without destroying them. I have another idea. The tube could have been forged from solid stock with solid "ears" and then the ears opened up into the scroll work with drills, jewelers saw and files. then the tubes drilled and threaded?
VITA BREVIS- ARS LONGA

Sawatis

  • Guest
Re: tumbler mill
« Reply #95 on: January 10, 2015, 01:37:18 AM »
Yeah, was pondering this all afternoon...David two options are the only ones I could come up with either. To make the blank with ears it would be pretty straightforward to split a rod and weld in a piece of flat stock to make the T...then draw it out thinner for both shaft and wings.  The fun would begin with cutting and filing out the scrollwork !
Might have to jack with this a bit this weekend to see how it would go...just 'cause  ;D
John

Offline James Wilson Everett

  • Hero Member
  • *****
  • Posts: 1097
Re: tumbler mill
« Reply #96 on: January 11, 2015, 03:18:46 PM »
Guys,

Here is a photo of another neat old tumbler mill.  It has the same style cutting teeth as the previous one, above.  That is, triangular teeth formed straight across the mill as if cut with a triangular file.  This one is a bit more simple artistically, but a bit more complex mechanically.  At least the wing screw is a lot easier to make! 

On the mill that I made, above, the two screws perform a dual function; advancing the cutters as the tumbler surface is milled, and aligning the two cutter sections.  This seems to work very well as long as the tolerance, gap, between the threaded rods and the two cutter plates is kept rather tight.  On both of the original tumbler mills pictured, these functions are separate.  There are alignment pins/rods and there are advancement screws.

Here is the photo.


Jim
« Last Edit: December 02, 2019, 02:54:03 PM by James Wilson Everett »

Offline David R. Pennington

  • Hero Member
  • *****
  • Posts: 2919
Re: tumbler mill
« Reply #97 on: January 12, 2015, 12:57:54 AM »
Wow, thanks again for posting Jim.
VITA BREVIS- ARS LONGA

Offline Dphariss

  • Hero Member
  • *****
  • Posts: 9896
  • Kill a Commie for your Mommy
Re: tumbler mill
« Reply #98 on: January 12, 2015, 02:02:16 AM »
I use a file and diamond hones, but I try to make the full cock notch rather neutral.    I want the sear to just stay in place.   For set triggers,  I use a flat flat sear fit to the full cock notch and for single triggers,  I round the nose of the sear.   Should I be dong something different?    You are the expert,  Bob.   How do you cut a full cock notch?    Actually,  I find cutting a half cock notch much more troublesome with just a file.    I have to use a knife edge jewelers file for that and it still isn't ideal.   
Round the sear nose may increase wear since the PSI at the contact points skyrockets. Try just stoning the upper edge slightly at an angle to let the sear come out of the notch easier.

Dan
He who dares not offend cannot be honest. Thomas Paine

Offline helwood

  • Full Member
  • ***
  • Posts: 147
Re: tumbler mill
« Reply #99 on: January 14, 2015, 06:22:31 AM »
Greetings Jim,
Does the last tumbler mill have the ability to cut 2 shafts or just ONE going through the lock plate? Interesting.
Hank