Author Topic: Double Set Triggers  (Read 104774 times)

whetrock

  • Guest
Double Set Triggers
« on: July 10, 2014, 12:09:28 AM »
This tutorial grew out of a discussion of double set triggers and some problems that result when they are not positioned correctly. What we have posted here is an excerpt from that longer discussion. It explains a technique for positioning double set triggers so that they will work effectively.  It explains how the arcs of the front and rear trigger intersect, and how you can determine the optimum position for your trigger in relation to your sear bar. The tutorial also explains how the front trigger bar must have room to move as the lock is cocked.

I hope you guys find it helpful.

Whetrock

PS: And thanks to Acer for help in getting it posted!

-----------------------------------------------------------------------------------

[These first images are provided as a way of explaining how the trigger bars of a double set trigger move as the trigger is cocked, released, and cycled through its various positions. It is important to understand how the trigger bars move if you want to position the trigger effectively in relation to the sear bar of the lock. If you don’t understand this movement, then you may accidentally set the triggers into the stock too deeply, or position them too far forward or too far to the rear. Those mistakes are easy to avoid if you first study how the triggers work, and then draw up a full size blueprint of the lock and trigger area of your rifle. A blueprint of that area can help you determine exactly where the triggers need to sit in order to work properly for your particular stock profile and lock position.]

For the benefit of newer builders, let me first post pictures of left and right view with all the springs in place. This is of a trigger pretty much as it comes, pretty much right out of the box. I think I may have opened up the curve of the rear trigger just a bit, which can be done by heating it. (The gold color where the rear trigger pad is attached is because the pad is brazed on. That’s how Davis made this one.) I never finished work on this one, so pardon the roughness.


This kind of trigger has two springs: a main spring, that bears down on the back of the rear trigger bar, and a small one that wraps around and under the front trigger bar and moves it into the set position as you cock the rear trigger. The small screw in the middle is a set screw that adjusts how much overlap there is at the engagement point where the two triggers catch against one another.

« Last Edit: January 13, 2020, 10:17:14 PM by rich pierce »

whetrock

  • Guest
Double Set Triggers
« Reply #1 on: July 10, 2014, 12:10:00 AM »
Now, so as to better show the engagement points I removed the springs, pulled the pins, and moved the levers to the outside of the frame.

1. Trigger at rest.


2. Trigger in midway position as trigger is being cocked by pulling back on the rear trigger. Pulling back on the rear trigger pivots the engagement point of the rear trigger down, so that it pushes the engagement point of the front trigger out of its way. The front trigger bar LIFTS up as the engagement points pass one another.


3. Trigger in cocked position. In that position, both bars are down.


4. Trigger again in midway position as front trigger is being squeezed. Squeezing the front trigger pivots the engagement point of the front trigger forward, so as to release the rear trigger bar. Again, as the two engagement points pass one another, the front trigger bar LIFTS up.  (You will note that image 2 and image 4 are identical. That’s because in these two steps the positions of the trigger bars are identical.)


5. Trigger in fire position, with the rear trigger popped up to where it taps against the sear. The main spring does not hold it at that position. Rather, it just gives it good reason to jump up to tap the sear.


Steps 2 and 4 require that the front trigger bar lift up (both during cocking and during release), so there has to be enough clearance for this to happen. And that means that you CANNOT position the trigger so high in the stock as to have the front trigger bar almost touch the sear when the trigger is at rest (as you would with a single trigger). If you do that, you will not be able to cock the set trigger.

« Last Edit: January 13, 2020, 10:18:24 PM by rich pierce »

whetrock

  • Guest
Double Set Triggers
« Reply #2 on: July 10, 2014, 07:50:25 PM »
The first diagram highlights the arc of the rear trigger. Note that the arc does not include the engagement point. I think its best to avoid having the engagement point strike the sear, as it could damage the engagement point. It could also get jammed if the sear were to slip into the notch at the end of the bar.

The second diagram highlights the arc of the front trigger. The lower position shows where the trigger bar sits when it is lifted, in the midway position, as happens when the trigger is being cocked or released.
The higher position on that arc is the maximum height possible for the front trigger. It is important to know that position if you hope to use the front trigger to release the sear (so as to lower the cock with your thumb, or to fire the lock without having cocked the rear trigger.)

The third diagram then highlights the effective area where the two arcs overlap. This is the area where the sear arm needs to sit if the triggers and lock are to work as intended.


The next diagram then plots the arc of the sear arm. The sear arm does not move much, but it does move in an arc that is centered on the sear screw. Since the sear screw is slightly higher on the lock plate than the sear arm, the arc is such that the sear arm moves up and back. On the image, the cocked position is the black dot. The release position is the white dot.


« Last Edit: January 13, 2020, 10:19:03 PM by rich pierce »

whetrock

  • Guest
Double Set Triggers
« Reply #3 on: July 10, 2014, 07:51:05 PM »
I mentioned earlier that I think it is very helpful to make blueprints. I think that would be true even if you are working with a kit or a precarve. Many precarved stocks leave a little wiggle room, and if you wiggle in the wrong direction, things may not fit together as well as you had hoped. Better to plan things out carefully before cutting wood.

I find it helpful to draw up a full size blueprint by using full size tracings of the components. This first image shows a tracing of a small Siler. (I made this tracing using a plastic template that I made up some years ago. The plastic template has tic marks along the edge to indicate sear position and the touch hole position.) I have drawn in the positions of the sear arm—both the cocked position (black dot) and the release position (white dot).


Next is a full size tracing of the triggers, with the relevant positions of the trigger bars and their arcs drawn in, so that I can identify the effective area (where the sear arm needs to sit).
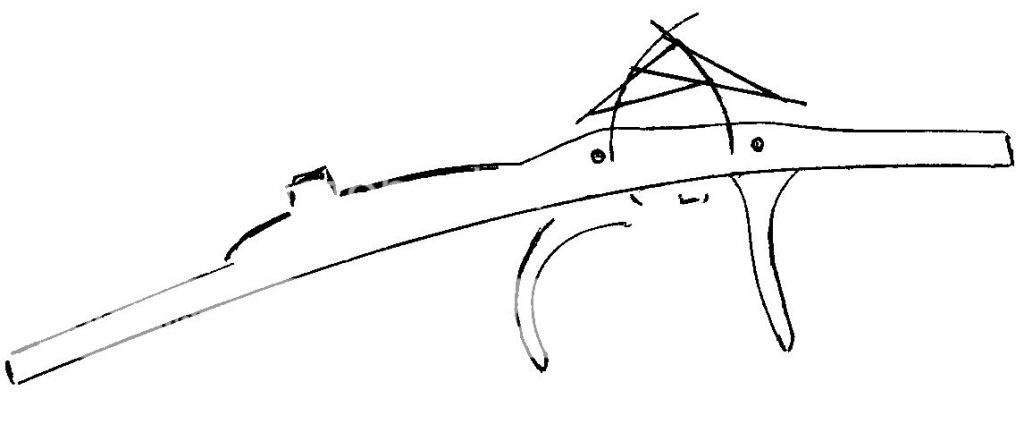


I find it is helpful to make these tracings on individual pieces of paper, so that I can move them around on the blue print and position them were I want them. (That is to say that I do not try to draw them in place on the blue print.)

To make the blue print of the lock/trigger intersection area, I first trace the barrel breech area onto a big piece of paper. The barrel is the mechanical foundation of the firearm, so it goes first. The lock must be positioned in relation to where I want the touch hole, so I position the lock tracing on top of the tracing of the barrel. The trigger is then positioned so as to be sure the sear arm will be in the effective area.
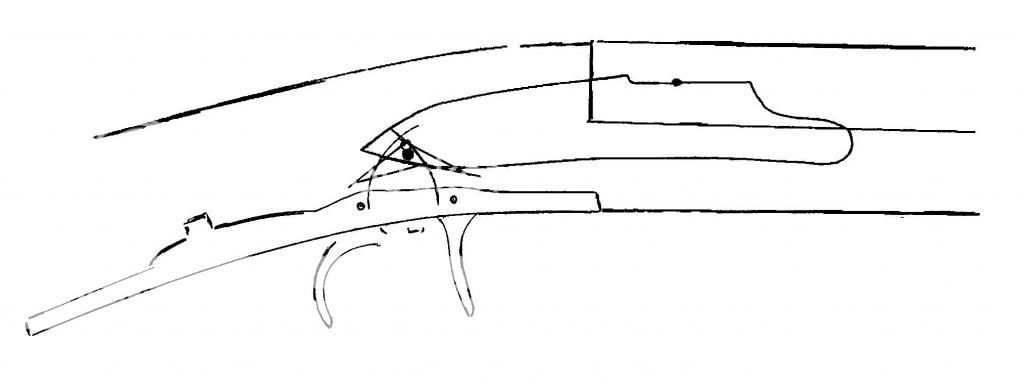


Here’s an enlarged view, so that you can see the intersecting area more clearly.



If building from a slab, then there is a bit of flexibility in the angle at which the components fit together. If working with a precarved stock or kit, there may be less flexibility, but the basic principles still apply. A plan like this allows you to know exactly where the trigger plate mortise needs to go so as to get the trigger and lock positioned properly.

This is just a sketch, so I have only shown the barrel, lock plate and trigger. In a real full size plan I would also draw in the main spring and bolster, the plug and tang, the trigger guard, rod hole, etc. The trigger plate profile must agree with the lower profile of the stock, but you can sometimes modify the plate a bit, provided you plan for it.

Let me also mention that I don’t mean to suggest that a blue print necessarily needs to include all these lines, arcs, etc. But it's very helpful for a builder to understand how all these things work together, and sometimes the best way to get that kind of understanding is to plot it all out.
« Last Edit: January 13, 2020, 10:19:55 PM by rich pierce »

Offline Acer Saccharum

  • Hero Member
  • *****
  • Posts: 19311
    • Thomas  A Curran
Double Set Triggers
« Reply #4 on: July 10, 2014, 08:23:16 PM »
Whet, thanks for that concept of components on trace paper. That is a great trick.

You need to place the set triggers so that BOTH front and rear trig bars can operate the sear bar. Yet there needs to enough clearance so that the lock can go to half and full cock with the triggers UNSET. It's tricky to find that sweet spot.

There is a LOT to think about.

If you just put the triggers in any old where, you get to think about all this stuff that wished you'd thought of before getting completely committed. You vow to yourself to do it right on your next rifle. If you can remember...... :D
« Last Edit: July 10, 2014, 08:25:18 PM by Acer Saccharum »
Tom Curran's web site : http://monstermachineshop.net
Ramrod scrapers are all sold out.

whetrock

  • Guest
Double Set Triggers
« Reply #5 on: July 17, 2014, 12:16:25 AM »
As Acer noted, this kind of design work can be done with tracing paper (available through art supply dealers). It can also be done with regular paper (such as printer paper) on a light table (a piece of plate glass with a light under it). I like to image that “back in the day” some of this sort of layout may have been done on the 18th century version of a light table (a sunlit glass window pane).

I like to use Reynolds ® brand Freezer Paper (Plastic Coated) for layout work. The local grocery store carries it in rolls 18 inches wide. It is white paper, with a plastic coating on the back side. It is slightly thinner than printer paper, but five times as tough. It works great for making plans and templates. The fact that it comes in rolls helps a lot when you are trying to draw up a blue print for a full sized longrifle. The freezer paper is not as translucent as tracing paper, though, so it works best if used on a light table.
« Last Edit: August 26, 2014, 05:29:41 PM by Acer Saccharum »

whetrock

  • Guest
Double Set Triggers
« Reply #6 on: July 17, 2014, 12:19:21 AM »
One of the forum members suggested that I post a few diagrams with the trigger bars drawn in. This is to help resolve some ambiguity about how the trigger bars work in the draft blue print. I’ve drawn the triggers as if they were outside the frame of the trigger plate, so as to make it easier to see how they are moving. (Maybe that will also make it easier to compare these images to the photo of actual triggers above.) The diagrams show the triggers in un-cocked position, cocked position, with the trigger bars lifted so as to engage the sear bar when it is at both its cocked position and its release position.

Set triggers in un-cocked position.


Front trigger in mid-way position (as the engagement point of the rear trigger pushes past). Note again that it lifts up. The triggers must be positioned low enough so as to provide adequate clearance for this movement.


Set triggers cocked.


Both triggers lifted, showing how they would intersect the sear arm when it is in cocked position.


Both triggers lifted, showing how they would intersect the sear arm when it is in release position.


In this last diagram, you can also see that it is not necessary for the sear arm to be directly centered between the two triggers. Provided it is within the effective area of the trigger arcs, then it will work correctly.

Note that for this particular stock profile, trigger assembly, and lock design, this particular position provides for the most shallow wrist possible. If the triggers were to be set any deeper, then the triggers bars would need to be modified (cut down, etc.) so as to accommodate the additional depth.


« Last Edit: January 13, 2020, 10:20:52 PM by rich pierce »

whetrock

  • Guest
Double Set Triggers
« Reply #7 on: July 17, 2014, 12:22:02 AM »

I’ve edited some of the description and diagrams above. I added some explanation about the release position for the sear arm. I also added a few more diagrams with the trigger bars drawn out.  I hope the changes make it all a bit more clear.

Whetrock
« Last Edit: July 17, 2014, 12:26:51 AM by Whetrock (PLB) »

Offline PPatch

  • Hero Member
  • *****
  • Posts: 2456
Double Set Triggers
« Reply #8 on: July 17, 2014, 01:31:50 AM »
Very interesting Whetrock - and different from the diagrams in a well known suppliers catalog showing the trigger bars, when cocked, sitting immediately below the sear bar. That messed me up when I inlet my double sets and I went too deep and had to shim back out. AND doing that induced a flex in the trigger bar, no wood support, when you tightened the tang screw. All of which caused yours truly to stomp on his hat  >:(, a lot. Your drawings show pretty much where mine ended up relative to the sear bar. Thus your drawings indeed clear set trigger position for me - thank you for your trouble and a good useful explanation.

dp
Dave Parks   /   Quis custodiet ipsos custodes?

andy49

  • Guest
Double Set Triggers
« Reply #9 on: July 17, 2014, 02:23:23 AM »
I am having this same problem on a pistol build and this has been an eye opener for me. My problem has been the components I buy (over the internet)  don’t  fit together without modification (sometimes major). It would really work well if the diagrams of the components were available to plan a gun before purchasing then finding out it was not the right component for your design.  The only thing you have to rely on is the vendors description i.e. “perfect trigger for a pistol”.
Andy

Offline Acer Saccharum

  • Hero Member
  • *****
  • Posts: 19311
    • Thomas  A Curran
Re: Double Set Triggers
« Reply #10 on: December 01, 2015, 05:49:41 PM »
Here is a link to a wonderful page on Double Set Trigger terminology:

http://home.insightbb.com/~bspen/triggerterm.html
Tom Curran's web site : http://monstermachineshop.net
Ramrod scrapers are all sold out.