Author Topic: French and Indian War Horn Tutorial  (Read 28569 times)

Offline Carl Dumke

  • Full Member
  • ***
  • Posts: 123
French and Indian War Horn Tutorial
« on: January 31, 2011, 04:42:22 AM »
Hey Everyone,
A member asked me how I went about making a F&I style horn--so here it goes...

First, find as white a horn as possible--helps to bring out the scrimshaw.  I know, sometimes this is a tough task at times! 

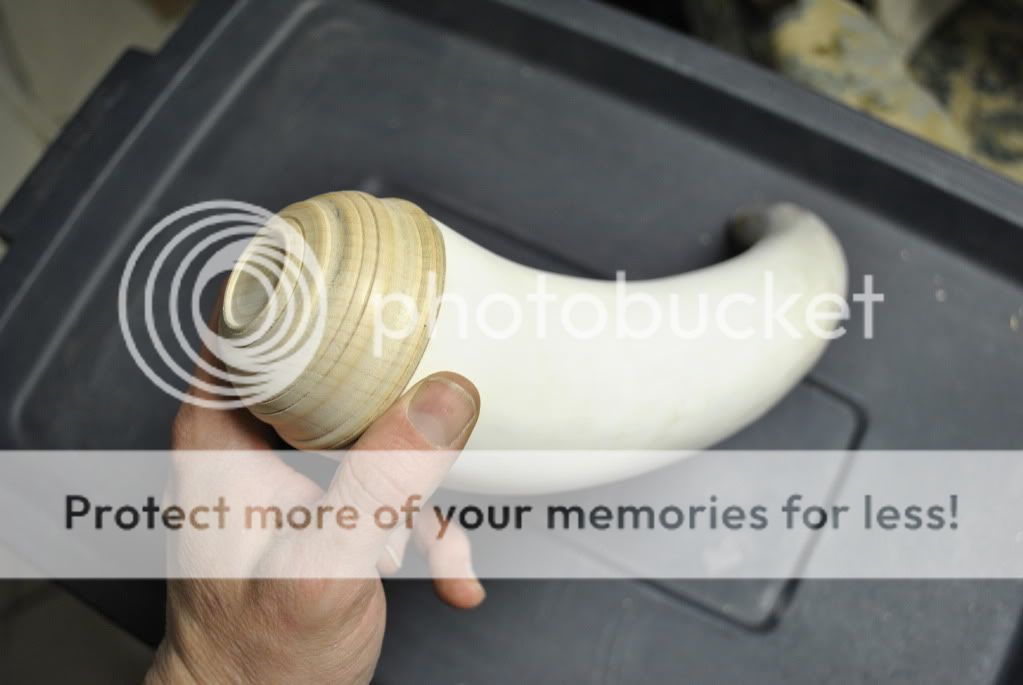
Here is the horn in the white, after I cut the tip (about 1 inch from where the internal cavity bottoms out at the tip) and squared the butt.  I use a belt sander to square the end.  The horn was very oval and it took a couple of heatings with varying types of sizers.  If the horn is very oval, you may have to heat in stages with longer and thinner sizers working your way out to the largest at the butt section.  Once it is round, I then turned the plug from a nice piece of maple--turned in the style of those from the period--there is no hard and fast rule--just look at a lot of examples.  I will extensively work the the body of the horn--I find it really nice to put it on a sizer that is in my 4-jaw chuck attached to the headstock of my lathe (helps that it rotates 180 degrees.  I can spin the horn around and file so that it is easier to round as you work it. 
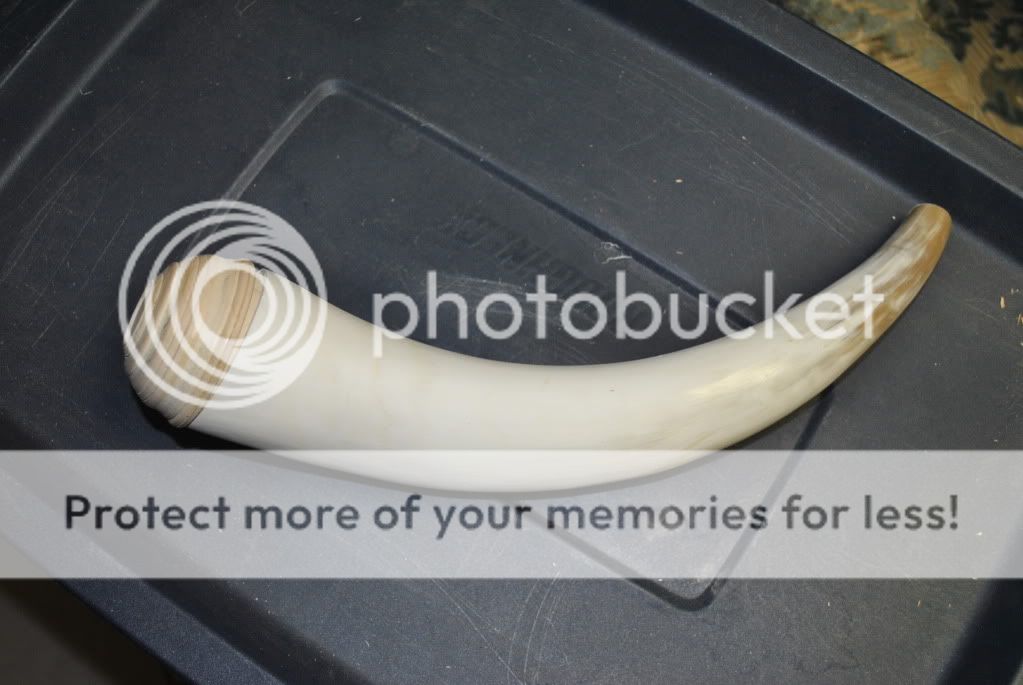


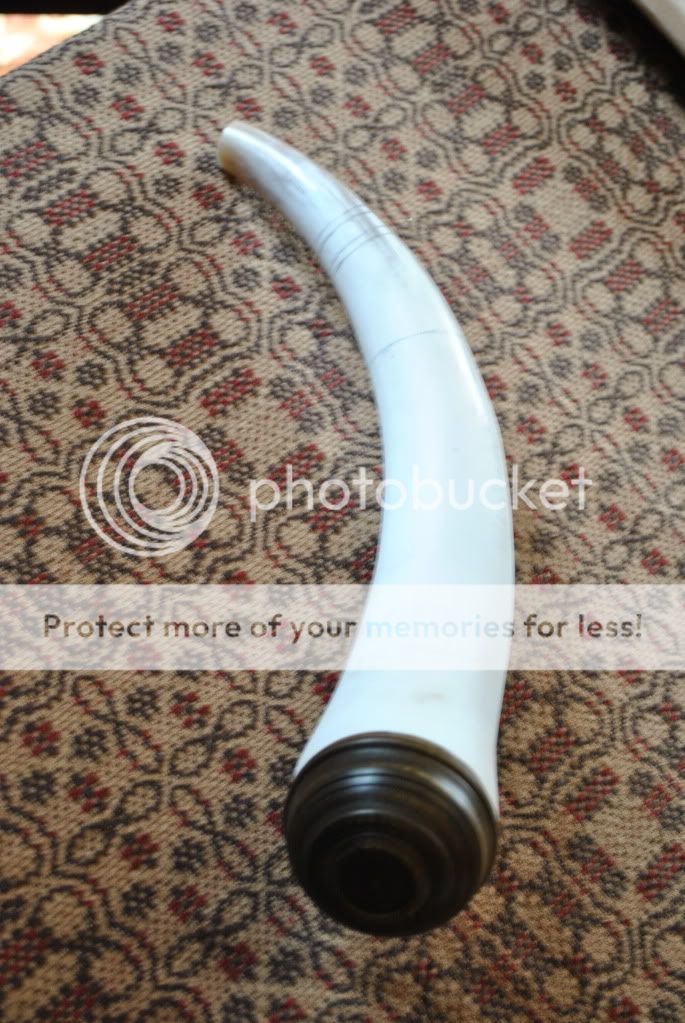
Below is the horn with the plug stained--I use Danglers dark walnut stain--alcohol based.  Stained, then sanded with #0000 steel wool three times--stain, sand, stain sand...  (you get the idea).  The plug is not permanently attached at this time.  You can see where I sectioned off where various parts of the spout will be carved--typically, you are looking for about 1/3 of the horn to be spout.  This is not a hard and fast rule!  Do some research and you will see what I am talking about--some spouts are non existant.  1/3 rule is just what looks good to the eye.


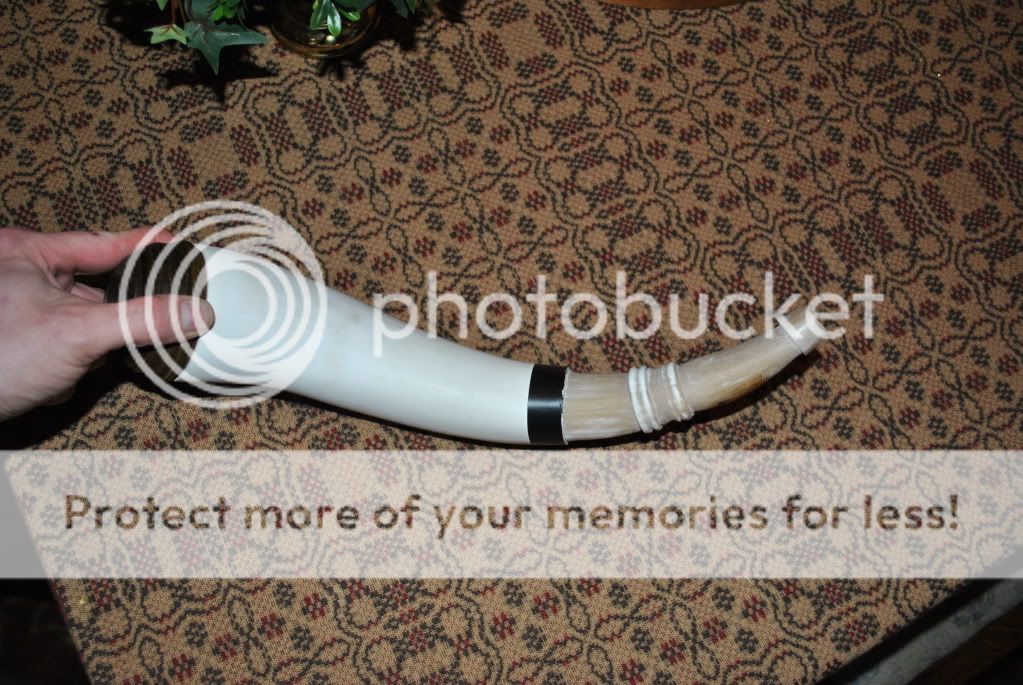
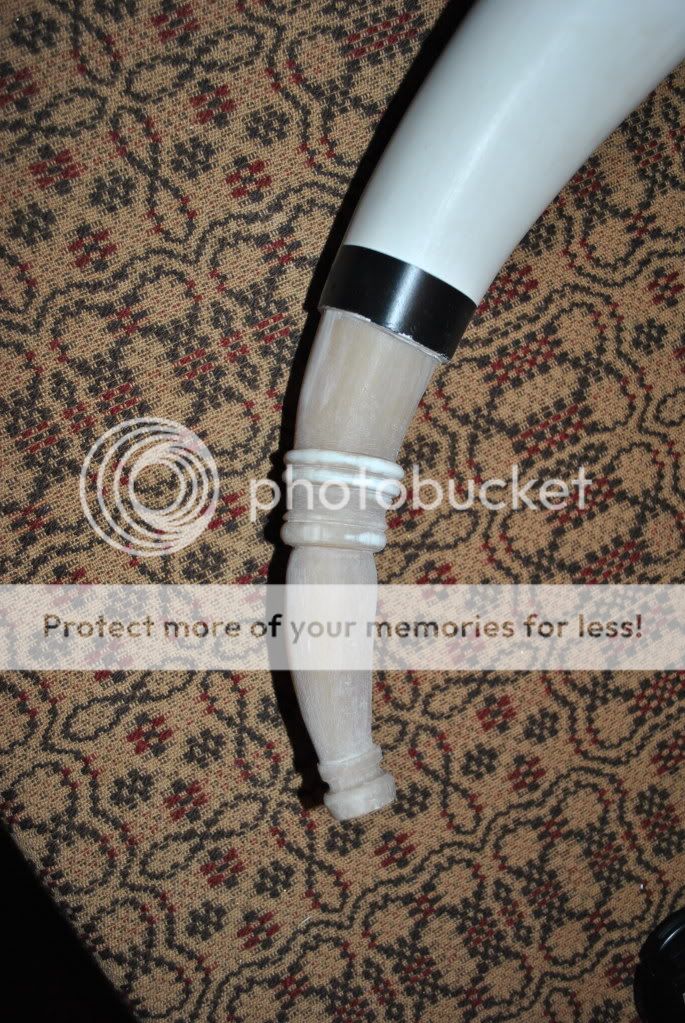
Here is the rough-shaped spout...I use a small xacto saw to cut the lines.  Next, I wrap a piece of electrical tape around where the engrailing will go so that I don't accidentally tear up that portion of the horn as I work the spout.  I then use various rasps to get the initial shape (look at any wood working store, flea market, or garage sales to pick up files.  I also use an auto-body file to take off a lot of materials.  Some folks use a chisel to take off layers of horn--key is to chisel away from the spout since horn grows in layers--think of a stack of Dixie cups (if you go the other direction, you will be going through the layers vs along with the layers).  Make sure that when you are filing the horn that you are keeping an eye on the "lines" of the horn so that the spout flows from the engrailing through to the tip.


Now the spout is further shaped using very fine needle files... I will use wet/dry emery cloth to sharpen the edges and take out the file marks (a sanding sponge is a good to get into the nooks and cranies and round over some beads.  I will then pick a design for the engrailing--personal choice here.  I will use wood chisels or even a rotary tool to make the pattern.

Here the spout is dyed.  Before dying, I have a simple trick--I use electrical tape wrapped near the engrailing and wound up the horn towards the butt section and back down to where I started.  The tape wrapping is a huge time saver since it prevents the dye from coloring too much of the horn--that means I don't have to spend the next hour removing the dye from the horn!  I use a package of dark brown Rit dye with about 1 tsp of black and a splash of white vinegar.  The vinegar fixes the dye so it will retain its color.  I believe in colonial times it is referred to as a "mort."


Before doing any scrim work, I will do a lot of research--I really like the work of John Bush and other artists from the Lake George school, so I gravitate to his style.  I will pick the lettering style and overall design.  This design is for a friend and is a relative.  To make the lines as straight as possible, I will go back to the electrical tape so that the lines are sharp.  It also can be stretched so that I can follow the shape of the horn--this is important so that the lettering maintains the same height along the length of the horn.  Before drawing the lettering, I will take the horn to the copy machine and make a couple of pics of the horn so that I can figure out the layout of the lettering without having to draw on the horn.  Then I just mark off where major sections of the horn--like first & last name--will be.  Keeping the Xerox pic nearby, I begin lining everything in--just concentrating on the outline of the lettering--detail work will come later.  After outlining, I will use a good art gum eraser so that I can see exactly where I cut into the horn.  Below is after the letters were lined then filled in.  There is a little bit of detail work, but a lot left to do.


Here is the completed name section of the horn.  Typical of John Bush's work is the chip-carved saw tooth pattern.  To this point, I have not inked the design in.  I like to use powdered tempera paint to highlight the lines of the design.  Just put a little on your finger and rub over the line.  If the design has chip carving--like the saw tooth--the paint will not get into the bigger carved areas.  Not a big deal as I use it just to give me an idea of where my lines are and to get an initial look at how the design is turning out. 


MORE WORK TO COME!
« Last Edit: January 13, 2020, 11:34:33 PM by rich pierce »
Carl

Offline Artificer

  • Hero Member
  • *****
  • Posts: 1660
Re: French and Indian War Horn "How To" Pts I,II & III
« Reply #1 on: January 31, 2011, 05:04:26 AM »
GREAT tutorial. Thank you.
Gus

Offline A.Merrill

  • Hero Member
  • *****
  • Posts: 791
Re: French and Indian War Horn "How To" Pts I,II & III
« Reply #2 on: January 31, 2011, 06:35:33 AM »
    Good info ,  Thanks.    AL
Alan K. Merrill

Offline Rick Sheets

  • Hero Member
  • *****
  • Posts: 729
  • HCH Master Horner and Web Guy
    • Proud Journeyman Horner with the Honourable Company of Horners
Re: French and Indian War Horn "How To" Pts I,II & III
« Reply #3 on: January 31, 2011, 09:50:52 PM »
Carl,
I am glad you "finished" the J in Johann. I have noticed on period horns the engraver would leave off the bulbous terminal of the J making it look like an I. Which is very disconcerting to the modern viewer.

I love the John Bush-iness of this horn in progress.

Thanks,
Rick
Proud Master Horner with the Honourable Company of Horners
     http://www.hornguild.org
My personal website:
     http://patriothorns.com
Like me on facebook:
     http://www.facebook.com/patriothorns

Offline Carl Dumke

  • Full Member
  • ***
  • Posts: 123
Re: French and Indian War Horn "How To" Pts I,II & III
« Reply #4 on: January 31, 2011, 10:02:16 PM »
Carl,
I am glad you "finished" the J in Johann. I have noticed on period horns the engraver would leave off the bulbous terminal of the J making it look like an I. Which is very disconcerting to the modern viewer.

I love the John Bush-iness of this horn in progress.

Thanks,
Rick

Rich,
I have seen it both ways--same with the "f" substitution for s.  At one point, I was under the impression that the "f" & "s" substitution was only within the word--never at the beginning.  Found a couple of examples of engravings/printings that countered that thought--just goes to show you that you never know and there are often no hard & fast rules!
Carl

Offline Down South

  • Jr. Member
  • **
  • Posts: 76
Re: French and Indian War Horn "How To" Pts I,II & III
« Reply #5 on: February 01, 2011, 02:51:05 AM »
Very nice work.  Can't wait to see it finished.  Lots of good info there too. 

Billy

Offline Tim Crosby

  • Administrator
  • Hero Member
  • *
  • Posts: 18320
  • AKA TimBuckII
Re: French and Indian War Horn "How To" Pts I,II & III
« Reply #6 on: February 01, 2011, 06:27:24 PM »
 Nice work, great descriptions and the tool list is a good help. Look forward to seeing the finished horn.

 Tim C.

Offline G. Elsenbeck

  • Hero Member
  • *****
  • Posts: 1231
Re: French and Indian War Horn "How To" Pts I,II & III
« Reply #7 on: February 01, 2011, 08:13:57 PM »
Nice tutorial and great looking horn Carl.  For those out there that aren't quite in tuned to all the different horn styles, etc.,  would you say this is an inspired F&I style horn vs. a re-creation?  Of all the books and references I have regarding F&I or Rev War engraved horns I see very, very few with fancy turned base plugs as most have flat or slightly domes style base plugs.  Your's is exquisite and does remind me of a York County screwtip horn.  Can you elaborate a bit more as I strive to learn something new everyday. 
Thanks,
Gary
Journeyman in the Honourable Company of Horners (HCH) and a member in the Contemporary Longrifle Association (CLA)

There is a very fine line between "hobby" and "mental illness."

Offline Carl Dumke

  • Full Member
  • ***
  • Posts: 123
Re: French and Indian War Horn "How To" Pts I,II & III
« Reply #8 on: February 01, 2011, 10:12:44 PM »
Nice tutorial and great looking horn Carl.  For those out there that aren't quite in tuned to all the different horn styles, etc.,  would you say this is an inspired F&I style horn vs. a re-creation?  Of all the books and references I have regarding F&I or Rev War engraved horns I see very, very few with fancy turned base plugs as most have flat or slightly domes style base plugs.  Your's is exquisite and does remind me of a York County screwtip horn.  Can you elaborate a bit more as I strive to learn something new everyday. 
Thanks,
Gary

Hi Gary,
First, let me say that I am no expert.  It is from both worlds--inspired and recreation.  Yes--the majority of F&I horns had fitted, flat or minimally domed plugs.  Yet, there are quite a few that had turned plugs as well--just what I gravitate to vs the fitted type.  Before I got my lathe, all of my horns had flat or domed plugs that were fitted by hand.  I still do hand fitted plugs, but (I confess) am a little addicted to my lathe.   You are correct in it looking a bit like a York County screwtip, but I was shooting for a sort of transitional plug that mirrored very early--mid 1700s horns made in and around Philadelphia.  That is what makes horn work so fascinating--there are no real hard-fast rules, just a lot of generalities.  That is the inspired part.  The recreation focuses on the engraving--took a lot of cues and style from John Bush's and others who were considered part of the Lake George school.  I pull a lot of the artwork on original horns into my attempts at recreating the feel of the horns at that period.  Hope this rambling makes sense...     
Carl

Offline G. Elsenbeck

  • Hero Member
  • *****
  • Posts: 1231
Re: French and Indian War Horn "How To" Pts I,II & III
« Reply #9 on: February 01, 2011, 11:04:20 PM »
First, so glad you responded and enjoyed your perspective on this hobby/craft?  ;)

Quote
but (I confess) am a little addicted to my lathe
 

I have to chuckle with this one as I totally understand where you're coming from as working on the lathe can be both relaxing and addictive.  ;D

I will likewise claim not to be an expert.  I can only draw upon my knowledge base or experiences whether a horn is this or that.  But, recently I became intrigued trying to answer the question I posed earlier regarding nicely lathe turned vs flat or domed base plugs on engraved F&I or Rev War horns.  I did a small and very un-scientific study using all the horn books I had at my disposable.  And rather than go through all that again I will send you a pm to the link.  You might be a bit surprised at the results. 

Anyway I'm a big fan of John Bush as well as a couple others of the classic masters and will spend hours trying to replicate their letters, etc.  And is especially challenging for this guy who is lacking basic drawing talents but, I would add that you pull it off very nicely sir. 

Gary
Journeyman in the Honourable Company of Horners (HCH) and a member in the Contemporary Longrifle Association (CLA)

There is a very fine line between "hobby" and "mental illness."

Offline Carl Dumke

  • Full Member
  • ***
  • Posts: 123
Re: French and Indian War Horn "How To" Pts I,II & III
« Reply #10 on: February 03, 2011, 04:59:13 AM »
Hello all!

This is the continuing sage of my work on another F & I horn. 

Here is where I have completed all of the engraving.  Forgot to tell you that my favorite tool is an Xacto stencil knife.  I like that the blade is very thick and narrow.  I do have to cut it down so that the blade is about 1/3 the length it starts out at.  This gives me a lot of control.  The white horn is grey and dingy from all of the powdered tempera paint I used to highlight the design as I was scribing it.  One of my friend uses spit and a regular #2 pencil, but use whatever makes it work.


Now I have inked the design in--I know, I know--looks a little sloppy.  I like to get a lot of ink on there so that I know it has gotten well into all of the lines.  I never could keep my room clean as a kid, and I certainly can't keep my shop tidy either.  I guess that is what God made kids for who need gas money!  I use a waterproof India ink and a rather small paintbrush.  Be sure to clean the brush with rubbing alcohol or you will be buying a lot of brushes.


These next photo show you the design as I am rubbing it off with #0000 steel wool.  The wool will also take off any stray file marks that remain on the horn.  I am back to the electrical take wrapped around the spout to protect it as I am removing the ink and polishing the horn.   

[IM]https://i1227.photobucket.com/albums/ee423/carldumke/DSC_0021.jpg[/IMG]

Here is the horn back to being snow white and with the design showing up really well.  I don't like to take off all of the imperfections, scratches or nicks--I want the horn to look old and period, not fresh and new.   Next comes the dying and the aging. 

More to come!


« Last Edit: January 13, 2020, 11:35:25 PM by rich pierce »
Carl

Offline Tim Crosby

  • Administrator
  • Hero Member
  • *
  • Posts: 18320
  • AKA TimBuckII
Re: French and Indian War Horn "How To" Pts I,II & III
« Reply #11 on: February 03, 2011, 04:33:06 PM »
 Really nice work Carl. Looks like one pic dropped out though. Thanks

 Tim C.

Offline G. Elsenbeck

  • Hero Member
  • *****
  • Posts: 1231
Re: French and Indian War Horn "How To" Pts I,II & III
« Reply #12 on: February 03, 2011, 09:43:15 PM »
So far, so good Carl.  I'm impressed with your lettering too.  What are you using for engraving? 
Thanks for sharing the pics and info.
Gary
Journeyman in the Honourable Company of Horners (HCH) and a member in the Contemporary Longrifle Association (CLA)

There is a very fine line between "hobby" and "mental illness."

Offline Carl Dumke

  • Full Member
  • ***
  • Posts: 123
Re: French and Indian War Horn "How To" Pts I,II & III
« Reply #13 on: February 03, 2011, 10:39:46 PM »
So far, so good Carl.  I'm impressed with your lettering too.  What are you using for engraving? 
Thanks for sharing the pics and info.
Gary
I use an large, heavy duty #5 Xacto knife with a #19 angle wood chisel tip for the straight, long lines.  The blade is thicker than the regular blades, so the cuts are more pronounced.    There are different blades out there, but I am not a fan of the thinner, sharp-angled blades--always breaking the tips. 

For finer work, I use a #4 stencil knife--the blades are very thick and slender.  The handle is only 1/4 inch in diameter with a knurled nut to tighten the blade.  The smaller handle & with the knurl near the end lets me rotate the blade between my fingers as I am cutting.  The down side is I have to cut the blade down to about 1/4 inch so that it is more rigid in the handle and lets me get up close to the horn.  When cutting with a pair of diagonal cutters, you have to make sure you are protected--espeially the eyes!  It is easier if you put the blad in the cutters, then cover with a thick rag over the tool to keep it from becoming a bullet.  I have experimented with a lot of tools--have to in order to find what is right for you. 
Carl

Offline Carl Dumke

  • Full Member
  • ***
  • Posts: 123
Re: French and Indian War Horn "How To" Pts I,II & III
« Reply #14 on: February 04, 2011, 05:48:45 AM »
Hello all,
Well, now I am ready to begin coloring the horn.  I have two pots of dye.  One is a large pot of golden yellow Rit dye with a splash of mandarin orange.  Need to add vinegar as a stabilizer.  In the other, very small pot is my brown wash.  This is mainly the same yellow with a little dark brown Rit dye.  Both pots were on the stove until boiling.  Below is the small pot and a old paint brush I use to apply as a wash over the horn.


Here I am starting to dye the white horn with yello.  I keep it in the yello until I have good strong color.  Don't worry if it is too yellow, the brown will tone it down.  


I then take the horn out of the yellow and quickly go over to where I have the smaller pot of yello/brown.  I use the old paint brush to spread the wash over the horn--concentraing on some areas more than others, like around the base.


Here the wash has been applied to the horn.  If you go too dark, you can lift some of the color with a paper towel with some bleach--do it carefully remove a little at a time, or you will have to start all over again.  


I will dip the horn in the yellow dye for a minute to soften the base--this helps when I install the plug.  I then will start the the aging process.  I use Minwax dark walnut oil stain mixed with a little bit of powdered tempra paint and wash it over the horn--once again concentrating on some areas more than others.  This will deposit some of the black in the dings, scratches and low areas--not too much, I personnally have not seen many horns that have thick areas of grime--that does not mean they did not exist, just have not seen any.  If you put on too much of the mixture, you can always take it off with a papertowel diped in the stain.  What you are left with is a rather sticky coating on the horn.  I take some of the powdered paint and rub it over the horn to dry the surface.  Then I switch to a alcohol-based dark walnut stain and rub it into the horn--concentrating more around the base and the engrailing.  I look to make it look a little splotchy--remember, it is an organic material and it ages differently throughout the horn.  I let this dry--does not take long.  For this horn, I used 5 steel pins that I forged--started out as a round rod, heated it with a propane torch until it was yellow and hammered it square.  I used a hammer with a plastic head to hammer  the pins home.  Now the horn is ready for finishing.  I use an orange shellac for the finish.  I fold the end of a paper towel into a pad and rub a very small amount in until it is dry--does not take very long.  I coat the entire horn and then buff it with #0000 steel wool. 

I will post the final horn after I make the spout plug...   
Carl

Offline G. Elsenbeck

  • Hero Member
  • *****
  • Posts: 1231
Re: French and Indian War Horn "How To" Pts I,II & III
« Reply #15 on: February 04, 2011, 08:01:37 AM »
Very good job Carl.  I enjoyed your presentation and good story of you on the HCH blog.  Congrats. 

Gary
Journeyman in the Honourable Company of Horners (HCH) and a member in the Contemporary Longrifle Association (CLA)

There is a very fine line between "hobby" and "mental illness."

Offline Tim Crosby

  • Administrator
  • Hero Member
  • *
  • Posts: 18320
  • AKA TimBuckII
Re: French and Indian War Horn "How To" Pts I,II & III
« Reply #16 on: February 04, 2011, 04:49:40 PM »
 Look forward to seeing the finished horn. Thanks for the pic and write up.

 Tim C.

Offline G. Elsenbeck

  • Hero Member
  • *****
  • Posts: 1231
Re: French and Indian War Horn "How To" Pts I,II & III
« Reply #17 on: February 04, 2011, 10:01:19 PM »
Carl I'm anxious to know if we'll get to see this in person at the annual meeting next month?
Gary
Journeyman in the Honourable Company of Horners (HCH) and a member in the Contemporary Longrifle Association (CLA)

There is a very fine line between "hobby" and "mental illness."

Offline Carl Dumke

  • Full Member
  • ***
  • Posts: 123
Re: French and Indian War Horn "How To" Pts I,II & III
« Reply #18 on: February 06, 2011, 02:34:13 PM »
Carl I'm anxious to know if we'll get to see this in person at the annual meeting next month?
Gary
Gary,
Unfortunately, this will go off to its new owner this week--if he doesn't like it you very well may see it at the meeting!  I am sure it could find a home with my other works.
Carl

JB

  • Guest
Re: French and Indian War Horn Tutorial
« Reply #19 on: October 12, 2017, 11:32:18 PM »
This is great.. Too bad all the photos are gone..


Offline vtmtnman

  • Jr. Member
  • **
  • Posts: 79
Re: French and Indian War Horn Tutorial
« Reply #20 on: October 21, 2017, 12:31:42 PM »
This is great.. Too bad all the photos are gone..
Exactly...

westbrook

  • Guest
Re: French and Indian War Horn Tutorial
« Reply #21 on: September 04, 2019, 03:22:04 AM »
Excellent demo....glad you were able to get the pictures restored!

Thanks!!

Offline Clark Badgett

  • Hero Member
  • *****
  • Posts: 2251
  • Oklahoma
Re: French and Indian War Horn Tutorial
« Reply #22 on: September 16, 2019, 03:10:56 AM »
Excellent demo....glad you were able to get the pictures restored!

Thanks!!

Unfortunately they are quite blurry.
Psalms 144