Author Topic: Banana Patchbox Springs  (Read 28257 times)

Offline Ken G

  • Hero Member
  • *****
  • Posts: 5526
  • F & AM #758
Banana Patchbox Springs
« on: January 05, 2009, 01:03:32 AM »
I'm posting this in hopes someone will find it helpful.  It is a part of building a TN rifle I found to be a daunting task when I started out. 

I still remember the disappointment I felt when I poured all the parts out on the counter and saw the springs that were included with my banana patchbox.  Uuugh!  They looked nothing like the ones I had seen on originals.  I read through the archives and found nothing that helped.  Just verbal descriptions which may as well been Greek to me at that point. 

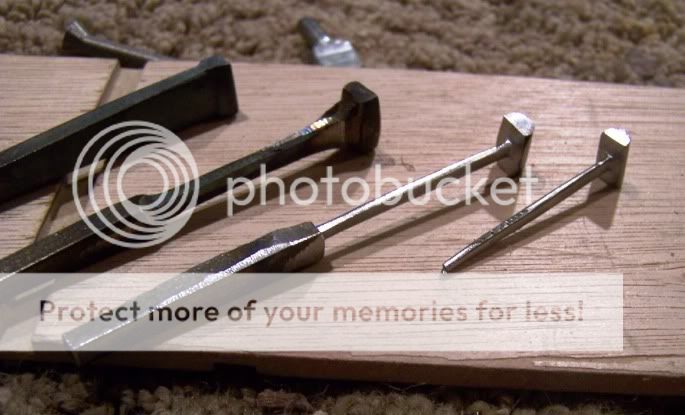
Let's start with the spring that pops the door open.  I use an old hacksaw blade.  You can rough cut it with a pair of tin snips and then grind it to shape or just grind it.  Heat it up with a propane torch and make your bends with it red hot.  I like to use the end pieces.  The hole that is already there comes in handy and will save you a step.  This is a fancy one compared to most I have seen. 


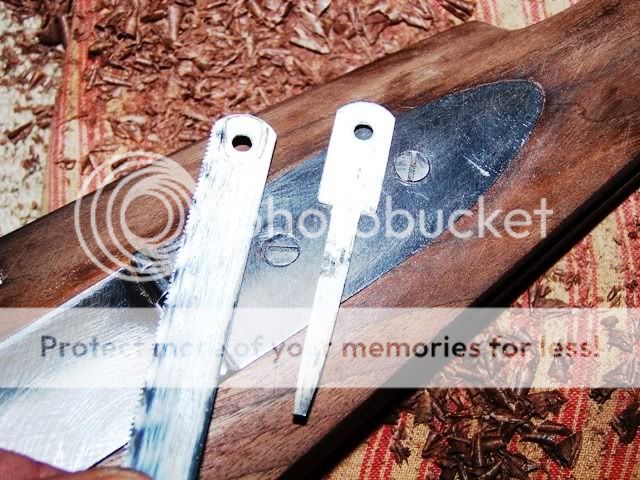
Here's the spring bent to shape and inlet so the lid screw holds it in place.  Set it aside until we are ready to temper. 


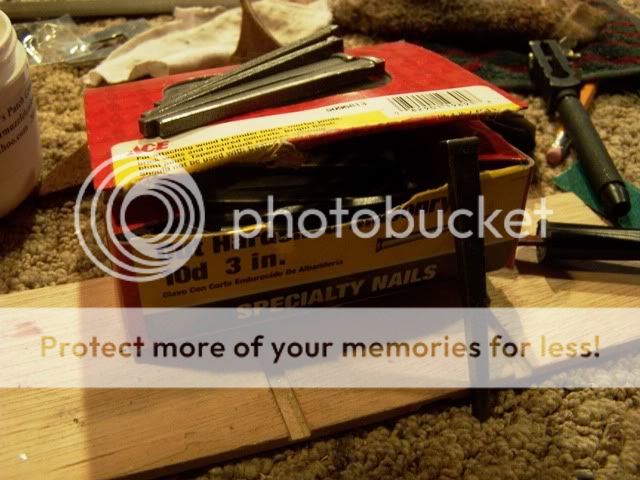
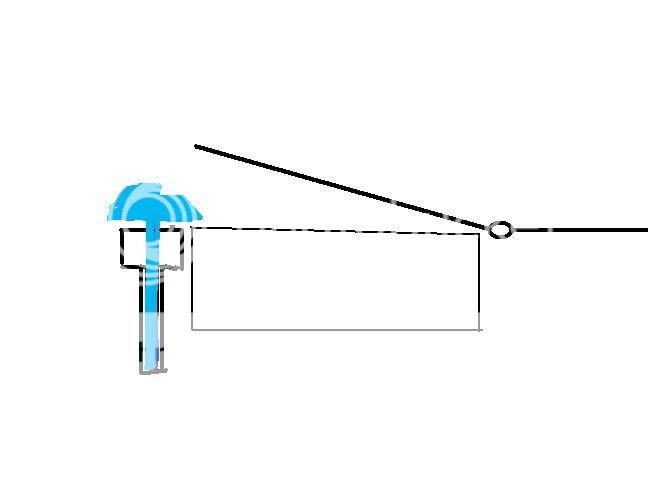
Now for the one that scared me>  Not because it is hard to make but because there are no pictures if what it looks like.  Start with a 10d, 3" masonry nail.  You can use about anything that is spring steel.  Old broken files work well too. 

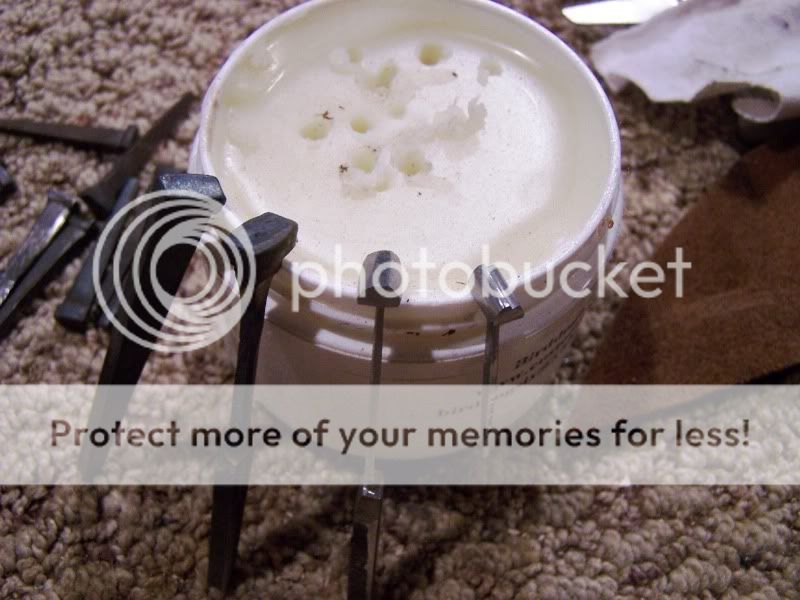
You want to anneal the steel by heating it cherry red and then letting it cool.  I have a small pan of sand I keep by the bench for burying parts in to let cool. 
Picture to come
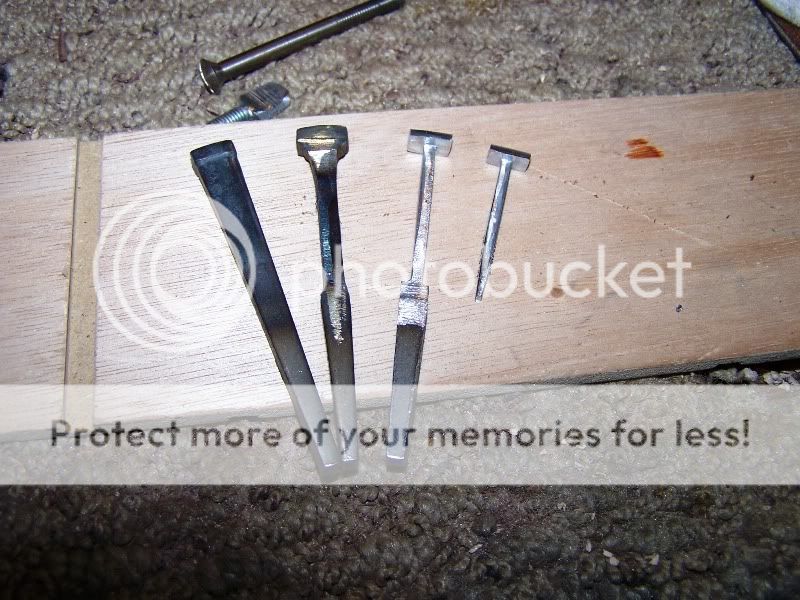
Start working the shaft down to nail size.  You can grind it, file it or even heat it and forge it out if you want.  I grind the bulk of it away and then file it the last bit. 

This shows nails in various steps of being worked down.

More pics


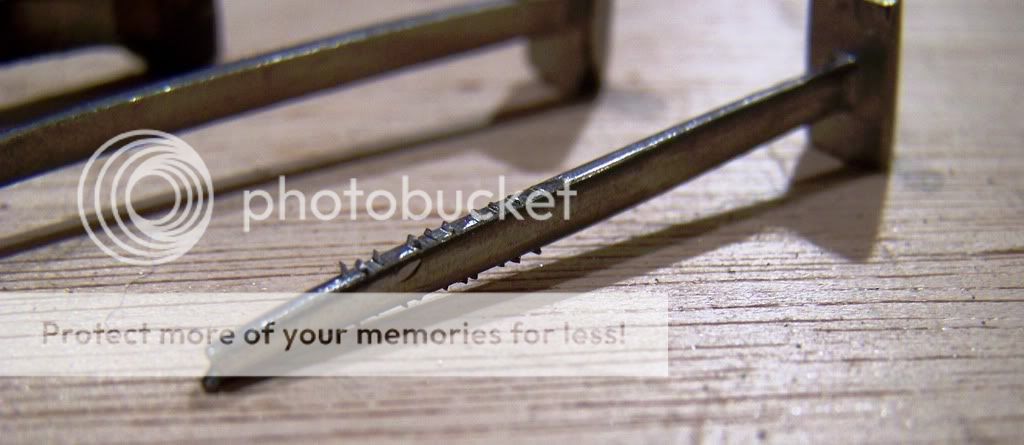
Notice the final one has a groove filed in it for your nail to catch and work the latch.

It may not be necessary but I take a small chisel and make some little spurs that stick out and hopefully will grip the wood better.


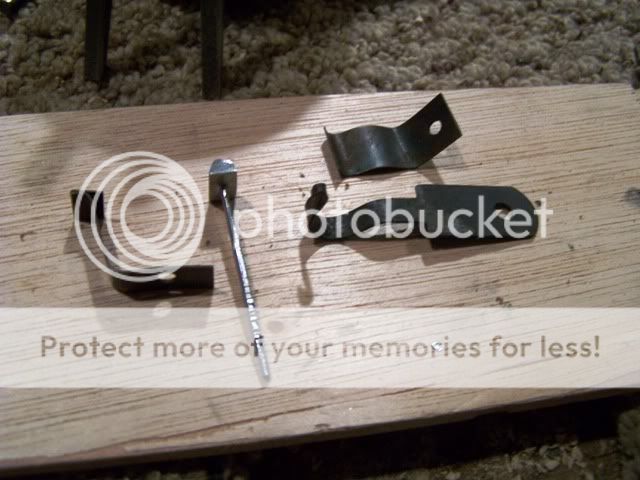
How's this compared to the kit springs?


Now time to temper.  Heat the spring with a propane torch till cherry red and quench.  I use motor oil.  Once you have done this do not try to bend them.  They will break for sure.  To temper get a small Altoid or sardine can and cover the spring with motor oil.  I use a propane torch to light the oil.  Let it burn until the oil is gone. 

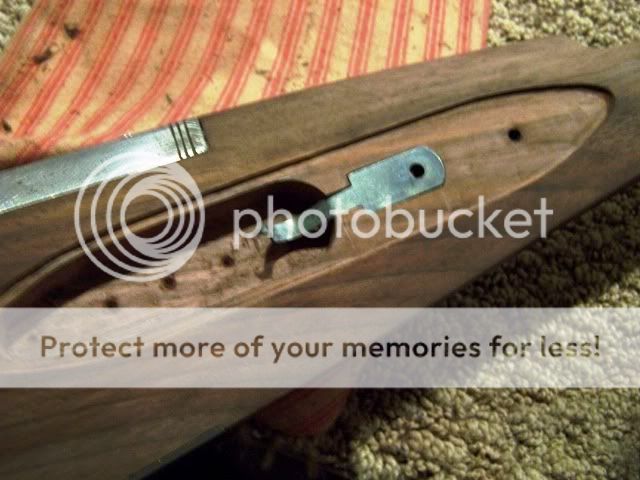
Now, for the hole.  Carefully measure where the nail shaft would need to go to just barely catch the lip of the box lid.  You will drill a hole 1/16" here.  This is your pilot hole.  Maybe 1" deep but measure your stock and make sure you don't drill out the other side.  Find a drill bit with the diameter just smaller than the head size and drill a larger hole about 1/2 the depth of your first one.  This gives the spring space to move.  If you are not sure about the depth.  Clamp the spring in a vise and you can see how far down the shaft it should be to let the spring move.

You are ready to take the plunge and drive the nail in.

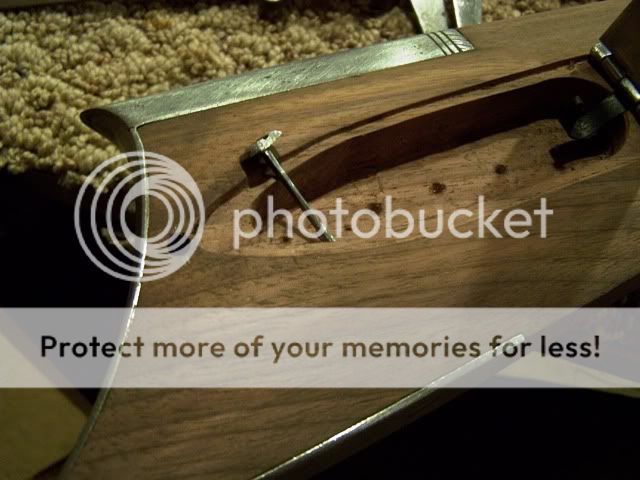
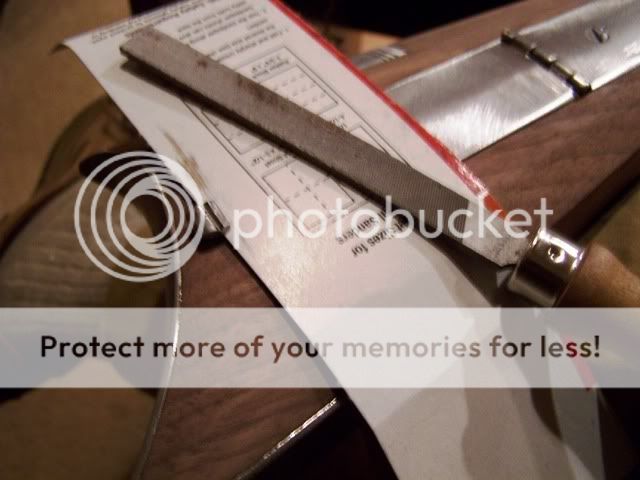
Stop just short of having it down on the lid and you can see if it needs to be adjusted.  If it does, place a piece of cardboard or sheet brass underneath to protect the gun and file away.  Don't count of doing a lot of adjusting if your spring has been hardened right. 

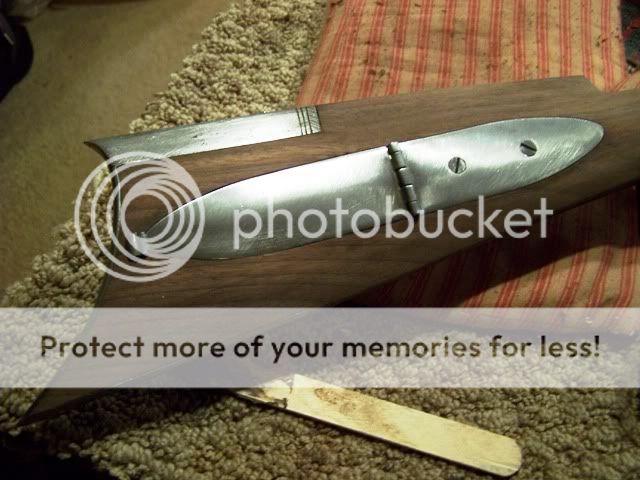
If you have done everything right, with very little pressure you box lid should pop right open with a little thumb pressure and snap back in place without touching the lid spring. 

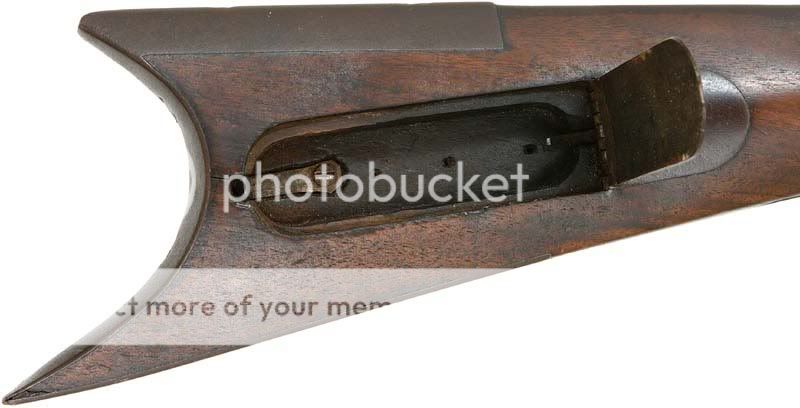
Here's a picture of the inside of an upper E. TN patchbox. 

For comparison, here's a picture of the insode of a Soddy-Daisy patchbox.  Notice the difference in door catch springs.


I hope someone finds this helpful.
Cheers,
Ken


« Last Edit: January 13, 2020, 10:01:11 PM by rich pierce »
Failure only comes when you stop trying.

Offline P.Bigham

  • Hero Member
  • *****
  • Posts: 575
Re: banana Patchbox Springs
« Reply #1 on: January 05, 2009, 03:30:26 AM »
 Ken   Nicely made spring and good Photos.
" not all who wander are lost"

Offline Dave B

  • Hero Member
  • *****
  • Posts: 3103
Re: banana Patchbox Springs
« Reply #2 on: January 05, 2009, 03:41:15 AM »
Ken, Nicely done. I think this should be posted over in the tutorial section for future refference for those of us yet to build a bananna shaped Iron boxed mountain rifle.
I am always interested in seeing how our bretheren do what they do. Ken you dont happen to have any pic's of originals with the box open so we can see what they look lke on the inside?
Dave Blaisdell

Offline Ken G

  • Hero Member
  • *****
  • Posts: 5526
  • F & AM #758
Re: banana Patchbox Springs
« Reply #3 on: January 05, 2009, 04:06:56 AM »
Dave,
I was adding pics as you were typing.  I added two open box pictures to show the difference between upper E. TN and Soddy -Daisy springs. 

ken
« Last Edit: January 05, 2009, 04:08:18 AM by Ken Guy »
Failure only comes when you stop trying.

timM

  • Guest
Re: Banana Patchbox Springs
« Reply #4 on: January 05, 2009, 08:04:35 AM »


« Last Edit: February 22, 2021, 06:29:41 AM by rich pierce »

Offline Dave B

  • Hero Member
  • *****
  • Posts: 3103
Re: Banana Patchbox Springs
« Reply #5 on: January 05, 2009, 08:13:09 AM »
Thats what Im talkin bout!  Great stuff Ken.

Tim, Thanks for sharing your example's as well. This is the stuff we just don't get to see out our way and have to just guess on what things looked like on the inside.
« Last Edit: January 05, 2009, 08:19:15 AM by Dave B »
Dave Blaisdell

chuck c.

  • Guest
Re: Banana Patchbox Springs
« Reply #6 on: January 05, 2009, 08:37:31 AM »
Outstanding! Great job Ken, Thanks a lot!

Offline M Tornichio

  • Sr. Member
  • ****
  • Posts: 491
Re: Banana Patchbox Springs
« Reply #7 on: January 05, 2009, 04:37:50 PM »
thanks for posting ken.
I have a quick question for you guys. Are the banana patch boxes flat or slightly domed? I was wondering about this the other day.
Thanks again.
Marc

Offline Ken G

  • Hero Member
  • *****
  • Posts: 5526
  • F & AM #758
Re: Banana Patchbox Springs
« Reply #8 on: January 05, 2009, 05:01:05 PM »
They are slightly domed.  Strangely, some go back to flat right at the hinge section and then dome again to the contour of the stock.  Some have the hinge slightly curved with the lid. 
Ken
« Last Edit: January 05, 2009, 05:02:00 PM by Ken Guy »
Failure only comes when you stop trying.

Offline b bogart

  • Hero Member
  • *****
  • Posts: 693
Re: Banana Patchbox Springs
« Reply #9 on: January 05, 2009, 05:39:07 PM »
Ken
Thanks for that wonderful example. I believe that I can do that once it's shown like that! I love this place!
Bruce

Offline deano

  • Full Member
  • ***
  • Posts: 163
Re: Banana Patchbox Springs
« Reply #10 on: January 05, 2009, 06:14:41 PM »
I used a banana box set I had purchased from Myron Carleson years ago and your parts look exactly the same. The only difference was that he formed the release catch spring to a needle point though rather than a flat spring.  Just different ways of accomplishing the same task.

BTW, who was the builder on the banana box with the spike shape on the top?

Nice work and a great tutoral showing how it was done on some originals and can be done!

Ken

Offline Brian

  • Global Moderator
  • Hero Member
  • *
  • Posts: 6364
Re: Banana Patchbox Springs
« Reply #11 on: January 05, 2009, 06:30:59 PM »
A great thread!  Definately belongs in the Tutorial Section for future reference.
"This is my word, and as such is beyond contestation"

Offline PIKELAKE

  • Sr. Member
  • ****
  • Posts: 279
Re: Banana Patchbox Springs
« Reply #12 on: January 06, 2009, 12:40:19 AM »
MR. Guy. thank you so much for the time and effort you took to publish this tutorial. I go round and round trying to come with a latch that works. I,m going to make a couple tonite and replace  a couple that I'm not too happy with. Thanks again.
JOHN ZUREKI

Offline G-Man

  • Member 3
  • Hero Member
  • *
  • Posts: 2217
Re: Banana Patchbox Springs
« Reply #13 on: January 06, 2009, 01:29:16 AM »
That's excellent Ken - I love the comparison of the commercial springs (not even close to the right look) vs. the custom ones and the originals - little details like this are what often get overlooked on mountain rifles and are not shown clearly in the books.

Guy


northmn

  • Guest
Re: Banana Patchbox Springs
« Reply #14 on: January 06, 2009, 01:33:54 AM »
Timm.  The tutorial was interesting an one I will use for the future.  The buttplate on the rifle you pictured interests me as it looks like the ysmh was fitted to the plate.  Is it soldered or just held in ny the tang screw?

FP

Offline Steve Bookout

  • Sr. Member
  • ****
  • Posts: 332
  • AF & AM, #59
    • Toad Hall Rifleshop
Re: Banana Patchbox Springs
« Reply #15 on: January 06, 2009, 03:17:18 AM »
Ken, @!*% good instructions.  Glad to see you share with others.  Also glad to see that you found the 10 penny (d) nails.....or did you snitch a few off the blue box cabinet on my work bench the last time you were in town?  ;D  The photographs are a great help for novice Southern rifle builders and some of us old !@#$% as well.  Wish I had them when I was about 40 years younger.  Your box mortice looks very neatly executed and the inletting/fit of the guts and furniture are well attended to as well.  Looks like you're gonna be one of them gun builders some day.  Cheers, Bookie
Steve Bookout, PhD, CM, BSM
University of South Viet Nam
Class of 1969
Class of 1970
Class of 1971

omark

  • Guest
Re: Banana Patchbox Springs
« Reply #16 on: January 06, 2009, 03:36:56 AM »
thank you very much and please put in tutorials, very good job. 8)

timM

  • Guest
Re: Banana Patchbox Springs
« Reply #17 on: January 06, 2009, 03:58:56 AM »
Deano,...The rifle with the spike finial is unsigned. 
Northmn,....This butt plate is joined with a rivet.  This rivet is placed very close to the heel point.  I also don't see any witness of a braze or solder, although I haven't removed the butt plate.
tim

Madcaster

  • Guest
Re: Banana Patchbox Springs
« Reply #18 on: January 07, 2009, 10:57:47 PM »
 Thank you Sir for the help!

MikeW

  • Guest
Re: Banana Patchbox Springs
« Reply #19 on: December 11, 2020, 12:30:59 AM »
There is a Southern Mountain rifle in my future and I really appreciated your tutorial. The progression of pictures are tremendous. Thanks

Offline mountainman70

  • Hero Member
  • *****
  • Posts: 2393
  • USAF vet 1971-1972 malmstrom afb,montana
Re: Banana Patchbox Springs
« Reply #20 on: February 22, 2021, 05:30:25 AM »
Thanks Ken, just what the docta ordered. Dave F :-* :-*